How to make a presentation on a computer - detailed instructions. A quick way to create a presentation on a computer
In our age of rapidly developing information technologies it’s not enough just to listen to some new idea or program. Listeners also want to see for themselves the quality and benefits of the products offered by the narrator. Overview photos, well-designed diagrams, drawings, informative videos should be used here. Therefore, creating a presentation on a computer today is an important accompanying element of every storyteller, and sometimes even a teacher.
In what areas are such ideas applicable?
For example, this is marketing, economics, or even design. I believe that such a process is the key to success, unfolding before the eyes of those watching your abilities in creativity, all kinds of paths to further growth.
Powerful Tool Microsoft office PowerPoint has entered the structure of Microsoft Office. It is both simple and strong, high-quality designer of excellent presentations. Using this program, you can create a productive performance. In what ways can information be presented? This is a report, an exhibition, and even a demonstration. According to their structure, they are divided into simple or schematic, accommodating all kinds of graphics, illustrations, special effects.
Action plan for creating presentations
So let's start:
First things first, let's define the concept. To do this, we mentally answer the questions: the purpose of our speech, who is our audience, the content and duration of the story.
Start
We start the program. We find "Create a slide" at the top right, select the layout there. It may be different for each time.

Sample
When compiling a presentation, this program automatically contains a template. To execute a new one, you need to click "Office", then select "Create". A window will appear in which you need to find “Empty and Recent” in “Templates”, open “New Presentation”.


And the templates are selected through the "Microsoft Office" option. There are "Widescreen Presentation", "Modern Photo Album", "Classic Photo Album", "Advertising Booklet", "Quiz".
Subject
The “Themes” group in the “Design” tab will help bring a touch of originality to your work. The necessary images in the corresponding tab will allow you to change appearance them. You just need to click on "Apply to selected slides."


All the topics present in the program are suitable for any kind of presentation. The color scheme is changed through "Effects", "Colors", "Background Styles". By the way, for display in Microsoft PowerPoint it is possible to make a theme yourself. For this, personal drawings and photos are used.
Font
You have a good opportunity to vary the color, size and type of the font. Actions for the selection thereof are built by analogy with Microsoft Office Word.


To write, you need to place the cursor in the "Header", then in the "Home" tab, go to "Font". Here you will find a suitable font in all respects.
Not many people know that all information can be divided into basic and additional. The main one must be highlighted, then during the show it will be she who will demonstrate the main idea. And we use a side one to emphasize the main idea. I recommend using 22-28 font for the title, 20-24 for subheadings, write the text itself and the data in the tables in 18-22 size. And one more interesting fact- "principle of six": the best perception of information gives 6 words per line, and 6 lines per slide. I think the most understandable fonts are Times New Roman, Verdana, Arial, Bookman Old Style, Calibri or Tahoma.
Illustrations
Graphs, drawings and photographs are used to give the presentation clarity and expressiveness. Go to "Illustrations" in the "Insert" tab. Finding the right group.


I don't think you should resort to a "picture wrapped in text". The illustration will look clearer if placed on a separate slide.
Music in presentation
You probably didn't even suspect, but PowerPoint can be provided with music. To use it in your presentation, you need to select "Sound" in the "Media Clips" group (this is the "Insert" tab). A list of commands will appear, select "Sound from file" from it. A dialog box should pop up in which you need to select a folder for picking up music, as well as an audio file. The next step is to decide on the sound option: it can be automatic or on click. In "Working with sound" we will need the "Sound Options" group, where we will set the necessary options.

Animation
Your presentation will become much more interesting if you use animation in it. There is a tab with the same name with the group of the same name, by going to which you need to open "Animation settings". We click on the required object, or on the text. In the "Animation Settings" click "Add Effect", after which we perform actions using effects. They will appear in the Animation Setup list as you add them. And the start of the animation and its speed are set in the "Changing the effect" section.

Keep in mind that you don't need to overload your performance with special effects. In order not to overstrain your audience and keep their attention on the main idea. Therefore, animation will be useful only in small quantities and if it carries some kind of semantic load.
Transitions
An important component of a good presentation is transitions. If the user wants to set the same transitions, in the "Animation" tab, click on the slide icon, and then in the "Transition to the next slide" select the desired change effect.
To set the tempo for changing one slide to another, in the “Transition to the next slide” open the “Transition speed”, then determine the required tempo. In the "Slide Change" select the type of transition: in automatic mode or on click. But that's not all - the change can be accompanied by sound. In Transition to Next Slide, it's the Transition Sound button. If you need some sound that you do not see in the list, you need to use the "Other sound". And I recommend making 2 copies of your speech, in which you mark the transition points. The first copy is for myself, the second is for the technician who will assist you during the show.
The final
Well, here's the finale! Now let's enjoy our work. To view, click "Slide Show" in the right corner, at the bottom. Seeing that something went wrong, you can always return to any frame with "Esc" and correct. Then save the corrected version of the work.
To the entry "How to create a presentation on a computer" 12 comments
Sergey, thank you very much for the article, it is very useful to me now, I am doing a fire alarm project for a trolleybus depot.
Yuri, thanks. Good luck with your presentation.
Thanks for the helpful post. Actually, I'm not going to make a presentation right now. But I will know where to run in the future. To your site. Here's another example of such a presentation)))
An interesting description of the program is presented in an accessible way, and at the end there is also a link to a free program, I was so happy, but I had to rejoice for a short time, it turns out that this is only a trial version. Although I intended to use it from time to time, but this option does not fit. "Free" for this program is also not suitable.
Peter, thanks for your comment. The fact is that earlier a free version of the program and office 2007 was provided at this link. Apparently, Microsoft has already removed it. It's a pity. I will also delete the link so as not to reassure anyone.
After automatic skype update, the window "not enough memory to complete the operation" began to appear and the computer starts to slow down. After removing Skype, everything is restored, but after installing another Skype, everything repeats again. Scanned the computer using DrWeb, treated CureI, cleaned Tune up. Reg Organizer. CCLener. AusLogics - nothing helps. Please tell me what else can be done besides reinstalling the system.
Does this happen only with Skype or with other analogue programs too?
only with skype
Thank you. Installed, it works. But at first I was embarrassed by the lack of video, although the webcam turned on (the indicator turned on) and before that it worked. I installed another camera - the video appeared. And the previous one works in a strange way - there is no video until you pass your hand in close proximity to the camera. Then everything works until shutdown. Thanks again.
If everything is ok, perhaps the new version is somehow "eating" memory. Here it is necessary to understand on the spot for what reasons. Igor, next time you leave questions or or in the appropriate topic. otherwise people read “How to create a presentation on a computer”, and comments are about something else :)
Thanks for understanding!
Leave your comment
- Platforms: Windows, macOS, web, Android and iOS.
- Price: from 3,400 rubles per year as part of the Office 365 software package, the web version is available for free.
This program is so popular that its name has become a household name. When it comes to presentation software, PowerPoint is the first thing that comes to mind for most users.
It is worth noting that this popularity is well deserved. PowerPoint offers all the features you need to create stylish interactive presentations. A large number of editing tools, backgrounds, templates and fonts, the ability to work in a team over the Web, insert video, audio, tables and graphics - all this and much more is in PowerPoint.
In truth, there are so many features and settings that this abundance can confuse a novice user. But for authors who create complex professional presentations, PowerPoint fits perfectly.
- Platforms: macOS, web and iOS.
- Price: for free.

Apple Keynote- another heavyweight from the world of programs for, which can easily compete with Microsoft PowerPoint on an equal footing. Keynote comes with a rich set of beautiful effects, themes, fonts, and versatile text editing tools to make your ideas look professional. The project allows you to work collaboratively over the Internet and is compatible with PowerPoint formats.
The main differences between the two products include the cost and number of supported platforms. So, Apple Keynote does not have versions for Windows (although it is available through the site) and Android, but it is offered free of charge to all owners of iOS devices and Macs.
- Platforms: web, chrome, android and ios.
- Price: for free.

Google Slides has attracted a huge number of users working in teams. This is because the developers have placed a special emphasis on collaborative editing of presentations, having worked best on the online part of the project. You can edit slides together with colleagues in real time. Changes made by each user are recorded in a special log.
However, you can edit and save presentations offline. Just install the browser extension. Here you'll find most of the basic slide features found in PowerPoint. In addition, the Google service works great with PowerPoint formats, is very easy to learn, and is available for free.
- Platforms: Windows, macOS, Linux, Android and iOS.
- Price: for free.

Impress is a simplified alternative to PowerPoint and other professional presentation software. This program lacks a beautiful interface, some design features and online functions for working in teams. In addition, the Impress apps for mobile devices have been heavily stripped down.
On the other hand, unlike many competitors, the program is absolutely free, available on all platforms and compatible even with older OS versions like Windows XP.
5. Prezi
- Platforms: Windows, macOS, Android and iOS.
- Price: Free or from $15/month for offline version.

Among other programs from the list, Prezi stands apart. The creators of this project abandoned the usual slide format. Your presentation looks like one big map on which you can place text, videos, pictures and other information. During the show, the image does not move from slide to slide, but from one section of the map to another. At the same time, the desired areas are enlarged with the help of beautiful effects.
Prezi can be used for business presentations as well, but it's best suited for creative presentations. Even without the skills of a designer, you can create a dynamic non-linear presentation that can present absolutely any topic in a fascinating way. There are plenty of design features in Prezi. There is also an opportunity to work with colleagues online.
To create a presentation on a computer running Windows 7 and higher, you must have PowerPoint installed, written and error-checked text, good quality pictures, and video materials. It is worth noting that PowerPoint is available on all PCs that have Microsoft Office installed.
Create slides
From the creation of the first slide, work begins in Microsoft PowerPoint. To create an initial slide, follow these steps:
- Click "Start", "All Programs", select "Microsoft Office". We look for the desired program in the list.
- PowerPoint opens. The first slide is created automatically. It consists of a heading and a subheading.

- We fill in these fields. Enter a title and subtitle.

- In order to create a new slide, just select the appropriate function on the toolbar or right-click in the left menu and select "Create Slide".

- The next slide will have a different structure: title and text of the slide.

- If you need to change the structure of the slide, you must click on the "Slide Layout" button and select the appropriate option.

This way you can create any number of slides. All of these slides can be styled accordingly. The white background can be replaced in the following way.
- Go to the "Design" tab and select the appropriate theme.

- All slides will automatically change their appearance.

- If you want a certain theme to be applied to individual slides, you should right-click on the theme and select the appropriate option from the list. For example, "Apply to selected slides."


- As you can see, the first slide received a distinct design from the second.
Work with text
The text should be prepared in advance. It needs to be subtracted, checked for errors. Only in this case, you can prepare a high-quality presentation.
To work with text in the PowerPoint editor, there are special text blocks. The text in them can be typed or copied and pasted in the standard way (Ctrl + A - select, Ctrl + C - copy, Ctrl + V - paste).
Pasted text can be formatted. To do this, on the toolbar, you can select the font type and size, spacing, text orientation, bulleted and numbered lists.

It is also worth noting that you can insert a WordArt object instead of a title. To do this, go to the "Insert" tab and select the letter "A", which is responsible for WordArt objects.


In this way, we add text for all slides.
IMPORTANT! Don't put too much text on your slides. All material must be presented concisely. The person who will watch the presentation should not be busy reading. He should have time to listen to the speaker.
Adding pictures and working with them
If you add a picture to your presentation, it will become more interesting. However, for one slide, we recommend using no more than two high-quality pictures. Overflowing one slide with images would be inappropriate.
To insert an image in the PowerPoint editor there is a whole block. It is enough to go to the "Insert" tab and select "Drawing", "Picture", "Snapshot", "Photo Album".

It is worth noting that no matter which method you choose, you will need to specify the location where the image is stored.

After selecting a picture and adding it to the slide, the position and size can be changed. To do this, use the dots at the corners of the picture.

Also, if the picture interferes, you can specify its location "in the background". In this case, the text will be superimposed on top of the image.

Adding tables and graphs
If you need to prepare business presentation, in which you want to use statistics data, the program has a function to insert tables and charts. You can insert a table from Excel or draw and fill it out already in the editor.
In the first case (pasting from Excel), you should do the following:
- Select "Insert", "Table" and "Paste with Excel".


- Next, select the filled cells from the original table, copy and paste them into the presentation table.
If there is no completed table, you should click "Table" and select the number of rows and columns. During selection, the presentation window will display the dimensions of the table. However, they can be adjusted.

Then fill in the table with the necessary information.
You can also add graphs and charts to your presentation. To do this, in the "Insert" tab, you need to click on the "Chart" button or select the same icon on the slide itself.

Then choose the chart type.

The Excel file will open. Populate the table with data.

After filling in the table, we return back to the presentation. A chart will appear here.

Thus, the presentation can be used to provide reports, compare data.
IMPORTANT! After closing the Excel file, the chart will not disappear.
Working with video and audio
You can also add video and audio to your presentation. To add a video. It is worth doing the following:
- Go to the "Insert" tab and select "Video". Next, specify "From File" or "From Site".

- Next, indicate where the video is located. Select the video and click "Insert".

- Embedding the video will take some time. Do not click the "Cancel" button. The larger the file, the longer it will take to download.

To add audio, you should click on the "Sound" button and point to the file.

If you want the sound to last throughout the presentation, it's worth in the "Playback" tab, in the "Start" section, set the value to "For all slides."

You can also adjust the volume musical accompaniment. To do this, just click on the "Volume" button and specify the sound level.

To prevent the sound icon from being displayed on slides, it is worth checking the "Hide when showing" box.

Adding special effects
Special effects should mean transitions between slides, the appearance and disappearance of text. To add special effects, you need to select the first slide, the title in it and go to the "Animation" tab. Click here to add animation.


Specify "On click" or set the time range for the animation to occur.

It is worth noting that the animation will have to be set for each title and text separately. All animated elements will be indicated by numbers.

You can also set an output for each element. This is a special effect with which the title, picture or text will disappear. This function is in the same section as the input, only you will need to scroll the slider down.

After designing the first slide, you should go to the second and set the animation for each element separately.
Saving and viewing a project
After designing all the slides, you need to set up the presentation. Go to the first slide and press "F5". The project preview will start. We look and study the shortcomings. We fix them. Then go to the "Slide Show" tab and click "Show Settings". We indicate how the slides will change (by time or manually), the display parameters, the order of the slides.


You can start the presentation by double-clicking.
How to create a presentation, see the video:
Quite often, during a presentation with a report or a report, a presentation of a new program or product, it becomes necessary to visualize some information in front of the public. The most popular program for this is Microsoft PowerPoint 2007, an environment for creating presentations with various effects. Now, almost no event, such as a seminar, conference, diploma defense, is complete without graphic support created in power point. The development of technology has made it possible to reproduce presentations not only on a computer or TV screen, but also on interactive whiteboards and using projectors.
Power point overview
Making a presentation on a computer is not the only feature in Microsoft Power Point. With this program it is possible:
- impress the audience with an informative presentation;
- create graphic support for the target flow of people;
- scale slides by enlarging or reducing the desired areas;
- quickly switch slides, both automatically and manually;
- design a unique graphic support for the report;
- use both your own and the themes and designs developed by the program manufacturer;
- quickly and easily create the desired charts, graphs, etc.;
- add various visual and sound effects.
Video: business presentation
Components of a presentation
The presentation consists of slides, the number of which is practically unlimited. They are sequentially collected into a single file with the ".ppt" extension, which can be opened on any computer where the Microsoft Power Point program is installed.
Slides can be shown electronically or printed on paper.
On the slides you can place everything you need for the demonstration:
- text information;
- photographs, pictures, drawings, etc.;
- tables, graphs, charts;
- videos, films, clips;
- audio files;
- other graphic objects.
Slides in Power Point can be customized and modified:
- the size;
- markup (location of objects on it);
- template (design and layout);
- visual and sound transition effects.
The initial editor window in the program looks like this:

The Menu bar contains all the important commands of the program, and the main and frequently used options are placed on the toolbar. This panel can be edited by adding or removing certain elements. By clicking on the "Create Slide" button, an empty template will appear on the screen, on which you have to work.
The left panel displays all the slides that make up the presentation. They can be in the form of their thumbnails, or they can be displayed in structured text, displaying headings or slide content. Also in this panel, you can move and change the position of the slides. The task pane (located on the right) will display the actions that you can use in the process of creating a show. At the bottom of the screen there is a Notes area where you can enter all comments on the created slide, which are visible only in the process of working on the presentation.
All areas on the home screen can be enlarged or reduced by placing the cursor on their end lines.
How to make your presentation step by step
Create a presentation for interactive whiteboard possible in several ways:
- develop a completely new presentation;
- from a standard or previously made template;
- from an already prepared file;
- from the autocontent wizard.
If we look in more detail, then in the new demo you need to do all the markup, design styles, fonts, etc. yourself. Reworking a finished presentation will not end up with a unique product. Choosing a template is similar to the previous method and allows you to use ready-made graphic and design developments from the creators of the program. If you use the "Auto Content" wizard, the program will ask you questions, and based on the answers, it will create the desired presentation template.
Start of creation
To start creating a slide show, you need to open the desired program.
This can be done via:
- Start;
- Programs;
- Microsoft Office
- Microsoft Office PowerPoint 2007.
AT open program a working window will appear in which you must select one of the previously listed methods for creating a slide show.
Video: Presentation in Power Point 2007
We do according to the template
Can create beautiful presentation with the help of a large number power templates point. They include ready-made, in terms of design, slides where you need to enter data. Templates take into account:
- Background color;
- Slide color schemes;
- Fonts, etc.
You can create a slide show from a template through the menu:
- File;
- Create;
- Create a presentation;
- Templates.

Select the desired template and click "Create". A slide of the selected style will appear in the work area, which can be edited.

Loading slides
To create a new slide, click on the corresponding button on the toolbar. You can also do this by right-clicking on the slide thumbnail in the window on the left, choosing the same command.

In the presentation structure area, you can copy or delete slides by selecting them and pressing the corresponding keyboard buttons. Or through the menu that opens with the right mouse button when you click on the slide.
Slides can also be swapped:

You can change the layout of the finished slide through:
- Home;
- Layout.

Text is entered in special fields on the slide. When marking a slide, a place for text is already allocated automatically, but you can also add it to other places through the "Insert-Inscription" control panel item. Enter text in the field that appears.

The size of the input field will expand as you add text. You can finish entering by clicking on any free area of the slide.
You can insert a picture or your picture using the command:
- Insert;
- Picture.

Or by clicking on the picture in the slide layout itself:

In the window that opens, select the desired file location and the image itself, and then click the "Insert" button. If you select "Clip", you will be prompted to find the image among the standard pictures of the program.

Any field on the slide can be moved and resized.

For this you should:
- click once on the desired object:
- then move the cursor over its borders - the option to change will be available.
It is possible to add sound, video, tables, graphs, charts and autoshapes to a slide. Their buttons are in the workspace of the slide and in the "Insert" menu. There are quite a lot of options for each object, and the accessible design of Microsoft Power Point makes it possible to quickly understand them.
New design
You can change the design of the site through the menu:
- Design;
- Themes.

It has subsections:
- Colors;
- Fonts;
- Effects.
You can apply the selected theme to the entire show or to a single slide. The color scheme within a particular theme can also change. To do this, click on the corresponding column in the design area. Select the scheme and right-click on it, applying it either to the entire presentation or to the selected slide: You can make your own image or fill as a background:
- Design;
- Background styles;
- background format.

In this window, you can select the fill type:
- solid;
- Gradient (smooth transition from one color to another);
- Pattern or texture.

Text formatting is an important step in creating a slide show. A lot depends on the readability of the test.
To edit you should:
- highlight the desired piece of text;
- then use the tools on the main taskbar.
By default, each new line in the text is treated as a bulleted list. This is changed via the toolbar. Power Point also contains buttons for setting special effects, text direction, changing line spacing, and so on. When selected in the workspace of a slide graphic image, the Picture Tools tab appears on the toolbar.
There you can change:
- Brightness;
- Contrast;
- Display style;
- Colour;
- The size.
Video: Presentation in 10 minutes
Animation
Slides filled with information should be given a beautiful visualization. This is done using "Animation Effects" in the "Slide Design" task pane. From a large list of effects, you can choose any for each object on the slide. Then during the demonstration they will beautifully appear on the screen. One effect is applied to one slide, but you can click the "Apply to all slides" button and it will be on all slides of the presentation.

Adding transitions
The transition is used when changing one site to another. A new slide can appear immediately or gradually. The gradual appearance makes the presentation more beautiful and interesting.
To set up a transition, select a slide and go to:
- Animation;
- Next, you should choose the transition effect you like, the sound for it and the speed of the process. An automatic transition is also configured (then its time is set) and by mouse click. The transition can be done for each slide separately, or you can set it up for the entire presentation at once.
Completion
At the end of the presentation, you should adjust the parameters of the slide show itself in order to avoid unpleasant moments during the presentation. This is done in the "Slide Show" - "Demonstration Settings" item:

All the main display parameters are set here:
- slide management;
- slide change;
- Slide numbers.
You can also hide slides in the Slide Show menu that you don't want to show temporarily, but that you can't delete.
View finished work you can by clicking on the button "From the beginning":
- Save as…;
- Choose a save location;
- Write the title of the work;
- Save.
Microsoft PowerPoint- an affordable and simple program for creating presentations on a computer. A variety of visual effects and design themes will allow you to quickly create an original and unique presentation for your public speaking or school assignment.
To date, there are a huge number of ways to create slideshows: Microsoft PowerPoint, LibreOffice Impress, Google Slides, PowerPoint Online and many other online services. In this article, we will take a step-by-step look at how, using such programs, to make a presentation on a computer with Windows 10. It is worth noting that the principle of operation does not depend on the OS version. The same can be done on Windows 7 and 8.
In order to use this free service, you need to go to the official website. If you are there for the first time, you will see the following message.

If you want, you can click on the "Summary" button and read the recommendations from the Google developers. In order to get started, you need to close this window (click on the cross).

You have two ways:
- start from scratch;
- use a pre-made template.

Let's consider each option in more detail.
Using pre-made layouts
In order to create a finished presentation, you need to do the following steps.
- To view the entire gallery of templates, you need to click on the specified icon.

- In this gallery you will see several sections:
- recent;
- personal;
- Job;
- education.

- Click on any of the options you like.
Please note that the basis of this template should at least somehow match what you want to do. As an example, consider the "Progress Report".

- Wait for the download. The waiting time depends on the speed of the Internet and the number of slides in the presentation.

- As a result of this, you will see a completely finished work. You just need to change the text to your own.

- You can switch between slides using the panel on the left side of the screen.

- You can add author notes for each page. This text will not be visible during playback - it is available only to you. Here you can insert pieces of your speech during the report.

- You can change the color theme on the right side of the screen.

If this panel bothers you, you can always close it.

Template editing
In order to edit these slides to suit your needs, you must do the following operations.
- Click on any element you want to change. Immediately after that, a frame will appear around it and you can make any edits.

- As an example, we will indicate the name of the work “Dream Project”. Let's choose the name of some simple schoolboy - "Petrov Ivan".

- In this way, you can work with any textual information.

It is important to understand that this is not a Word editor and the pages themselves will not turn over. To move through the slides, you need to click on their thumbnail or move using the arrows on the keyboard ( and ↓ ).
In this case, you should not be in the process of editing any object, because in this case you will move inside it.
Changing the View Format
If there are a lot of slides, then you can switch from Ribbon Mode to Grid Mode.

As a result, the thumbnails will become large and will be displayed on the entire workspace.

In order to return to the previous size, you need to click on the adjacent icon.

Only in this way can you return to the contents of the project.

Create a presentation from scratch
To do this, follow the steps below.
- Click on the "Clean" icon.

- An empty project will look like this.

- In order to add a regular slide, just click on the icon with the “+” sign.

- To change the layout of a new page, click on the drop-down list icon. As a result of this you will see a large number of templates.

- In order to change the background, you need to click on the appropriate link.

- Immediately after that, a window will pop up in which you can:
- specify color;
- select an image;
- restore the original background (the option will be available if you have made changes before).

Please note: this setting can be set both for one slide and for the entire project.
Adding elements
In order to insert something into your presentation, you need to do the following steps.
- Click on the main menu "Insert".
- As a result of this, you will be able to insert:
- image;
- text field;
- video;
- figure;
- table;
- diagram;
- "Word Art" object;
- line;
- animation;
- comment;
- new slide;
- slide numbers.

The main thing is to understand that with the help of all these objects you can make high-quality, beautiful and interesting project. But if you overdo it, the consequences of this will be sad. Large quantity different elements can cause great harm to the appearance of the slides.
Try to arrange the pages of your project in such a way that the degree of skill shown will cause everyone to admire.
How to change the appearance of elements
In order to edit any object, you must perform the following steps.
- Click on something (we'll use a text field as an example).
- Click on the "Format" menu item.
- As a result, several more different sub-items will appear. Some of them are universal and suitable for all objects.
If any of the items is inactive, then it is not available for this element. That is, if you work with text, then there can be no question of any video.
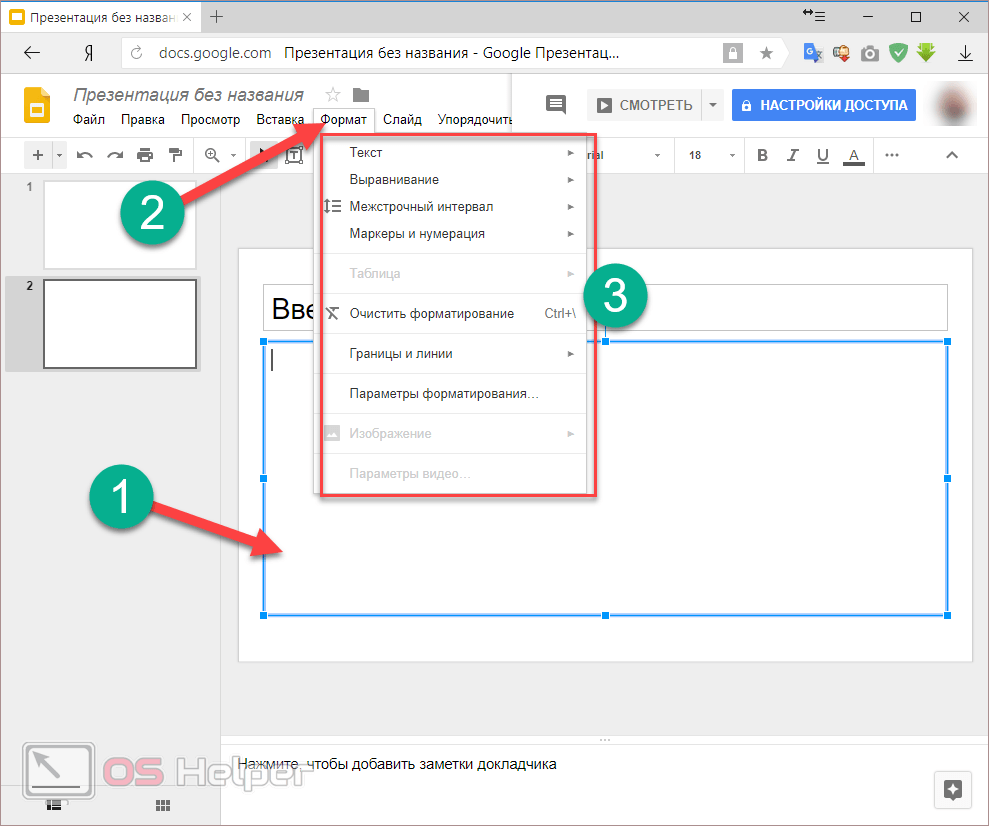
- For any text, the following options are possible.

The remaining items work on the same principle as the Word editor.
What can you do with a slide
By clicking on this menu, you can:
- create a new slide (or hotkey Ctrl + M );
- duplicate slide;
- delete slide;
- skip slide;
- move slide;
- change the background;
- choose a layout;
- specify the transition type;
- change template;
- Change the topic.

How to start a project
- In order to see what you get in the end, you need to click on the indicated button or click on hotkey Ctrl+F5 .

- Right after that, you will see the following.

- To make the presentation convenient, a panel with several buttons will appear at the bottom of the presentation. You can scroll through the slides using the arrows. Or you can immediately go to the desired page (via the drop-down list).
- To exit, just click on the "Close" button or on the ESC key.
Saving a project
When you open the "File" menu, you will see that there is no "Save" item.

The fact is that all your actions are recorded in memory automatically. This method is especially good if you experience power outages or your laptop is about to run out of battery.
You can finish your work at any time convenient for you (when the opportunity arises). To do this, just open a browser, drive in the desired address and open your presentation.
Version History
The Google Slides service is good because it allows you to see what happened to your project before. You will always open by default latest version. But if you decide that you deleted something in vain, and want to return it back, you can do it as follows.
- Click on the "File" menu.
- Select the appropriate item.
- Then click on "View Version History".
Or you can press the hotkeys Ctrl +Alt +Shift +H .

- In the window that appears, you can select versions by dates or by titles, if you specified them. It is recommended to name each version something so that you can quickly navigate and select the desired option.
- If you change your mind, you can return to the current version by clicking on the back arrow.

- Then, in order to reset all changes made after the selected date, you will need to click on the "Restore this version" button.

- The editor will ask you to confirm this action.

The main thing is that the system will remember all the changes. Even if you have returned to the starting point.

Don't forget to sign your versions.
Access settings
If you want to show your work to one of your classmates, supervisor or staff, this can be done in a few simple steps.
- Click on the "Access Settings" button.

- Enter your email address or username (in Google Accounts).
- Click on the dropdown list and select the desired access right.
- To save, click on the "Finish" button.

Immediately after that, that person will be able to edit, comment, or just watch. As you can see, technically you don't need to transfer the file to any device in order to show it to others.
Export presentation
Using the "File" menu you can:
- download your project in any convenient format;

- publish it on the Internet;

- send by mail.

Please note that not all formats are available for downloading the entire presentation. For example, all pages can be completely converted to PDF. And if you choose the JPEG or PNG extension, then only the current slide can be downloaded.
Microsoft PowerPoint
This product is one of the most versatile, especially modern versions (2007, 2010, 2013 and 2016). There are all the opportunities to make a competent project.
Let's create a simple presentation as an example. To do this, follow these steps.
- The first thing you will see is the title slide.

- Let's write something there.

- In order to insert a regular slide (which contains a title and text), you need to click on the "Create Slide" button.
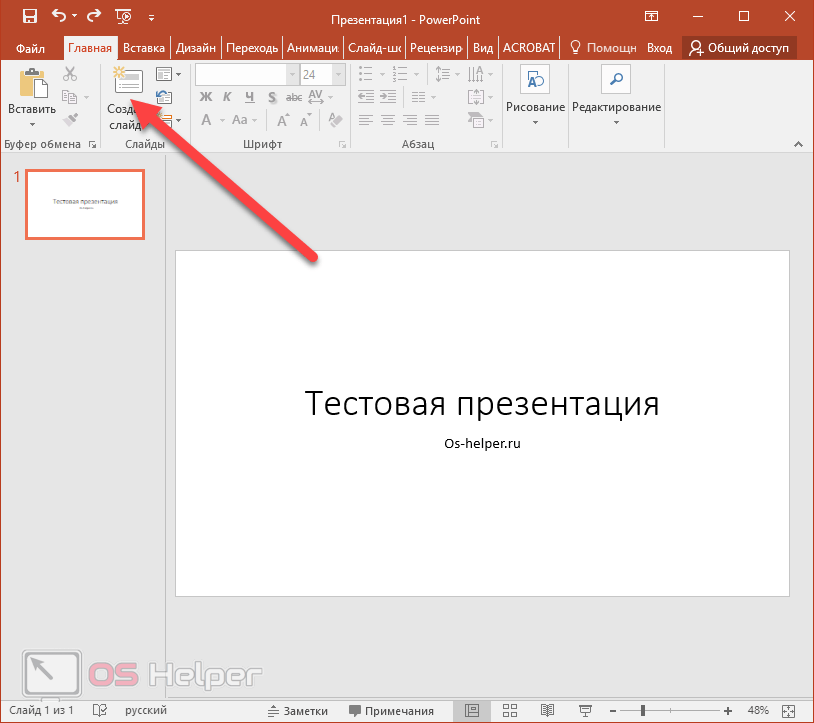
- If you want to use a different layout, you need to click on the small triangle next to this tool. As a result, you will be prompted to choose the layout of the future slide. Choose any of them.

- As a consequence, you will see something like this (depending on where you clicked).

- Click on any element and write something.

- In order to change the text format (for example, increase the font size or change its color), just select the desired fragment and use the main toolbar.

Anyone who has worked up to this point in the Word or Excel editor will see icons that are familiar to him. With these buttons you can decorate any element. We are talking about absolutely all objects, and not just about text.
Adding elements
For this purpose, the following steps must be followed:
- Go to the "Insert" tab. Click on any object you want to add to your presentation. You can navigate by name.
- Here you can add:
- slide;
- table;
- Images;
- figures;
- smartart;
- diagram;
- links;
- notes;
- superstructures;
- text;
- symbols;
- multimedia;
- Flash object.

- For example, in order to insert a shape, you need to click on the corresponding icon. Then, in the list that appears, select something suitable for your project.

- Immediately after that, you will see how the appearance of the cursor changes.

- Click where you want to insert the shape. The result will be the following.

- If you do not like the appearance of the inserted object, you can always change it using the "Format" tab. It appears when any element is selected.

In this way, you can insert anything.
How to change the presentation design
On the Design tab, you can choose any theme you like.
- In order to see full list, you need to click in the specified area.

- This list is quite large. At the same time, it is possible to search for topics on the Internet. For easier selection, a preview will be available to you when you hover over the thumbnail.

- What's more, there are different color options within the same theme. To save the changes, you will need to click on the selected option.

How to set up transitions between slides
To do this, you need to do a few simple operations:
- Click the transitions tab.
- Expand the list of all effects.

- Choose something from the list.

- Immediately after that, you will see how this transition will look like.

- As additional settings, you can select the duration of the effect and the soundtrack.

How to insert animation
This tab will be inactive until you have at least some objects on the slide.

As soon as you write or paste something, the icons will immediately become active (at this moment you must put the cursor on the desired object).

If you click on the Add Animation icon, you will see an even larger list.

The most important thing is not to overdo it with effects, because in this way you can destroy the readability of the text and all your efforts will go down the drain.
Print presentation
If the project is large, then you will need a very large amount of paper. To save money, do the following.
- Press the keys Ctrl + P on your keyboard.
- As a result of this, the "Print" section should open in the main "File" menu.

- After that, you need to click on the specified drop-down list and select the required number of slides on one page.

Thus, you can save paper and ink in the printer several times over. And most importantly, the printed version is much more convenient for memorization than the electronic one.
To see what formats you can translate your presentation into, follow these steps.
- Click on the "File" menu.

- In the window that appears, go to the "Export" section.

- As a result of this, you will see that you can:
- create a PDF file (if you have this application installed);
- create a PDF/XPS document;
- create a video;
- pack the presentation for a CD;
- create issuances;
- change file type.

No other program has such an export list.
PowerPoint Online
In order to use this service, you need to go to the following link. Before you get started, you'll be asked to sign in with your Microsoft account.

After you log in, you will see the following.

Please note that when working with slides, you will use the capabilities of two services: Microsoft PowerPoint Online and OneDrive. All your documents will be stored in this cloud.
To create a presentation, follow these steps.
- Choose any template.

- After selecting the desired sample, you will see the following.

- As you can see, this is a regular PowerPoint, the work of which we have analyzed above, only in the browser. Here you will do everything exactly the same as in the regular version for a personal computer.
It's a great alternative for those who don't have their laptop or PC handy. What's more, just like with Google Slides, all your projects will be stored in the cloud. It is enough to log into your account.
The official page of this program is as follows.

You can download it. Or go from the main page to the "Download" section.

After you download, install and run this software, you will see the following.

As you can see, this software is very useful and modern, because in addition to presentations, it can also work with other formats. Most importantly, during installation you are not asked to enter a key or buy something. LibreOffice - completely free program. It constantly receives technical development through open source.
Anyone can contribute and thereby benefit the project. If you decide to use the Impress program, try to download the most recent release. In addition, when the appearance new version The program will prompt you to install the necessary updates.
To create a slide show, follow these steps.
- Click on the corresponding menu item.

- At the very beginning, you will be asked to select the desired template.

- After you make your choice (and there are a lot of options), you will need to click on the "Open" button.

- After that, you can create any slides.

- The algorithm of work is exactly the same as in other editors, only all the panels are arranged a little differently. You just need to get used to it. If you want, you can completely change the architecture of the application using the "View" menu.

- When working with each page on the right side of the screen, you will always see (the function can be disabled) the properties of this element.

- To configure the transition scheme and the appearance of the slide, you need to click on the following icon (on the right side of the screen). Then you can specify all the necessary settings.

How to insert animation
For this you need:
- Click on the star icon.
- Press the button with the "+" symbol.
- Select the desired category.
- Specify the desired effect.
- Set advanced options.

How to add a new slide
To create a new page, follow these steps:
- Click on the slide menu.
- Then select the appropriate item.

Please note that for this it is enough to press the hot key combination Ctrl + M .
Adding Various Objects
If you click on the "Insert" menu section, you can see the following items.

These include:
- image;
- video and sound;
- media;
- diagram;
- an object;
- figures;
- table;
- guide;
- text field;