What is the organization of sales in 1s retail. Clarification of the seller in the document “KKM check”
AT trading floor The store employs sales assistants, their task is to help customers in choosing and selling goods.
We will solve the problem of setting up accounting for personal sales by sellers with the possibility of further analysis of the indicators of these sales.
In particular, let's look at:
Applicability
The article was written for the editors of 1C: Retail 2.1 . If you use this edition, great - read the article and implement the considered functionality.
If you plan to start implementing 1C: Retail, then most likely a more recent edition will be used. Interfaces and functionality may vary.
Therefore, we recommend taking the course 1C: Retail 2 for store automation and service companies, this will help you avoid mistakes and loss of time/reputation.
Creation of employees
Let's start with the creation of employees (sales assistants). In chapter Staff choose a team Employees.
The corresponding form will appear (see Fig. 1).
Fig.1 Form “Employees”
It should be noted that we are referring to the reference book “Individuals”. But only those individuals who are employees will be displayed in the form.
For everybody individual the value of the special attribute (parameter) is defined Is an employee. On which the selection is made. We see a folder Buyers, but if you open it, then we will not see the buyers themselves, since they are not employees.
From this form, we can both create new employees and combine them into groups. If the “Employees” group was not previously created in the database, then it should be created by clicking the Create new group button in the form command bar.
The group creation form will open (see Fig. 2). Specify the name of the group to be created and click the button Write and close.

Rice. 2 Creation of the Employees group
Similarly, within the group of employees, we will create a group “Sales consultants”. This will automatically fill in the Group of individuals field. persons, in which the value of the parent group will be set (see Fig. 3).

Rice. 3 Creation of the Sales Consultants group
Let's create a new employee (see Fig. 4).

Rice. 4 Form of creation of a natural person
Please note that the system automatically ticked the Is an employee box. At the same time, the form contains mandatory fields: Date of birth and Store. In the field Group physical. persons, the value of the parent group “Sales Consultants” will be indicated. Enter your last name, first name, patronymic and gender.
To demonstrate an example, it is enough for us to create two or three individuals (a sales assistant, see Fig. 5).

Rice. 5 Form “Employees”
It is important to note that sales assistants are not users of the Retail 2 program, so you should not create additional users for this task.
An employee and a user are two different entities of the system. There are situations when these two concepts are confused and a user is created for each employee - this is not correct, and this is not necessary.
Reflection of personal sales of sellers
For further analysis, we need to reflect several sales indicating sales consultants.
Consider the documents Sales of goods and Check KKM. Commands for opening lists and creating new documents are located in the section Sales(See Fig. 6).

Rice. 6 Sales Section
Clarification of the seller in the document "Sale of goods"
Let's create a new document “Sales of goods” (see Fig. 7).

Fig. 7 Form for creating the document “Sale of goods”
For the current user and this store, you can set the setting to automatically fill in the seller field in the document header. To create such a setting, in the Administration section, select the Users and rights command.
This command opens a special form from which access to various user settings and their access rights is provided (see Fig. 8).

Rice. 8 “User and rights settings” form
We are interested in the Users command, which opens a list of users (Fig. 9).

Rice. 9 User list form
Double-click to open the card of the current user for editing (see Fig. 10).

Rice. 10 User card
In the navigation bar of the form, select the User Settings command. A list of all user settings available in the system will appear (see Figure 11).

Rice. 11 User setting list
At the top of the user settings form, select the store for which we plan to specify user settings (for one user, you can define different settings for each store).
After you select a store, you can define a default value for the salesperson field. The setting shown in this figure corresponds to the automatic filling of the header of the document “Sales of goods”, shown in Figure 7.
In the list of goods of the document "Sale of goods" there is a special column for specifying the seller specific product(see fig. 12). When adding a new line, the seller specified in the header of the document is automatically set.
If you replace the vendor set from the default settings in the document header, then the already changed value will be used to fill in the newly created rows of the tabular section. The vendor that is automatically listed on the line can be optionally changed manually.

Rice. 12 Document “Sale of goods”
When posting a document in its movements through the “Sales” accumulation register, it is the seller from the tabular section that will be used (see Fig. 13).

Rice. 13 Report on the movements of the document “Sales of goods”
Clarification of the seller in the document “KKM check”
Let's create a KKM check and make sure that the principle of working with sellers here will be similar (see Fig. 15 and 16). It is recommended to create a POS check document from the list form, as it contains additional commands for managing the cash register shift. If the cash register shift is closed, it must be opened (see Fig. 14).

Rice. 14 List form Checks KKM

Rice. 15 Check KKM

Rice. 16 Report on document movements Check KKM
In the KKM check, only an employee can be selected as a seller (an individual with the mark Is an employee).
Clarification of the seller in the workplace of the cashier
Let's analyze the behavior of the system in the Cashier's Workplace (RCW). RMK is launched using the RMK command (managed mode) in the Sales section in the Service group of commands.
Changing the current seller will be performed by pressing the button on the bottom command bar of the RMK Vendor (the location of the button may differ and depends on the settings of the RMK).
If there is no such button, you need to add it in the RMK settings. To do this, in the main menu of the RMK, select the item Adjustment of the RMK - Change the setting of the RMK (see Fig. 17).

Rice. 17 Calling the RMC setup form
The RMC setup form will appear (see Fig. 18).

Rice. 18 RMC setup form (the Enter seller button is already present)
On the Buttons tab of the bottom panel, add the Enter seller button (see Figure 19) and define its order in relation to other buttons using the Up / Down commands and the Maximum number of buttons in one row setting.

Rice. 19 Adding a Enter Vendor Button

Rice. 20 Cashier interface
When this form is opened, the seller is displayed at the top, which is defined in the current user's settings as the default value (similar to the field Seller in the header of the previously reviewed documents). This value will be automatically inserted into new lines of the KKM check.
To change the current seller, use the command of the bottom panel Seller. If the current seller is set, then the first press of this command will reset this value, and the seller will be empty.
When adding new check lines, the seller will also be empty in them. When you click on the Seller command again, a form for selecting an individual will appear in which you need to select a new value for the current seller (see Fig. 21).

Rice. 21 Choice form Individuals
Let's select Anna Ivanovna Shcherbakova as the seller, and she will be displayed at the top of the cashier's interface. Now, when choosing a new product, it will be filled with the new value of the seller.
When selecting a product already available in the tabular section, rows will still not be added, but the quantity in the already existing row with this product will increase (see Figure 22).

Rice. 22 Cashier interface after changing Merchant value
The value of the seller can be corrected directly in the list of receipt items (see Fig. 23) or using the line editing service, called using the Edit button. lines in the upper command zone (see Figure 24).

Rice. 23 Changing the value of the seller in the tabular section

Rice. 24 Changing the vendor value in the row editor
In order for the user to be able to edit the previously filled value for the seller, it is necessary to grant him the appropriate additional rights.
To do this, in the Administration section, select the Users and rights command.
A special form will open, which provides access to various user settings and their access rights (see Fig. 25).

Rice. 25 “User and rights settings” form
We are interested in the Additional user rights command, which opens a form for setting additional rights (see Figure 26).

Rice. 26 Setting additional rights
It is necessary to check the box the Availability right of the field and the column “Seller” in the Manage Forms Availability rights group.
Entering employee registration cards
In the Retail 2 configuration, it is possible not to enter sales assistants manually, but to use special employee registration cards for this.
Let's create registration cards. To do this, you can select a sales assistant from the Employees list (Personnel section).
In the navigation panel of an individual's card, select the Registration cards command (see Figure 27).

Rice. 27 Fragment of an individual's card
A list of registration cards of this individual will open (see Fig. 28). Let's create a new group called "Employee Cards".

Fig 28. List of information cards
After registration, we will place cards of all store employees within this group. Let's add a new registration card with the Create command (Fig. 29).

Rice. 29 Creating a new information card
For the created card, you can specify a magnetic code or a barcode. We will use a barcode and enter its value. The system can offer automatically generated variants of the Name, we will choose the most complete one and write down the element. Similarly, we create another registration card for the second sales assistant.
There is no built-in mechanism for printing registration cards in the system. Registration cards are expected to be printed by external means.
It should be noted that work with reading registration cards is provided only in the workplace of the cashier. In the documents “Sale of goods” and “KKM check”, reading registration cards will not give anything.
When reading the registration card of the sales assistant in the RCC, the value of the current salesperson is automatically determined and changed. Entering information about the seller using registration cards is really very convenient.
Analysis of personal sales of sellers
Let's analyze registered personal sales. Let's turn to the reports. In the Sales section, select the Sales Reports command. A form with a list of sales reports will appear. Select the "Sales" report and generate it.
In the report, we see that one of the data groupings is the seller field. All sales are already displayed in the context of sales assistants (see Fig. 30).

Rice. 30 Sales report
Another useful report is the Gross Profit Estimation report. In this report, the seller is also one of the standard data groupings.
We can evaluate the profitability of sales for a particular seller, we can compare the performance of different sellers and evaluate their work. (see fig. 31).

Rice. 31 Report “Gross Profit Estimation”
Return of goods from customers during the current shift
Let's consider situations of return from buyers, when sales were attributed to a certain seller.
We will issue a check for a refund within the current non-closed shift. Let's open the form of the list of documents "KKM checks" and find the sales receipt for which you want to issue a refund (see Fig. 32).

Rice. 32 Check KKM
Based on the sales receipt, you can enter new check KKM, in which the operation type “Return” will be automatically set and the list of goods will be filled in (see Fig. 33).

Rice. 33 KKM check for a refund
For clarity of the results obtained, we leave the complete list of goods in the tabular part. In the KKM Receipt for a refund, you need to fill out Analytics for households. transactions and on the Payment tab, enter information about the refund.
Let's post the document and turn to the report on document movements (see Fig. 34)

Rice. 34 Fragment from the report on the movements of the document KKM Check for a refund
It can be seen from the report that the KKM Check for a refund also makes movements in the “Sales” accumulation register. In this case, the sale is reversed (the quantity and value indicators are negative). As a result, sales totals per salesperson decrease.
When registering a return in the RCC interface, the situation for movements in the “Sales” register is similar.
Return of goods from customers after the closing of the shift
Consider the situation when the return is made after the shift is closed. Let's decide on which check we will make a refund.
In the Sales section, in the Service group of commands, select the Return goods from retail customer. In the form that opens, indicate the reason for the return, the number and date of the check. tabular part The goods will be filled with goods from the check (see Fig. 35). On the payment tab, enter information about the refunded funds.

Rice. 35 Processing “Return of goods from a retail customer”
Push button Create Documents We generate return documents. Go to bookmark Created Documents and open the document “Return of goods from the buyer” (see Fig. 36).

Rice. 36 Document “Return of goods from the buyer”
In the tabular part of the goods of this document, there is also a completed Seller column. Let's post the document and turn to the report on document movements (see Fig. 37).

Rice. 37 Fragment from the report on the movements of the document “Return of goods from the buyer”
We see that the sale is reversed. In the “Sales” accumulation register, the quantity and value indicators are negative.
Total indicators for these sellers are decreasing. You can compare the indicators of reports before and after the registration of returns (see Fig. 30.31 and 38.39).

Rice. 38 Sales report

Rice. 39 Report “Gross Profit Estimation”
Igor Saprygin,
Kemerovo
This article provides recommendations (a kind of tutorial) on the correct and, therefore, the fastest possible setup of the cashier's workplace (RCC) - a functional unit software product 1C Retail (release 2.2.6.33 dated 08/31/2017), developed on the 1C:Enterprise platform.
Since the solution itself is designed to automate the work of retail outlet with any throughput, the functionality that ensures the operation of the cash register, which may include, for example, weighing equipment, can be considered the main one. That is why, the work of setting up the program in this part is simply called “setting up the 1C store”.
The RMK software module has comprehensive functionality for effective work cash point on retail space any bandwidth. Access to the toolkit of the module with the ability to use certain functions by a specific cashier is specified in general settings 1C Retail in combination with the personal rights of a particular employee.
Setting up shop equipment
Let's start setting up a 1C store in general and RMK in particular with such an important component of trade as retail equipment. It is hard to imagine stores without electronic cash registers, and after all, less than 30 years have passed since their mass distribution. Ability to connect fiscal registrars to information system simplified the process of not only serving customers, but also obtaining reports while improving the accuracy of data and their relevance to reality.
You can configure the operation of the equipment by going to "Administration" - "Connected equipment". By checking the box "Use plug-in equipment", we move to the menu item "Connected equipment", which is located on the right.
In the 1C Retail 2.2 window that opens, select "Fiscal registrars" - "Create".


After "Record and close" our registrar appeared in the list of equipment.

After selecting it from the list, click "Settings". If the hardware driver is not installed, the program will report this and offer to install it.

After the "Install driver" command, the program will install it and open the hardware settings window.

Here you should conduct a “Device Test”. Its results will be displayed in a message, and if everything went well, the equipment will be successfully connected. In conclusion, select "Save and close."
Setting up a 1C store can be done in the context of food retail and non-food retail, but regardless of this, it is important to set up user rights, since this will ensure control over the correct work of personnel with inventory and, of course, in terms of settlements with customers.
Go to "Administration" - "Users and rights" - "Personal user settings" - "Additional user rights".


The first user, if it is not created, would be more correct to appoint an administrator. Put all the checkboxes and click "Record".
For reporting and generating the correct fiscal document (receipt), you must specify the details commercial enterprise in "NSI" - "Details of the organization".

We fill in all the necessary information and save the data.

Next, we create a store from which sales will be carried out in "NSI" - "Stores" - "Create". We enter the name of the store directly into the system, the name of the warehouse from which shipment will be carried out, the organization from which sales will be carried out and pricing rules.
Let's take a closer look at the latter.
In order to create a new rule, press the select button from the list (down arrow on the right). You will automatically be prompted to select a rule from the list or create a new one (green plus). Since we are setting up a new base from scratch, the list will be empty and we will have to "create a new" rule. Enter the name of the rule and create a price type. To do this, as before, click "Select from the list" and in the window that appears, click "Create". The Create Price Type window opens.

Let's start by creating a "Purchase" price type. It will not be used in the sale, so the corresponding item is not checked. You can fill it manually or automatically by substituting the value from information base. In the example, we select the option “Fill in according to IB data upon admission”. Data composition scheme: "Incoming prices" (in this case, the prices will be filled in from the receipt document). Click "Save and Close". Our manipulations did not affect the “Types of prices” window in any way, and the price we just created did not appear. This happened due to the fact that the "Use when selling" checkbox was not checked.
By clicking "Create" again, we will now work with the "Retail" price type. Check the box “Use when selling” and select the method of setting the price “calculate according to other types of prices”. In the same window, a formula builder will appear a little lower, with the help of which you can set up automatic price calculation according to a given formula.

In the example, we created a markup of 30% of the purchase price by clicking Save and Close. Only after these actions, our retail price was displayed in the list of price types. And by clicking "Select", we confirmed the need for our price to be added to the pricing rule.

Repeat "Save and close" twice. Store creation setup completed successfully.

To “create”, that is, to set up a cash register, go to the “NSI” - “Cashier” section. Click "Create" and select the store we created earlier. We select the name of the cash desk and put a tick in the box "Punch checks at the KKM cash desk." The cash register has not yet been created, so we create it using the selection button on the right, ask “show all”, then “Create”.


In the connected equipment, select the fiscal registrar, set the name, specify the serial and registration number. Finally, click "Save and Close".

Select the created checkout from the list and click "record and close" again.
On this, we have finished setting up the details necessary to launch the cashier's workplace (RCC).
Creating Documents
Let's start with the receipt of goods in the "Purchases" - "Receipts of goods" section and create a new document.
In the document itself, it is possible to create a new supplier by writing down the name of the supplier and all necessary details. We can fill in the document nomenclature table, as with the supplier, by creating new nomenclature positions, directly from the document being created. Specify the product name, item type, VAT rate and unit of measurement. As a result, we get the following document:

Click the "Post" button (a document with a green arrow), and then "Create based on" (two documents with green arrows). In the drop-down menu, select "Set item prices".

"Set item prices" will open.

The program automatically calculated the retail price according to the formula that we set. The purchase price is recorded in the Receipt document. Click "Submit and Close".
For the sake of the experiment, let's go and check the balance of goods in warehouses. To do this, in the main menu, go to the section "Warehouse" - "Warehouse reports" - "Balances in warehouses" - "Generate".

We see that the goods have arrived and are listed in the balance of the warehouse.
Sale of goods
We proceed directly to the sale of goods. To do this, go to "Sales" - "RMK (managed mode)".
Before us is the RMK menu - what the cashier will see in front of him. To get started, you need to open a shift. We press the "Open shift" button, which will cause the receipt of the shift opening to be printed.


The program will break the check.


"Change RMK settings" and "Create".

In the window that opens, select the necessary settings: on the first tab, set the flags opposite the items "Combine positions with the same product", "Use advanced configuration of the bottom panel buttons" and "Open the bottom panel at startup". On the second tab, we select which buttons will be present on the bottom panel (here you can select an arbitrary number of buttons).
Please note that the "Maximum number of buttons in one row" box should contain a number other than 0, because of this, various errors may occur when working with the RMK.

After configuring the bottom panel buttons, click "Record and close." Now, when we open the Sales Registration section, we see that the bottom panel has appeared with the buttons that we have selected in the settings.

To close the cash register, click "Close shift". The program will ask you to confirm the closure. By clicking "Yes", we will receive reporting information about sales for the past shift.

Click the "Close Shift" button. The program will print the closing receipt and generate a report on retail sales.

This completes the quick setup of the 1C Retail store, and you can work with it. Of course, there are much more settings in the program, but for a quick start, the ones considered are quite enough, and the rest can be filled in as the work progresses.
Good luck with your sales!
We will show options for setting up a cashier's workplace shop retail when automating with "1C: Retail 8".
Program "1C: Retail 8" is definitely one of the leaders in the retail automation market. You can automate a small pavilion, and big store with multiple checkout lines.
The 1C: Retail 8 program initially contains extensive functionality that can be effectively used by a large store, and a small retail department represented by an individual entrepreneur in mall can be limited to only the most necessary functionality.
Setting up an online cash register connection to 1C
Cashier's workplace. Sales registration.
Workplace cashier of the program "1C: Retail" is a window in which the seller generates a list of goods sold to the buyer.
Registration of retail sales can be performed both manually by selecting products from the list, and using a barcode scanner, which is of course the most preferable.
After forming a list of goods and summing up the final amount, the seller chooses a payment method - cash or non-cash. The choice of payment method for retail sales is carried out using the buttons at the top of the sales registration window.

After choosing the payment method and confirming the payment, a receipt will be printed for cash register if it is connected to a computer.
Setting up the sales registration window "1C: Retail 8".

This figure shows the setup of the retail sales registration window, in which the checkboxes that are used in most cases are checked.
Merge positions with the same product.
If there are identical goods in the check, they will be combined into one line with the total quantity. In trading, there are situations when the same item needs to be reflected in one sales document several times, with different prices. That is why this parameter was introduced in the "1C: Retail" setting.
Show product SKU
If in your store the goods are identified by the article and it has importance, then most likely it will be convenient for the seller at the checkout to see the item number in order to resolve any ambiguous situations. Otherwise, this option can be disabled.
Open bottom bar on startup
The bottom panel in sales registration mode is a series of buttons that allow you to perform additional actions in retail process.

You can use the commands of the bottom panel in two ways - by pressing the button directly, or by using the specified keyboard shortcuts. Also, if your store has a touchscreen monitor, you can activate the command by directly tapping the edit screen.
The automatic opening of the bottom panel can be disabled, for example, if you are using a compact small monitor. If necessary, you can call the bottom panel hot key F10.
Assign a price to products with a zero price
When a retail store is just opening, an assortment is being formed, goods are being imported, it is quite normal that the sales prices for some items have not yet been entered into the database. For this case, the 1C: Retail program provides a setting, when installed, the program will request manual entry of the selling price of the goods if it is not set.
Control the balance of goods when closing a receipt
A common situation is when the goods have already been delivered to the store and put on the shelf, but the incoming invoice has not yet been reflected in the 1C: Retail program. For example, the documents are kept by an accountant or a merchandiser, but you already need to sell. In this case, you can turn off the specified setting and the seller at the checkout will be able to perform sales without any restrictions.
However, for our part, we note that this practice of automating retail trade is a source of problems with commodity accounting. For example, they sold a product, but when entering an incoming invoice, the user (accountant or merchandiser) made a mistake and received a similar product. As a result, there will be a negative balance for one position, and a surplus for the other. In addition, the cost of goods sold will not be formed, and you will not be able to evaluate financial indicators store based on the reports of the 1C: Retail program - there will not be enough initial data to generate reliable reporting.
Therefore, our advice is retail automation timely reflect all operations with the goods and include control of balances.
Open line editing when searching for a product.
The optimal solution for automation retail store is to use a barcode scanner. But if it is not possible to use barcoding, then you can make a sale manually by selecting products from the list. The specified setting just serves to open the search window if you need to change the product already selected in the check.
Close the search box when selecting a product
The second setting for the case of manual selection of products in retail is an indication that the search and selection window should be closed after the product is selected. Those. it is assumed that in the program "1C: Retail" the operator at the checkout opened the search window, selected the necessary product and the window closes immediately. To select another product, you must re-open the selection window. If such a scheme of work is not convenient, then the setting can be changed.
The first step in setting up the 1C: Retail 2.2 program will be the creation Organizations. To do this, go to the point Regulatory Reference Information (NSI), select in the navigation bar Organization details.
In the window that opens, select Entity or Individual entrepreneur. After that, fill in the relevant details: Name in the program, Abbreviated name, Full name, TIN and others. 
The next step is to create Price types. Go to the section Marketing, select in the navigation bar Price types and press the key Create.
We need to create two types of prices: Purchasing and Retail.
Let's first create Purchasing for this, in the window that opens, fill in: Name, Pricing Method, and Data Composition Schema. Purchasing The price will be filled in from the goods receipt document. 
After adding Purchase price must be added retail price, that is, the price at which we will sell. Fill in the new price: Name, Use when selling, Price setting method and Calculation rules. In this case, we will get an automatic price calculation, i.e. Goods Receipt Price + 50% markup = Retail Price. In the future, you can change the price manually. 
The next step is to create Pricing Rules, go to Marketing Pricing Rules and press Create.
In the window that opens, fill in Name and Price type.
Program 1C: Retail to work requires the creation store who will release the goods. We go to Regulatory Reference Information (NSI), in the navigation bar select The shops and press Create. 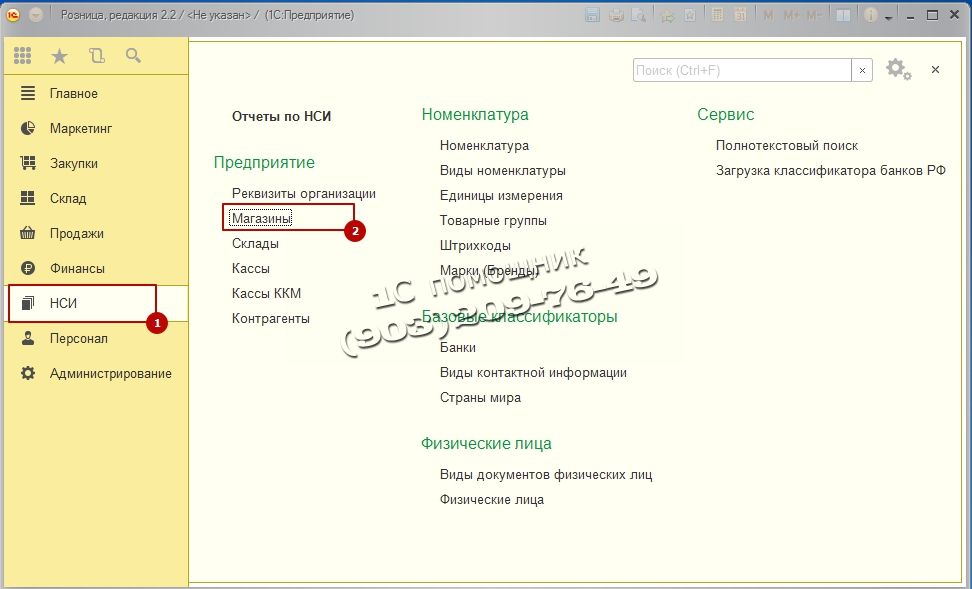
In the window that opens, fill in the basic details: Name, In the shop here you need to choose either work with one warehouse or with several, Warehouse name, Sales organization this is the organization with which sales will be carried out, Pricing Rule, Type of minimum selling prices this is the same purchase price, below this price it will be impossible to sell, so as not to work at a loss, The order of rounding the amount of the check this item will allow you to round the amount of the check so as not to mess around with pennies, if you think that you will have even prices anyway and this is not required, then you are mistaken, because when applying discounts, pennies will still appear, in paragraph Rounding type choose Round up total this item will allow you to lose less money on rounding. After filling in all the details, press the button Write and close.
RMK (Cashier Workplace) cannot function without the Fiscal registrar, so the next step is to add the fiscal registrar to the system. In our case, we will add fiscal registrar emulation. We go to the section Administration, select in the navigation menu Connected equipment.
Next, check the box Use connected equipment and go to Connected equipment.
The list of equipment is empty, we are adding new equipment. Press the key Create.
Fill out the opened form: Type of equipment choose Fiscal registrars, Hardware driver select 1C: Fiscal registrar (emulator), check the box Device in use, click on the Record button an object and go to Tune…
If the device driver is not installed on the computer, click: Functions and choose Install driver. If the driver is installed, check settings will appear. You can change them to your liking or leave them as default. 
The next step is to set up KKM cash desks which will punch checks in your Store. Go to the section Regulatory reference Information(NSI), KKM cash desks and press Create.
We fill in the main points. Type of cash desk, Shop, Name, Workplace, Connected equipment the Fiscal registrar that we created earlier should appear in the field. Then presses Record and close.
Now we need to add our user the rights to use all the functions of the RMK. This point is very important. We go to Administration, Users and rights and choose Additional user rights.  First, let's give the user all rights. Click on Button with a green checkmark and press Write down. All necessary rights will be given to the user.
Next, we need to post the goods to the warehouse; for this, we need to create a document Receipt of goods. We take the data for filling from the supplier's invoice. We go Procurement, select the item Goods receipts.

A list of all documents will appear Goods receipts created earlier, in order to create a new document, click Create.
We will not consider in detail how the Goods Receipt document is created, this can be found in the article
In order to sell goods, we must have Retail prices for goods. To do this, after creating and filling out the Goods receipt document, select Create based on then we choose Setting item prices.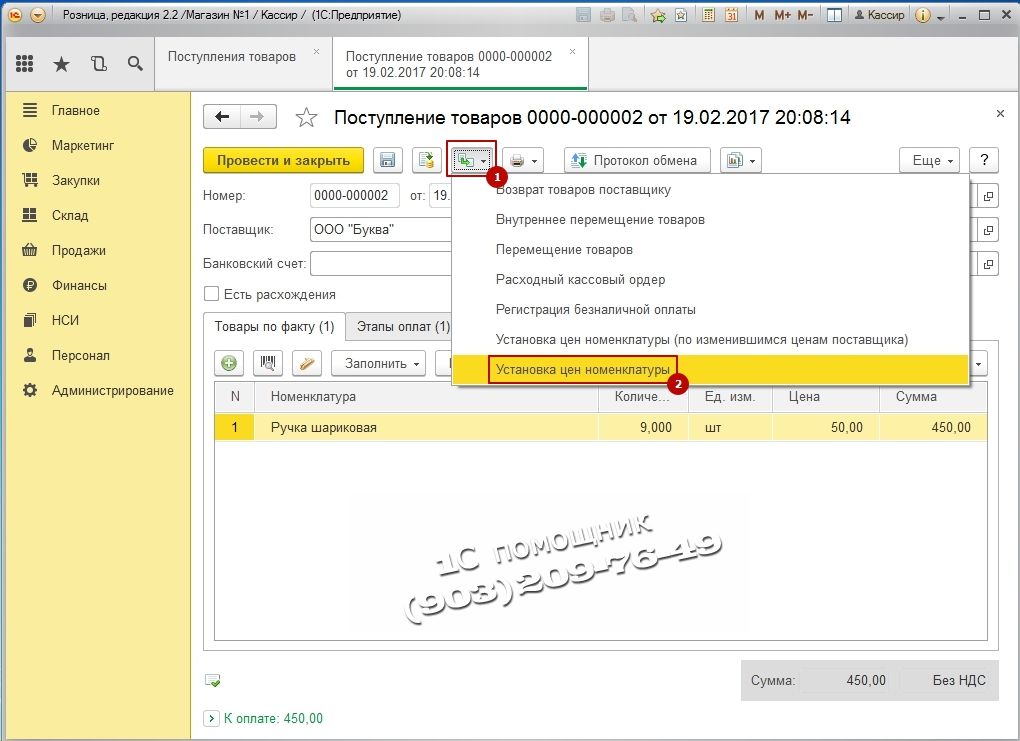
The document will open. This document generates Purchase and Retail prices. The program itself calculates the price based on the formula that we set earlier. Purchasing is equal to the receipt price of 50 rubles, and Retail equal to Purchase +50% margin amounted to 75 rubles. You can change the calculated prices manually by double-clicking in the price field and then entering your price. To save the document, click Run and close.
So we have made the basic settings of the RMK, now we go directly to the Cashier's Workplace. To do this, go to the section Sales and choose RMK (controlled mode).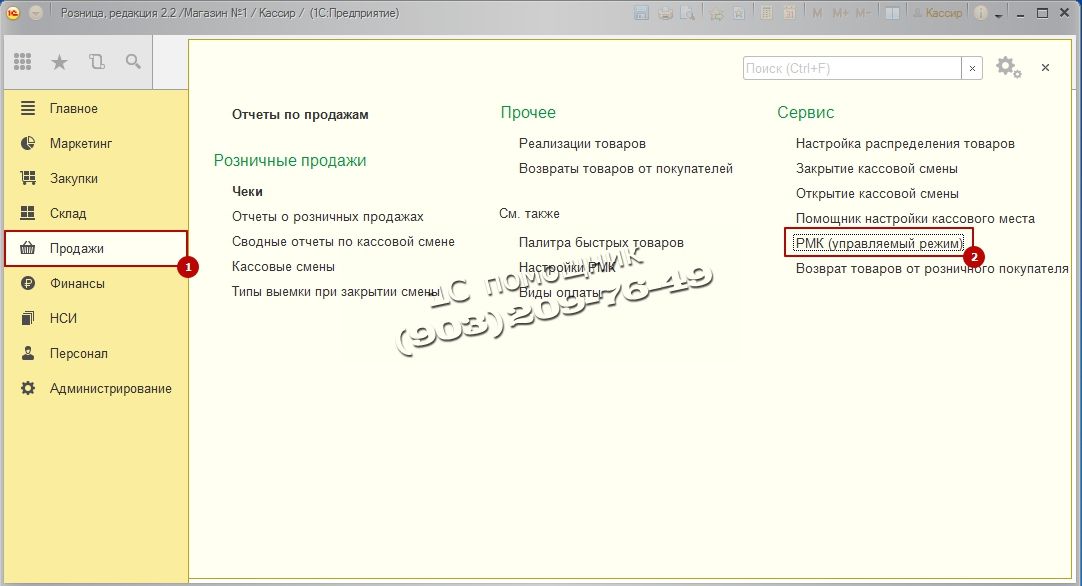
The RMK panel opens, initially we need to Open a shift, click Opening Change and then press Sales registration.
In the window that opens, press the button Menu(F10) when you click on it, the bottom menu will appear, then press the button Search (F11) to select an item from the list. 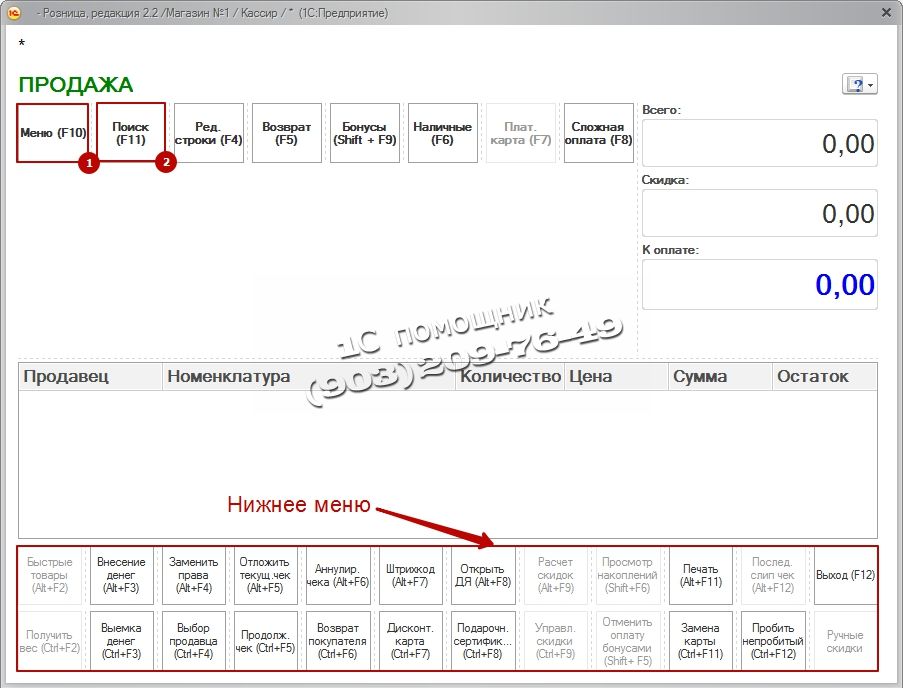
In the opened window Search and selection of goods in RCC enable display additional information prices and balances. To do this, click the button below Show Information.
In the next window, select two checkboxes Display: Remains and Prices. At the bottom of the selection, current stock balances and the retail price will appear. 
Select a product with two mouse clicks and close the product selection window. In the RMK window, enter quantity of goods sold press the button Cash (F6) to make a sale, enter the amount of money deposited, the program will calculate the change and press the button Enter.

Your sales receipt will be displayed at the bottom right. If you are not using the Emulator, but a real fiscal registrar, then your fiscal registrar will print a Receipt.
After you have completed the working day, you need to close the shift. To do this, exit the RMK by pressing the key Exit(F12). The RMK launch window will open. Now we need to close the cash register. We press the button Closing the shift.
The program will ask you to confirm the closing of the shift. If you are ready to close the shift, click Yes.
If everything is in order and the amount of sales per day matches the sales, press the button Closing the shift.
Cashier is closed. The program will display an information window about the cash register shift. If you are using a real fiscal registrar (not an emulator), then it will print out for you Z-REPORT. 
Setting up a cashier's workplace (RCC) and registering retail sales in 1C: Trade Management 8 edition 11.2
Consider setting up RMK using an emulator.
In chapter Reference information(NSI) → Warehouses and shops create Retail store. Fill in the appropriate fields. (Fig.1).
You need to connect to this store checkout KKM . We create it in the section NSI → Kassa KKM. We have a cash desk type fiscal registrar and select our warehouse - Shop "Technique" (Fig. 2).

Fig.2
For a retail store, you need to connect trade software, which is configured by processing Connection and setup commercial equipment. NSI → RMK and equipment → Connected equipment. We create and configure connected equipment. (Fig.3).

Fig.3
Before making sales, you need to set up cashier jobs(RMK) in the section NSI → RMK and equipment → RMK settings. In the settings of the RMK, you must specify the cash register of the cash register and the equipment connected to the cash register. (Fig.4).

Fig.4
For registration of retail sale, RMK is used, which opens from the section Sales → KKM checks → Opening checkout shift .

We select a product, quantity, the price is filled in automatically from the document Setting item prices. (Fig.5). Cash payment → We punch the check. (Fig.6).

From the list of KKM checks or directly to RMK, you can close shift. (Fig.7).

After closing the checkout shift, checks issued for the current shift can be deleted, archived or left unchanged. When you press a button close shift a document is formed Retail sales report. (Fig.8).

Fig.8
The report generates information about all sold goods. Simultaneously printed blanking report (Z-report).