Openwork wood carving sketches. Slotted thread (openwork) and stencils
Contour wood carving, being a kind of geometric carving, requires some experience. Without habit, it is difficult to cut absolutely straight lines without nicks and chips. Not very complex technique is combined with maximum detail, resulting in beautiful carvings.
An example of contour woodcarving
Wood carving is the cutting and cutting of wood material. As a result, finished contour drawings come out from under the cutter's knife. The outlines of objects, landscape compositions, flower collages are embodied mainly in wooden panels.
How is the process of working with wood carried out? How are beautiful pictures made? All work on a piece of wood, which later becomes a work of art, can be divided into stages:
- First choose an image.
- The drawing is translated into .
- They make it from a stencil.
- Wood carving is being done.
- The finished panel is sanded, sanded, varnished.
Wood carving requires special skill, the sketches of which involve the implementation of a complex pattern.
 A selection of sketches for contour woodcarving
 Each line drawn should be straight and clear. For drawings in a particular case, the master himself decides how deep the lines should be cut. The expressiveness of the image on the tree depends on this.
Caskets, crosses and other products are made using the contour wood carving technique, where it is necessary to reproduce the outlines of flowers, animals, people. Work is carried out both on natural wood, and on tinted, as well as on plywood.
Work technique
Wood carving techniques are divided into cutting lines and curls. The lines are first cut, then cut. In this case, a special sharp knife is used - a jamb. The blade of the knife should be located at a slight inclination from a vertical position. In this way, incision is made.
 Example of contour carving technique
 Then the slope is done in the opposite direction. The cut part of the tree is cut. When cutting contour grooves, the jamb is clamped in a fist, the movement of the blade is directed with the other hand. In the process of pruning, it is important that even strips of wood come out from under the knife. If sawdust, uneven stripes are obtained, there will be no beautiful lines.
Read also
Wooden carved patterns
Woodcarving for the purpose of cutting curls and rounded lines involves the use of various chisels. But experienced craftsmen know how to cut sinuous contour patterns with just one jamb.
The technique of cutting curls, small circles is as follows.
 Slotted wood carving technique
 The chisel is held in a fist, making a slight inclination towards the center of the circle. The blade is deepened into the wood by several centimeters, after which the plank is turned in a circle along the axis. Then do the cutting. It also rotates along the axis with cutting off a cut piece of wood. Further, the radius is increased if necessary.
For woodcarving, flat and rounded chisels are used. An experienced craftsman, knowing the purpose of each, can cut out the most intricate pattern. The pinnacle of craftsmanship is contour carving with a pillow. The resulting pattern in the center looks like it is raised above the rest of it. In reality, only the depth of the grooves differs. In the center, it can be made larger, along the edges - smaller.
Wooden patterns on plywood
Plywood carving is somewhat different from wood carving. Working with the material involves the implementation of several techniques. These include:
- performing contour cutting;
- carving;
- openwork carving;
- combined thread.
According to the sawing method, contour images of animals, figures of people, flowers are cut out. The result is a convex image on a flat background. Contour carving involves cutting out a complex pattern by cutting and trimming. The result is a embossed exquisite pattern.
Openwork carving involves cutting through the details of the pattern. The pattern performed in this technique is the most laborious and beautiful. The product resembles an airy lace. Combined contour carving combines 2 or more techniques at once.
 The process of making slotted threads
 Most often, openwork carving and contour sawing technique, contour carving and sawing are used simultaneously for its manufacture. Plywood carving, although a more laborious task, is easier to perform. It's all about the material. Hardwood is more difficult to process than plywood samples.
Plywood carving technique
Before starting work, a blank is made, it is polished, crumbled, if necessary, into a dark tone with nitro paint. Allow the workpiece to dry and paint over again. A drawing or sketch is applied to the finished sample using ink, gouache. Sometimes stencils are used instead. All curves of the picture are drawn according to the prepared form.
The presented wood carving lessons will introduce beginners to this craft so that you can create objects from natural materials with your own hands.
The history of the craft and types
Wood carving is a type of arts and crafts that originated in antiquity. In Russia, woodcarving was called carving, and the drawing performed in this technique was called a sign, a pattern, or a pattern. In this technique, masters made braids, teeth, grooves, poppy seeds, fungi, etc. on a flat surface. You can see such samples in the Assumption Cathedral by visiting the royal place.
Russia owes the development of woodcarving to the monk Ambrose, a novice of the Trinity-Sergius Lavra, who at the end of the 15th century combined Russian ornament with Western and Eastern in his works.
In 1660, the masters decorated the royal dining room with German carvings, which were figured, with Gothic motifs. This is how German elements appeared in Russian carving, including new tools and terms.
Thread types are conditionally divided into:
- through;
- deaf;
- brownie;
- sculptural;
- chainsaw thread.

Here's how they differ:
- The through thread is subdivided into consignment note and through thread. This includes slotted carving, when through sections are cut with chisels and chisels; and profile carving, where such sections are cut with a jigsaw or saw. If these types of carving are performed using a relief ornament, then this is called openwork.
- If there is not a single through hole in the processed tree, such a thread is called blind.
- Facades of buildings are decorated with house carvings.
- Sculptural - one of the most complex types of carving, requires great skill. In this technique, figures of animals, sculptures of people are made.
- With the help of carving with a chainsaw, global work is performed. This requires strength, therefore it is more suitable for men, while women also successfully master other types of carving.
Woodworking tool, cutting blanks
Beginners can use only 2 tools - a well-honed penknife and a joint knife.
When you learn how to perform simple elements with them, you want to improve, then you can buy wood tools, for example, such a set.

There may be even more tools, but only professional carvers who perform complex work need such a number.

See what types of recesses you can make with semi-circular cutters of different sizes, sharp-angled.

But what set of tools should a cabinetmaker have in order to produce the following types woodwork:
- carving;
- sawing off;
- splitting and trimming;
- planing;
- turning;
- chiselling.

- Pay attention to the cutters that are used for manual turning of wood. In addition to the semicircular, there is also a flat oblique, angular, detachable, beveled, angular, etc.
- Saws are used to saw off the workpiece. They can be transverse, longitudinal, universal. The teeth of the rip saws are chisel-shaped; in the transverse they are triangular, sharp. Universal are equipped with teeth having a right angle. Such a tool can cut fibers both along and across and at an angle. Each of these saws can be hacksaws, simple, one-handed.
- If the workpiece is made from a ridge, beam or trunk, then axes or cleavers are used. Adze - a kind of ax, the blade here is located perpendicular to the handle, is used to create figured and concave products.
- To remove chips from the workpiece, turning or hand tools are used, planers can be used.

The most popular carving tools are chisels. They usually consist of:
- steel rods;
- cutting blades;
- shank.
- Wide and straight are used for cutting or stripping flat or convex workpieces.
- With round blades - for working with horn knots or hardwood.
- With the help of narrow workpieces are processed in narrow places.
- A chisel with a thick steel rod is used to clean a deep cavity or workpiece with a hollow. Deepen the chisel into the wood with a mallet.
- Cranberries make gutters of various depths and radii.
- Corner chisels make grooves and triangular recesses.
Wood carving: sketches and master classes
After you have learned a lot of useful things, got the necessary, let's try to cut a flower. To make it, you need the following:
- flat wooden blank;
- pencil;
- transparent paper;
- v-shaped chisel-corner;
- narrow and wide semicircular chisels.
If you don't already have a v-shaped chisel, you can use a sharp knife for this pattern.
Attach a sheet of paper to the screen, redraw the diagram.

Then transfer it to a wooden blank. Start by cutting along the outline of the center circle, then cut towards the center from the outer circle using a large semi-circular chisel.

Mark up the flower petals.

Using a v-shaped chisel, cut the petals along the outline.

With the same tool, remove the excess wood between the petals (“triangles”).

Take the next woodworking tool in your hand - a semicircular chisel to cut out the outer contour of the petal. In doing so, it will become similar to the upper part of the heart.

With a large semi-circular chisel, make cuts inside the contour of the petal.

With a small semicircular chisel, make two cuts on this contour from the center of the flower.

To increase the cut area, just cut again.

Unfold the chisel and round the center of the flower.

Now you need to take the next carving tool - a v-shaped chisel and make such cuts in the center of the flower.

Everything, you can admire the result of the work.

If you want to carve a fox, the following sketches will come in handy.

If you want to make butterflies, wood carving sketches are also included.

If you want to make a mold for printed cookies with the image of the Snow Maiden, then prepare:
- beech plank;
- ruler;
- jigsaw;
- simple pencil;
- ruler;
- sandpaper;
- eraser;
- linseed oil.

Draw a rectangle on the board. Drink it up.

If you do not have an electric jigsaw, then you can cut the workpiece with a saw or an ordinary manual jigsaw.
Make the surface of the cuts even with sandpaper. If the farm has a grinder, use it for this procedure. Transfer the drawing to the workpiece using a simple pencil.

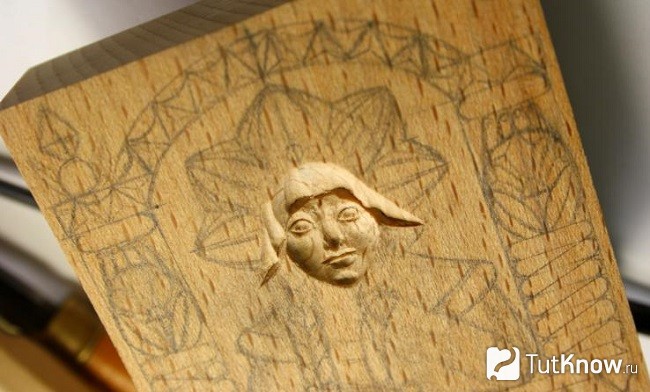
With the help of a semicircular chisel, we make a recess in place of the face, then we again apply its contours here.

The ongoing wood carving sketches will help you carve out the facial features correctly. At this stage, we also make a cape on the head of the Snow Maiden. Note that it is at a level above the face.
Based on the sketch, cut out other elements of the workpiece.

Now you need to erase the pencil with an eraser-rubber, then with the finest sandpaper. If you immediately do this with sandpaper, then part of the stylus will rub into the tree.
Pour linseed oil into a container, dip our wooden mold into it for an hour. If you are doing great job then saturate it with oil using a swab or squirrel brush and leave to dry for 3-4 days.

Everything, you can roll out the dough, cut it into rectangles, apply a pattern using a wooden blank and bake.

To prevent the cookies from burning in some places, you need to cut a stamp out of wood so that there are no too prominent elements on it.
How to cut a sign for a bath?
For her, take:
- a board (in this case, a coniferous wood step was used);
- triangular ruler;
- simple pencil;
- saw;
- furniture varnish in a can;
- stain;
- brush;
- sandpaper.

To draw letters, download the letters you like from the Internet, then redraw them on wood. You can use this sample.

Draw oak leaves on the right and left on the plate.

Next, the carving begins. For beginners, such tasks are great, because they do not require long training and a lot of tools. Here, 3 types of cutters were used: a joint-cutter and chisels "Tatyanka". Make cuts according to the pattern with a chisel cutter along the outlined contours, cut it under the contour with a chisel to highlight the pattern above the background.

Next, the carved surface is sanded sandpaper No. 180 and No. 220. Draw clouds at the top and bottom of the tablet, cut them out with a chisel and a chisel, and then sand them.

It remains to cover the product with stain. For this plate, it was applied in 1 layer, and when it dried, the recesses were painted a second time. After that, you need to go through the letters with sandpaper to give the effect of a three-dimensional image.

After coating with varnish from a spray can, you need to let it dry for 12 hours and you can hang the sign in place.

How to turn soap into beautiful flowers with your own hands?
You can cut not only on wood, but also using soap. This is a softer material and at first you can “stuff” your hand on it.

This soap will be a nice present for friends. After all handmade much appreciated. In order to make a rose out of soap, you will need a little, namely:
- a piece of soap;
- cutter;
- tassel.

Then you need to cut out the second and subsequent petals. At the same time, move from left to right in a circle.

This is what the job should look like after you make the first circle.

Perform the second and subsequent ones in a checkerboard pattern in relation to the previous ones.

Here's how to decorate soap with your own hands by combining carving and woodcarving.
In conclusion, 3 plots are offered to you. From the first one you will learn in detail about wood carving, about tools for beginners.
After viewing the second, you will be able to carve a spoon with a beautiful carved handle.
From the third, you will learn how to carve a charming rose from wood.
Interested in wood carving for beginners, as a rule, people who do not have an art education. For them, this art is a hobby. Due to the fact that the knowledge of most of these carvers is scattered, we will try to streamline them. There is nothing difficult in wood carving itself. In Russia, this type of creativity has always been the main one. Even in the processing of stone, at first they used techniques that had long been accustomed to.
Drawing a pattern on a wooden blank
Today, this art form is of genuine interest, despite the fact that many of the skills are already being lost.
Generally speaking, wood carving can be attributed to plastic art. Traditionally, relief and are distinguished. A novice carver should first master the techniques of creating a relief.
This technique has several thread options:

The list doesn't end there. There is still a lot left behind. From the names you can understand how this or that technique of performance differs. Classification is often complicated by the fact that our country is large. In different regions, the names of the same technique may differ. However, the essence does not change, so we outline general tricks work.
All novice carvers get acquainted with geometric carving. She is simple but beautiful. This type of thread is divided into three types:
- contour;
- trihedral-notched;
- nail or staple.
For execution you will need:
- linden board;
- joint knife;
- Ruler and pencil.
Drawings are drawn on the board in the form geometric pattern. The carver can come up with his own or copy what he likes. You do not need to immediately take on complex elements if there are no skills and the hand is not strong enough.
 Several ornaments for woodcarving
 The board must be smooth. Such a surface is achieved by planing. Under no circumstances should the surface be sanded with sandpaper. If abrasive particles remain in the fibers, they will not make the thread clean and neat. In addition, the cutting edge of the knife will dull faster.
For beginner carvers, it is recommended to choose hardwood for making geometric ornaments.
They allow you to draw straight lines with a knife. Creating straight lines on boards conifers much more difficult. So, the tip of the knife cuts into the surface vertically. Depth - 1.5-2 mm. Then the entire line is cut, the knife is pulled towards us. In this case, the blade is tilted at an angle of 40°. Movements should be smooth. Note that you need to start carving the line and finish with the tip of the knife. 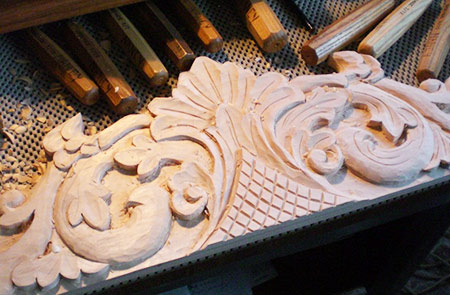
Having made one line or notch, we make the next one. Only now the slope of the blade should be in the opposite direction. The chips will separate, and a geometric recess will appear on the board. If the edges are sharp and the surface is shiny, then everything was done correctly. Gradually cut out the entire element, and then the entire ornament.
It must be remembered that the knife goes easier along the fibers. When cutting through the transverse fibers, it is necessary to apply more effort. The hand can slip, and here you need to know the rules:
- work safety;
- organization of the working space;
- instrument preparation.
Workplace of the cutter
Work with sharp tools should be carried out behind a workbench that meets all the requirements for stability and strength. If it is not possible to make such a workbench, you can limit yourself to a countertop. It can be of any size, but the height should not be higher than the level of the carver's belt.
The countertop should always be smooth and clean. Often during work, the knife slips and hits the table. Chips form and need to be removed. Professionals always monitor the condition of the surface of the workbench. They do not recommend hammering nails, chopping with an axe, or throwing a sharp tool onto a workbench, as these can damage the countertop. The board on which the ornament is cut out is carefully fixed with clamps. Work on your knees, on an unstable table or stool should be excluded.
 An example of an equipped workplace for a cutter
 The woodcarving work table should be well lit. You can install it near the window. However, there is little daylight.
If there is only one light source, dull dark shadows appear that prevent the carving from being clean. Therefore, 2-3 more lamps are installed above the table.
They should illuminate the work from different angles, especially if it is dark outside. Lamps should be installed above the carver's eyes. During work, the eyes are stressed. This is noticed even by experienced craftsmen. A novice carver gets tired faster, and high-quality lighting makes working conditions comfortable and safe.
Tool Requirements
Contemporary open wide opportunities for artists. In wood processing, they are used with success. But we will consider a tool for manual work.
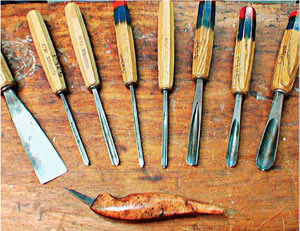 A selection of chisels for woodcarving
 After all, getting the skill to work with such a tool is more important and more difficult.
In the arsenal of the master is always:
- saw;
- hand drill or brace;
- plane;
- chisels are semicircular and flat;
- knives different sizes;
- small axe.
Many manufacturers have already taken care of the carvers and create a variety of sets. It is impossible to unequivocally assess their quality and usefulness. There are disputes about this. We only note that not a single professional master has such a set. All tools are purchased separately and finished by hand.
To work with wood, any saw with large teeth will do. It can be a hacksaw, a bow saw or a jigsaw. It is good if there are saws of different sizes and types. A beginner should monitor the condition of the canvas. It should always be well stretched and sharpened. In addition, do not forget about the wiring.
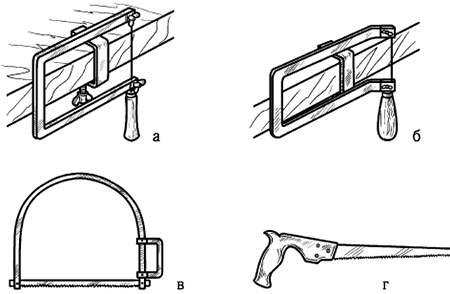 Various types saw for woodcarving
 A planer is an indispensable tool when working with wood. For a novice master, one planer is enough medium size. Sometimes this tool is called a plow, which reflects its function. Experts attribute the planer to one of the varieties of plow. In the future, you can purchase jointers and scrapers, with the help of which the surface of the tree is perfectly leveled.
The main tool for carving is considered a chisel. This is true. The carver should have a set of chisels of different thicknesses and shapes. Experience shows that at first it is enough to have 3 flat chisels:
- wide;
- average;
- narrow.
The same can be said about semicircular chisels.  The most important point is the correct sharpening and condition cutting edge. Chisels need to be sharpened frequently. Sometimes it is recommended to do this before starting work, but most often the chisels are prepared in advance. Do not use blunt tools. This is dangerous. An unsharpened chisel breaks more often, and you can get serious injury.
The carving in this case will be ugly, and the work will go long and hard. To sharpen chisels, you can use a grinder, sandpaper and a piece of genuine leather with polishing paste to finish the blade.
There is such a type of thread as through or openwork - it is subdivided into, in fact, through and overhead, has two subspecies: slotted thread (through sections are cut through with chisels and chisels) and saw thread(actually the same, but such sections are cut with a saw or a jigsaw). The most productive tool, of course, is a jigsaw. With it, it is just easy to do slotted carving, which is great for woodworking!
Welt carving is called openwork, because, as you can see in the photographs, products made using this technique look incredibly light, like the most delicate lace. The essence of slotted carving is to saw through a pattern in a thin wooden blank. This type of carving has gained incredible popularity in the field of decorating design and interiors. The most striking examples of slotted carving can be considered brownie carving - decorations for platbands on windows and doors, carved railings, decorations of pediments were created in Russia from time immemorial and many of them have survived to this day.
The main difference between the slotted thread is that the background of the product is completely removed. But sometimes, for the best perception of the pattern, it is nailed or glued to a solid background of a contrasting color. This technique is called overhead threading.
Learning slotted wood carving: how to start work
Initially, it is necessary to select a wooden blank that is suitable in size, and for this type of carving, coniferous wood (spruce, pine, fir) is usually used.

Then the desired ornament is selected and prepared for transferring the workpiece. At the same time, you can create a drawing of the future stencil yourself, or choose an existing template from the Internet, where you can find a huge number of both individual pictures and entire albums with images. The photo below shows examples of convenient and simple drawings:

The selected pattern is first transferred to paper, then the paper is rigidly fixed on a wooden blank. After that, you can either immediately drill holes for the file and start sawing, or additionally transfer the pattern to the surface of the tree, and then proceed to carving.
When choosing a sketch, it should be remembered that the small details of the ornament will be invisible against a large background, for example, on the facade of a building. Therefore, it is necessary to select the desired ornament taking into account the proportions of the element being decorated, whether it is a house or a frame for a picture.
We select the tools and devices used to create patterns
When carving this type, a variety of cutting tools are used, such as ordinary knives and chisels. But working with such tools is very laborious and tedious. Therefore, a drill and a saw are more popular for such purposes, and the type of saw can be different - from a jigsaw to a hand saw, depending on the size of the template you created.
Nowadays, masters rarely use manual labor while doing large-scale works. Often, convenient household power tools are used, for example, an electric drill, a hand mill and a jigsaw. With the use of a jigsaw, work is quick, easy and of high quality. But with such work, it is impossible to do without a drill used to pre-drill holes for the file. Working with a manual milling cutter is not so easy and productive, and it also requires prior skills in handling this power tool. But the thread is much better and it does not require making preliminary holes in the workpiece.

There are more original ways to create a slotted pattern on a wooden blank. One of these methods is burning. The essence of this method lies in the literal burning of a through pattern on a tree with a highly heated nichrome wire. The disadvantages can be considered a specific smell of burning, the need to cool the working tool, because of which the work is a little delayed in time, as well as noticeably charred edges of the finished pattern.
A more advanced method of this method can be considered laser cutting, which stands out high quality and accuracy of the resulting pattern. However, the use of this method is possible only with the purchase of very expensive equipment, which is why now this type of work is not very often used in practice.

At the end of the article, I would like to show you the amazing work of a very experienced master, depicting in his works not just abstract drawings, but very accurate and detailed copies of animals.
Video on the topic of the article
Having barely learned to hold objects in his hands, the little man shows a craving for creativity. Over time, he will have the opportunity to try himself in various types of skills: needlework, modeling, origami, woodcarving, drawing. Of course, certain skills that the child received in early childhood will be useful for this. Sometimes a simple hobby gradually turns into a hobby, and then becomes a matter of life. So many centuries ago in Russia, one of the main types of creativity was woodcarving. And in the 21st century, it still arouses genuine interest among people.
Popular types of intricate art
 For a long time, people have decorated their homes with wooden carvings. All sorts of paintings, kitchen utensils, religious objects, children's toys were considered valuable things for any family. Perhaps that is why they appeared different kinds woodcarving. The most popular options are:
- geometric;
- flat notched;
- slotted;
- sculptural;
- embossed;
- openwork;
- invoice.
Fortunately, the list does not end there, because this type of creativity is widespread throughout our vast country. Let's consider just a few of them.
 Geometric wood carving involves the use of various figures in the work. These are triangles, circles, squares and polyhedra. It is used for the manufacture of furniture elements, household utensils, as well as wall crafts. ancient species such a thread is a trihedral-notched thread. This is one of the most simple methods, since it is performed with only one tool - a joint knife. For such woodcarving, you will need a simple set of items:
- lime board;
- special knife-jamb;
- ruler;
- pencil.
First, sketches of geometric shapes or a finished ornament are applied to the board. It is better for novice amateurs not to use complex drawings so that the work turns out to be flawless. For the first work, material from deciduous trees is suitable, since it is more convenient to draw straight lines on it with a sharp knife.
The wooden surface should be as smooth as possible. This is achieved by planing the board. However, it does not need to be sanded with sandpaper. Otherwise, the thread will not turn out clear and accurate, and the tool will quickly become dull.
The flat-pitted method is used to cut out recesses of various sizes and shapes on a plane. It can be oval contours and all kinds of bulges.
 The slotted type of thread is also considered quite simple. It is done with a jigsaw. A sketch of any figure applied to a wooden plane is cut out along the contour. As a result, cute crafts come out. A slotted carving is used for the manufacture of background objects through which other planes are visible. It is often called openwork carving, and it is used to decorate furniture in the Baroque style. It can also be elements of cupboards, window casings, doors, and sometimes decorative screens. If crafts are attached to a special base, then this type of thread is considered to be overhead.
The process of working with a slotted method begins with a sketch, which is applied to a pre-polished workpiece. It is transferred to the surface using a special template or transparent white paper. Then holes are made on the contours and cut out on the desktop using a thin jigsaw file.
 Relief carving includes two main methods: flat and deaf. In addition, the deaf option implies a low or convex relief. The bottom line is that the pattern is formed due to the main background of the surface.
 The flat-relief method is performed in such a way that the pattern and the background surrounding it are made at the same depth over the entire area of the base. Blind carving is characterized by a convex pattern that does not have a flat outline. Such products are valued for their high decorativeness and richness of composition. After all, a kind of miniature landscape is created on the plane with hills, depressions and depressions. To create such masterpieces, masters use elements of almost all types of woodcarving. Therefore, beginners should master each method separately in order to apply skills with more.
First steps towards mastery
 History shows that wood was traditionally used to decorate a living space. Nowadays various pictures, drawings and sketches of woodcarving exhibited in local history museums or printed publications. This suggests that smart people who are willing to learn are able to master this art form. Wood is a wonderful natural material from which you can create decorative compositions, paintings, furniture elements and kitchen utensils. Having mastered the basics of ancient art, some have become true masters of woodcarving, devoting their whole lives to this.
Folk wisdom says: "Dashing trouble - the beginning." This is how it is if you do nothing. Practical Tips woodcarving for beginners opens the door for brave people to the world of magnificent DIY crafts. First you need to prepare the tools and understand the basic nuances of the craft.
It is advisable for beginners to choose high-quality and durable equipment for work in order to acquire valuable craftsmanship skills.
 For wood carving, you need to prepare the following tools:
- sharp knife;
- chisel;
- jigsaw;
- bit;
- drill;
- needle files;
- spoon cutter;
- bars;
- milling machine.
Of course, for beginners, it will be enough to purchase a special set of tools for woodcarving, which includes a knife, a jigsaw and an awl. With their help, it is very convenient to master the skills of ancient craftsmanship.
The next step is the choice of raw materials. This is what the quality of the product depends on. In nature, there are two types of wood: hard and soft. The first group includes mahogany, oak and beech. To the second -, aspen, pine, spruce, birch. Of course, soft wood is easier to work with, but with one wrong move, it quickly deteriorates. Despite this, it is considered the most suitable raw material for beginners.
Hardwoods are used by professionals because they are very expensive.
In addition to the strength of the material, the color of the wood also plays a key role. A suitable raw material to learn the craft is birch. It lends itself wonderfully to cutting and drilling in any direction. When choosing drawings for woodcarving, it should be borne in mind that birch wood darkens over time. Despite this, she is very easy to work with. 
When the pattern is selected, it must be transferred to a wooden blank. In the age of technology, you can use ready-made photos or drawings provided by experts. The theme of the images is very different, but each has its own unique beauty. When everything is ready, you can start creating your own masterpieces. An invaluable help for beginners are thematic wood carving lessons.
Master class simple crafts
 When you look at the finished crafts, it seems that making them is not at all difficult. Therefore, many lovers folk craft took the tool in their hands and set to work. To cut an ordinary flower, you need to prepare the following set of items:
- wood blank;
- double soft pencil;
- tracing paper;
- chisels.
It must be borne in mind that only special chisels for woodcarving are suitable. They should be v-shaped, narrow and semicircular. The next step is drawing. It can be taken from the Internet. To do this, a sheet of paper is applied to the screen, the diagram is redrawn, and then applied to a wooden plane. 
Start work from the central part of the sketch, carefully cutting out a circle. Then, using a v-shaped chisel, the petals are cut along the contour. Waste wood between them is removed in the course of work. If there is no such chisel, professional wood carving knives are suitable, which are no worse to wield in this craft. 
The outer part of the petal is cut out with a semicircular chisel. It becomes similar to the outline of a heart, but it's not scary. Then cuts are made in the inner part of the petal, connecting it to the center of the flower. It remains only to round it and the flower is ready. Now you can admire the first creation of your own hands. An invaluable help for beginners is a thematic wood carving video that encourages you to immediately get to work.
Modern technology for experienced craftsmen
AT modern world many works have long been performed mechanically. Applied craft does not lag behind in this. The use of technology enables craftsmen to save their strength and precious time. Wood carving machines make it possible to quickly and efficiently prepare the source material for work. The only drawback of such devices is their high cost, but people for whom carving is not just a hobby are ready to purchase them.
Pantograph
 The device is designed to work with any wooden surfaces. It performs operations of various kinds, both volumetric and on the plane. The pantograph is used to process arcuate, bent or rotating parts. So with the help of a machine cut out various elements of furniture, statues or panels.
Drill
 Excellent device for working with hard wood. It is important to take into account the properties and location of the fibers of natural material. With the help of a drill, craftsmen sharpen tools, grind wood, and, if necessary, polish it.
Wood species with dense wood that do not tend to chip are suitable for working with a drill.
CNC milling machine
 This technique is mainly used for the production of wooden furniture with carved decoration. The machine is designed to work with plywood of any kind and wood. It is characterized by high functionality and technical capabilities. When working with such equipment, it is important to use special means protection - goggles and gloves. Also follow the instructions for use of the device.
 As practice shows, such machines simplify the process of woodcarving. They make it possible to create a huge number of products in a short time. Devices are used not only in industry, but also for a personal workshop.
In any case, handmade products bring real satisfaction to a person. They create a pleasant atmosphere in the house, help to express the feelings of the master to his loved ones, and serve for the benefit of the household for a long time. Wooden crafts retain their natural beauty for a long time and never go out of style. Woodcarving is an art that has been passed down from generation to generation. It is available to anyone who wishes to master this craft. The main thing is not to be afraid of failures, but to be willing to learn, pick up tools and create masterpieces.
Wood carving video tutorial for beginners