Basket made of willow vines with your own hands. Vine weaving for beginners: the best do-it-yourself furniture
The art of creating various products from a vine or willow twigs was known more than a thousand years ago. Then it was a necessary skill associated with the satisfaction of everyday human needs. At present, weaving willow baskets for beginners and experienced craftsmen is rather an exciting hobby that allows you to get beautiful products designed not only for collecting and storing mushrooms, berries, fruits and vegetables, but also for decorating rooms.
Modern designers are increasingly resorting to the use of all kinds of baskets, as they allow you to fill the space with a unique rustic "spirit" and comfort, inherent only in rural houses. This is especially true in rustic, country and, which are now becoming more and more popular among residents of various private houses.
Basket weaving technology
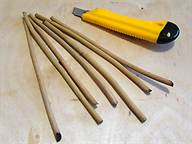
For basket weaving, you can buy ready-made willow twigs or assemble them yourself. Freshly cut rods filled with juice must be dried well, and before starting to weave the product, soak for 30-40 minutes in hot water to make it more flexible. The tools you will need for the job are pruning shears, a sharp pocket knife, scissors, and an awl or screwdriver.
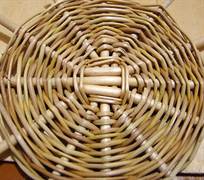
The art of basket weaving has its own simple terminology. If you look at the bottom of the basket, you will see thick straight rods that diverge from the center in the form of rays and are called "knitting needles". After they are folded upwards in the process to form the walls of the basket, they become "racks" (or "box").
All sections of thin wicker that bend between the needles and uprights are called "knit" (or "weave/weft").
Usually baskets begin to weave from the bottom. Sometimes it is also called the base. Then weave the walls, bend and, if necessary, handles.

Weaving willow baskets for beginners step by step
Consider one of the methods of weaving a basket with a diameter of about 28 cm and a height of about 12 cm.
We will need the following materials:
- 6 thick willow branches (future knitting needles);
- 24 rods of medium thickness (for the side parts of the bottom);
- 50 thin branches (25 for racks and 25 for walls);
- 12 rods of medium thickness (for a special weave designed to connect the base and walls).
In total, there are five stages of basket weaving.
Stage 1: basic
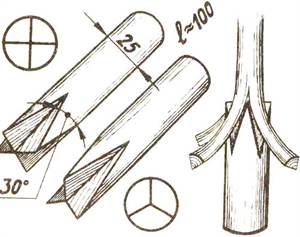
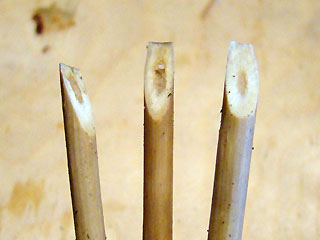
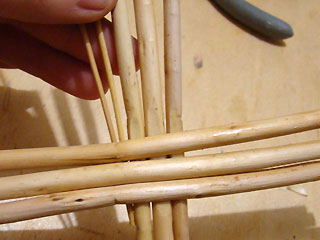
From a thick shoot, cut 6 rods 35-40 cm long with a pruner. They will serve as base knitting needles.

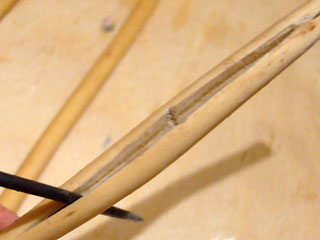
In the center of each of these three rods, use a knife to make a split 4-5 centimeters long. This split is called a "cut".


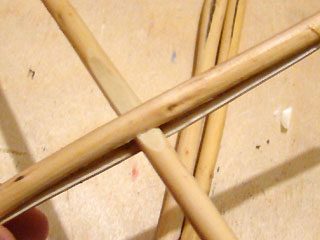
Put together three rods with splits, and insert the remaining whole rods into the slots so that you get a cross.

Now we begin to weave the very base (bottom).
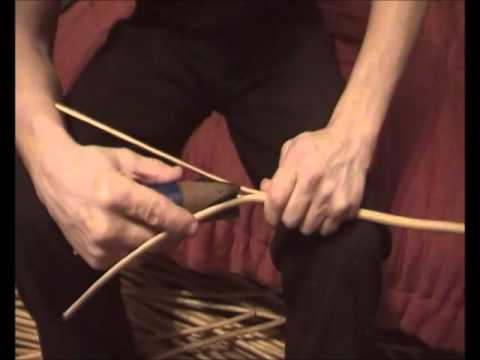
Select the longest and thinnest rods. Take two rods and insert their thin ends into the slot of the slot, as shown in the photo.

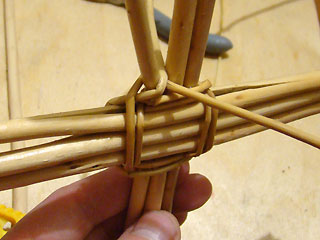
Separate the twigs, pass thick knitting needles between them and braid them like this, skipping from above and below alternately. Thus, you need to make two circles to get weaving from two thin willow twigs


Then continue to make the same weaves, only single ones, tightening the twigs tightly and bending each of the knitting needles outward in turn. It is necessary to try to ensure that the distance between large branches is uniform, as a design should be obtained that resembles spokes from a bicycle wheel.


The following picture clearly shows what exactly should be the pattern obtained in the process of weaving around the knitting needles.

In describing the method of weaving baskets from willow and vines for beginners, one important detail is often overlooked, on which the quality of one of the most important elements, the bottom, directly depends. This is the need to tighten the twigs as tightly as possible after each weave of the knitting needle, without moving them up or down!

Using the described method, continue to work, moving in a circle until the twig ends.

To increase the length, do not use two new branches at once. Just stick the twig with the pointed end between the old twigs from the last rows, bend it in the right direction and continue weaving at least a few more moves forward before changing the second twig. Trim the remaining ends carefully. As a rule, replacement should be done when there are still about 10 cm left to the end of the branch.

The base of the finished product should turn out to be slightly concave so that the basket can stand firmly on the veranda or the bottom technique clearly demonstrates that, when the diameter reaches 7-8 cm, you need to wrap your hands tightly around it and “push” the very center outward with your thumbs a little. However, here it is important not to overdo it and not to bend the base too much.

Continue weaving until the bottom reaches a diameter of about 22 cm. It is advisable to guess so that this moment coincides with the end of the next twigs, the ends of which should be fixed by tucking between the branches of the previous row.

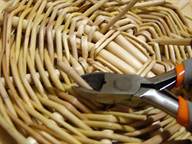
Cut the ends of the twigs with secateurs as close as possible to the wicker base itself, but so that they still rest against the knitting needles.

Here is the bottom and it's ready. For beginners, the result may turn out a little different than in the photo, but this is completely normal.

Stage 2: breakdown of the base
On the this stage in the weave of the base, new branches are added to each knitting needle, which will then play the role of racks for further creation of the basket.
It is important to consider that each wicker has a natural curve with an inside and outside.

For high-quality weaving of our basket, we need 24 such branches. Cut each of them with scissors or secateurs to get a pointed and long oblique cut, located strictly on the inside or outside of the rod, but not on the side.

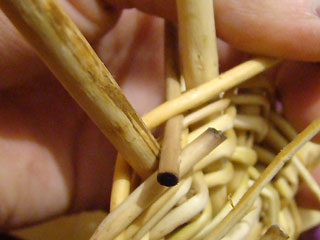
Holding the base with the concave side down, press the awl or screwdriver into the weave next to the needle as shown in the photo.

Remove the awl and immediately insert the prepared rod with its inside down and another rod on the other side of the knitting needle. Using the same method, insert two branches into the will of each knitting needle.

In various descriptions of weaving strong willow baskets for beginners, it is always indicated that the rods must be inserted with the inside down so that the product bends itself beautifully. If instead you insert them with the outer side down, the basket will move apart.
On each upright, make a kink a short distance from the beginning of the weave of the base (about 5 mm) by simply pressing on them with your thumbnail.

Raise all the racks up, secure them with a hoop or tie them, making sure that there is no bending inward and skew to one side.


Cut the base knitting needles of the bottom at the same level with the edge of the weave a little below the bend of the uprights.

Stage 3: connecting the bottom to the walls
One of the most important steps in basket weaving is connecting the finished bottom with the uprights to the side. In order for this transition to turn out to be uniform and look neat, use the softest light twigs of medium thickness in the amount of three pieces.
Position the basket on your lap with the base towards you - this will be the easiest to work with.

Take three twigs of uniform average thickness and trim their length so that it is the same. Insert them with their tips into those weaves on the bottom that are adjacent to the vertical posts. In order for the rods to hold firmly, their tips should go deep into the base by about 5 cm.

Start creating a braided pattern from the leftmost twig. Hook it and throw it over the first, and then over the second rack of the second row. Keep in mind that weaving should not be on the side, but on the edge. This will allow you to get the most aesthetic connection.

Take the next twig, moving from left to right, and braid it around the uprights in the same way.

Continue weaving around the entire base, always choosing the twigs one at a time and making sure that the branch that is in work is on top of the other twigs.

It is important in the process to always tighten the twigs tightly, which will allow the product to get a beautiful shape due to the good fixation of the racks at the very bottom. After the first circular weave, place the basket upright on a table or any other convenient surface. This will make the next process easier.

Leave the small end of the twig sticking out, as shown in the photo. Start adding new branches from left to right, simply moving the old twig a little and inserting a new one into the resulting weaving gap. Make a few weaves before adding the next twig.

As a rule, several circular weaves are enough to create beautiful transition from the base to the walls. Pull the remaining free ends down through the resulting weave, and then cut off with sharp scissors.

Stage 4: weaving the walls
There are many patterns of rods of varying degrees of complexity, but when weaving a willow basket for beginners, it is better to use the simplest option, the diagram of which is presented below.

With an odd number of racks, it is permissible to use one rod as the basis of weaving, however, we got 24 racks, so the best option is to weave from two branches.
Place the blank of the basket on a vertical surface, place some weight in it that will prevent the product from falling, and start weaving. First add one twig, and only after a few throws over the racks in front and behind (about the middle of the diameter of the basket) add the second. Next, the branches need to be alternated, using one after the other in turn.
When the twig is finished, add a new one in the same way as shown in the picture. Always trim the branch before it becomes too narrow, so that there are no too thin parts in the weave.

After making a few circles, remove the hoop that supports the racks. If at the same time they begin to move too much to the sides, return the mount to its place. In total, you need to move up about 9 cm.

After completing the main weave, take three of the same twigs that were used to create the connection between the bottom and the walls. Secure them by simply sliding the ends under the posts.

Make several circles of weaving light rods of medium thickness and tightly fasten the ends in the same way that was described above at the stage of connecting the base and walls.
Vine is the oldest material for weaving various devices: dishes, furniture and decorations. AT recent times weaving from a vine as a kind of creativity returns its popularity - environmentally friendly materials and natural motifs in decorating home interiors are back in fashion.
Product types
The vine is a flexible pliable material from which it is convenient to weave a variety of household items. Most often, craftsmen use willow twigs and vines - they are the most flexible and strong enough not to break during the work process.
Among the wicker products you can find the following:
- furniture - armchairs, tables, racks, large baskets for things;
- dishes - baskets, trays, bread boxes, vases;

- decorating elements - floor vases, figurines, caskets, Christmas-tree decorations.

Baskets, tables and chairs made of wicker are made more often than other items due to the simplicity of their design. In some cases, their creation is similar to macrame weaving: the same technique of alternating knots and free parts of the threads.

Toys from a vine began to be created in antiquity. But now this creativity has been revived thanks to the growing love for environmental materials.
Types of creativity
This concept, many novice craftsmen can confuse with the techniques of weaving products from the vine. Weaving differs not only in the way it is created, but also in appearance and tightness of the bars. In addition, weaving from a vine of the same type can combine different techniques.
solid weave
The classic view of the creation of products from the rod. With continuous weaving, there are no decorations in the form of openwork holes and patterns on objects.

This type is used to create baskets, chairs and tables - due to the tight fit of the rod, the product can withstand a lot of weight well.
openwork weaving
This type is characterized by many openwork and twisted elements in the product. It can be slots, waves and loops.

Most often weave souvenir baskets, biscuits and vases of this type.
Twisted weave
This type of weaving was forgotten for some time. And only in recent years has received a second wind. With its help create miniature products like Christmas decorations and figurines, armrests for furniture.

The peculiarity of this type of weaving from a vine is that the rods are not intertwined, but twisted together. In this case, the product is given a certain shape.
spiral weaving
High demands are placed on products from this type of weaving, therefore, mainly professionals are accepted for its implementation. Rings of rods are taken as the basis, which are braided through one with a special tape.
The vine in this case should be especially flexible and not leave creases. Therefore, instead of willow vine, spruce or pine roots are often used to start the spiral weaving. In addition, the diameter of the beginning and end of the rod must be almost the same so that the ring is uniform.

Braiding tape is cut from the top glossy layer of willow vine. It should be thin and elastic, but very strong.
There is also a figured type of weaving from a vine, which is based on combining several types of this creativity in 1 work at once. As a result, the work of the master is not correct geometrically, but with corrugated edges in the form of waves.
Weaving techniques
Weaving from a vine is carried out according to 1 simple principle - initially the master builds the frame of the product with long strong rods in the form of a fence. After that, thinner flexible twigs are taken, which braid the base in a certain order, forming a pattern.
There are currently many different techniques weaving of products from a rod. In addition, for each part of the product - whether it be the bottom, walls or edge - a different method is used.
But the techniques presented below are considered basic and easiest to perform. Therefore, beginners are advised to initially engage in their development, and then move on to more complex ones.
simple weaving
The easiest weaving technique. In addition, it is universal - with its help you can weave any kind of product.

For execution easy way start braiding the frame rods with one vine through one: 1 rod in front, 1 in the back. For the next row, change the order of braiding - now the first cheat is braided from behind, and the second - from the front, so that the rows form an interesting diagonal sequence.

To speed up the process and diversify the pattern, you can weave 2, 3 or more rows in the first order, and also 2 or 3 in the second order to increase the width of the resulting pattern.
Weaving in oblique rows
This technique is also called the layered method of creating products from the vine. In this case, the same number of braiding vines is taken as there are rods in the frame.
The first twig goes around the first vine in the frame in front, the second - behind, and is brought out of the product. Repeat this with each vine, gradually weaving the layers of your work.

This method is better suited for circular weaving - creating baskets, baskets, large round household baskets.
For a variety of patterns on the product, you can also take 2 and 3 rods to perform one action.
Rope weaving
An interesting way of weaving from a vine, which is often used to separate one layer of patterns from another. It is possible to weave a rope from 2 or 3 rods. The pattern looks like a small twisted rope.

For weaving from a vine into two rods, go around 1 vine of the frame behind with 1 working rod and bring it out. Repeat the action each time with the upper rod that was just used, pressing the lower one.

Weaving in 3 vines is based on a slightly different method - you need to go around not one, but two pegs of the frame, and not from behind, but from the outside. After that, the vine goes around the third riser from the inside and is brought out. Weaving in 3 vines can also be used for circular braiding products.
Willow wreath: master class
If you have never tried your hand at creating complex twisted wicker products, but really want to learn this type of needlework, start with the simplest - weaving willow wreaths for interior decoration.
This master class does not require special knowledge in the field of weaving. At the same time, it will help you learn how to properly handle wicker in your work.
Collect willow twigs 30-60 centimeters long and clean them from the top glossy layer. Forty elements will be enough for you to create 2-3 wreaths. After that, soak the vine in water for about 4 hours to make it more flexible. On this preparatory stage finished - you can start working.
- Weave a ring from the first twig. To do this, start wrapping the thin end of the rod around its thick part.

- Take the second element and braid it around the first.
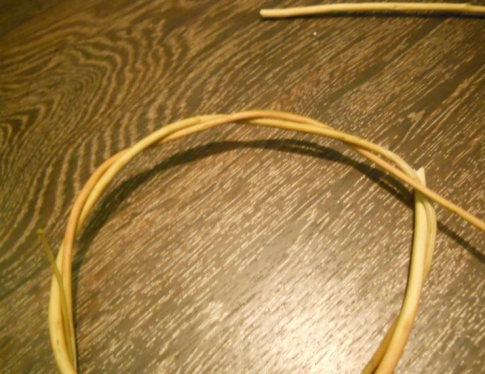
- Hide and fix the thin tip between the gaps of the wreath.

- Using the same technology, start wrapping the rods around the already formed base.
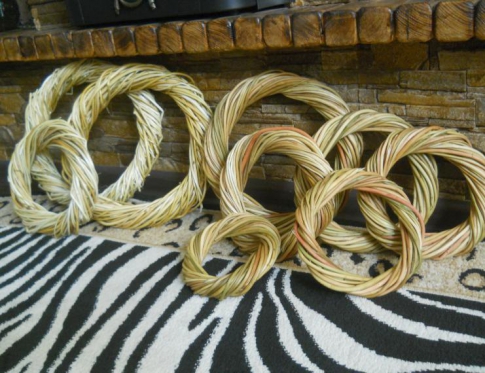
Leave the finished wreaths to dry in a warm, dry place for about 3-5 days. After that, they can be used as a finished decor element or a base in a more complex master class. Such blanks are often used to create wreaths for Halloween or New Year.
Weaving from a vine originates in Ancient Egypt and ancient Rome, wicker chairs and lodges were found during excavations. In ancient times, various baskets were woven from willow. In the Renaissance and the Middle Ages, caskets, bread bins, baskets and baskets, baby cradles, carts were created with the help of basket weaving. A master class on simple and quick weaving from a dense vine will help you quickly master the technique for beginners.
In Russia, initially, in most cases, baskets and fishing tackle were woven, later, with the development of trade, weaving began to be used to pack transported goods into boxes for sale. In the 19th and early 20th centuries, before the Great Patriotic War, many factories were created on the territory of the country for growing cultivated willow and weaving furniture and household utensils from it. Entire plantations, abandoned during the war, began to revive and re-create factories for weaving, mainly baskets. There were entire villages that were engaged in basket weaving.

Initially, vines were used for weaving, but more often in Europe and Asia, flexible willow twigs were used for weaving. In addition, in Asia, furniture is woven from materials such as rattan and bamboo.
Due to the fact that in today's Russia there are few masters in wicker weaving, some have become interested in how you can weave a basket of willow vines with your own hands, because there is a desire to have such a natural thing with a special aura in everyday life or in the interior. The natural energy of this item brings coziness and comfort to the house.
Harvesting vines for weaving products for beginners
Before starting to create a wicker item, you must first make a blank for weaving.
You can, of course, buy ready-made rods to immediately start weaving, but it’s better to learn how to prepare the material yourself, this will help later in working on the product.
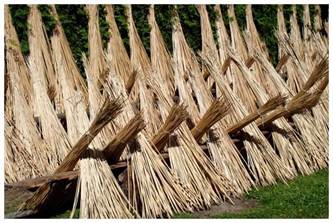
For weaving, shoots of the first year of growth are used, and they are collected all year round. It is necessary to cut the branches at an acute angle with a knife or secateurs, so as not to harm the tree, it is more useful to leave 3-4 buds on the branch remaining on the tree. When collecting branches, it is important to check them for flexibility: the first branch cut from a tree must be bent in the place where the thicker end, if it has not cracked, then it is suitable for decorative weaving. Spring shoots have a very soft bark, so without pre-treatment the bark can be removed, and if the shoots were collected at another time of the year, then the rods must first be soaked for 1-2 weeks or steamed for 1-2 hours, or boiled for 20 minutes, removed bark. The shoots after cleaning from the bark must be dried, otherwise the rod in the finished product will delaminate and break. The rods should be sorted so that it is convenient during painting and weaving. Before work itself, the vine is again soaked in water to gain flexibility.
Painting can be done with aniline dyes, a solution of potassium permanganate or herbal decoctions, immersed in the dye for a while, then the rods are rinsed with clean water and dried on a flat surface, preferably on the floor, so that there are no stains in the color.
Some rods are too thick for weaving small and medium sized items, so you will need some tools to cut the rods into narrower strips, tires.
A pinch or pinch helps to remove the bark from the rods.
Mastering weaving with a simple master class
Immediately before weaving, it is necessary to soak the willow rods in hot water, and also during work it will be necessary to moisten them with water - all this to maintain the flexibility of the rods.
For beginners, weaving from a vine is better to start with a simple element - from the bottom, this is the basis of many wicker items, using a photo or video master class.
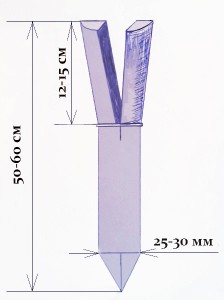
It is better to take rods for weaving with a margin, because. for beginners, rods often break during work, it is necessary to soak or wrap with a wet rag for the bottom seven or more sticks with a diameter of 4-7 mm, about 20 cm long, and more, depending on the desired size of the bottom and thin twigs (up to 3 mm in diameter) 30 pcs. and more, the length of which should be at least 50 cm. The thicker ones go to create the skeleton (beams), and all the beam sticks are braided in the form of a rope.
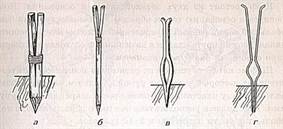
The first step is to make a cross, around which weaving will then be carried out. You need to take 3 thick sticks (you can take four for each side of the cross), on them a third of the thickness is cut off in the middle part and the ends are sharpened from a thinner edge, for the convenience of pushing other sticks into the crack. The other three or four sticks in the middle must also be split in the middle with a knife or an awl.
This should be done carefully so as not to split too much or the entire stick, because this can no longer be corrected, and the product will be defective.
Then it all comes together.


It is necessary to turn all the inner sticks, on which part of the thickness was cut off, to one wrong side, and the fit of the outer sticks to the inner ones, in the place of the crack, should be as tight as possible.
Now you should take two thin twigs and start the braiding process. The ends of the so-called rope must be hidden in the crack of the axle sticks.
Two twigs diverge in directions, one will first go above the axes, an arc - under the axes, then they change position. It is necessary to braid the inner guides first.


Two rows are braided (you can make three such rows of braid), then you need to spread the axes to the position of the rays, like the sun, in a circle so that the distances between all the rays are equal. The scheme in the photo below:

The braiding begins not of three sticks at once, but each individually in the same manner.

When the twig with which the braid is being braided ends, you need to weave the next twig of a similar size and color, in such a way as shown in the photo.
We must try to ensure that the ends of the ended twigs go to the wrong side, then the front side of the bottom will be smooth and beautiful.

The twigs must be taken in different lengths so that the build-up occurs evenly in different places. The larger the bottom of the product, the greater the distance between the rays of the cross, so if the product is large, you need to use more rays.
For the oval bottom of a basket or cradle, a similar cross pattern is used:
Furniture for skillful hands with a description of the work
Furniture weaving is already done by skilled craftsmen in this craft with their own hands, because it was necessary to weave a lot of various bottoms and baskets for these bottoms and gain experience. Also, for making furniture with your own hands using wicker weaving, you will need not only experience, but also a greater variety of materials and tools. Furniture requires strength, because. will affect her great power gravity than, for example, at the bottom of a basket or cradle, therefore, a frame of sticks is first constructed (thickness 2 cm or more). Next, you need to attach racks to the frame, which will later be braided with thinner twigs or strips / ribbons from rods; in the weaving process, regularly perpendicular racks are added for rigidity. You can braid various types weaving.
Basket weaving is growing in popularity. Now it has become fashionable to put furniture and other items in a house or apartment. self made. It is especially nice when they are made with your own hands, and not purchased ready-made in stores. You should not start with complex products, it is better to choose something simple. For example, weave a basket.
Basket weaving material options
For basket weaving, you can use different materials, up to newspaper tubes and plastic bottles. But most often, willow twigs are used. They are pre-harvested and soaked in water or saline, which gives them elasticity. Willow rods are used to create various products: lampshades, furniture and more.
Wheat or barley straw can also be used. It is quite flexible, so it is convenient to work with it. Products made from such material are airy, have a beautiful golden color.
Birch bark is also suitable for weaving baskets. For children's creativity suitable for this material. Thanks to the unique birch bark pattern, the products are unique.
But it is from the vine that the most durable baskets are obtained, which can be used for various purposes.
The secrets of the master and tools for weaving baskets
Before you start weaving from a vine, you need to prepare the following tools:
- knives - it is recommended to use a tool of medium length and width with a moderate sharpness of the blade;
Advice! The knife should be sharp enough to freely cut a thin and medium rod at an angle, but not damage the wood when peeling the bark.
- pliers - it is impossible to work with wire without this tool, although it is rarely used;
- Phillips screwdriver - self-tapping screws are used to attach the handle to the hoop;
- marking pencil - some elements in the weaving process require preliminary marking;
On a note! It is not necessary to use special marking pencils that are designed for construction works, you can buy ordinary stationery.
- ropes - necessary for tying bunches of vines and fixing some elements;
- base board - the whole process of work takes place on it;
Advice! It is desirable that the board was made of solid wood.
- tape measure - required for marking the hoop;
On a note! It is allowed to use a construction tape measure or an ordinary soft centimeter. You can even use a simple rope for these purposes, which is wrapped around the hoop, and then measured with a ruler.
- sandpaper - designed for processing parts in order to roughen them;
- brushes and varnish ready product preferably varnished;
- wire - used to temporarily secure certain elements;
Advice! It is desirable to prepare a soft wire made of aluminum or copper having a diameter of about 2 mm.
- self-tapping screws - are intended for fastening of the handle.
On a note! If a fabric handle is provided, there is no need for self-tapping screws.
The diagram below shows the main ways of weaving

Step by step weave a basket of vines
A master class for beginners on weaving an openwork basket from a vine is presented below. The following actions are performed step by step:

The wicker basket is ready.
Video with lessons on weaving an openwork basket
The Kovalenko brothers became famous in this craft. With their participation, many videos have been created. Below are some of them.
Video: how to weave the bottom of a basket.
Video: how to weave a basket handle.
The lessons of basket weaving are detailed in the book by N. V. Sidorenko, which is called “Basket Weaving”. The author offers a practical guide with a step-by-step description. Here are the basics for a novice master: preparation, collection of material, weaving process, visual diagrams.

The book can be downloaded electronically.
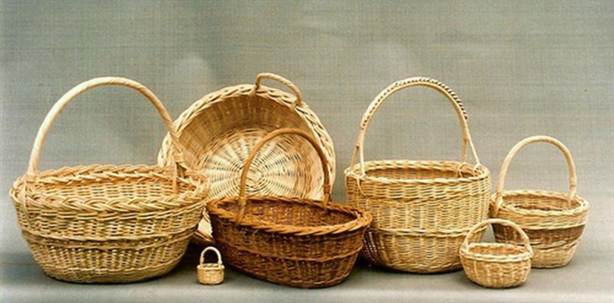
Photo of baskets made of vines, made by hand
Wicker baskets look attractive and are valued for being handmade.

Ribbons can be used as decoration.

Such baskets, as in the photo, are suitable for laundry.


And these are suitable for storing or transporting onions or garlic.


A variety of options allows you to use baskets for different purposes.

Weaving is an interesting activity. It is possible to weave various products, up to packaging containers, lampshades or furniture. It is worth noting that they are not the lowest cost. Weaving from a vine requires patience and time, which should be appreciated.
Surely every house has at least a small basket woven from a vine. With these, our grandmothers to this day go to the market, and most of the parishioners do not carry Easter eggs in them. The cost of such a basket is quite high and quite justified: the vine should be found and correctly, and then manually weaved. The technique of weaving from a vine is not such a difficult thing, but it may well become your hobby.
Where to get a vine for weaving?
Your task is to find the right tree, the right period of the year, and properly prepare the collected twigs. The most suitable period for collection is from July to August, when the juice begins to slow down its run through the branches. In principle, all types of willow behave equally well, with the exception of brittle.
As a rule, the place where you can take a vine for weaving is located in a suburban area near the water. If you live in an industrial city or you definitely won’t find willows nearby, hazel, tree roots and even some shrubs, as well as bast with chopped bamboo, will do just fine.
The wicker weaving technique involves, as a first stage, the processing of the collected material. If you collect it at the right time, it will be very easy to peel and split it. They also use the method of revitalization, for a couple of weeks they put the twigs with their wide ends into the water and wait for the appearance of green sprouts. If necessary, the twigs are steamed and made as pliable as possible.
Types of wicker weaving
There are several options for weaving from willow vines:
- continuous(the twig completely fills the base with a continuous layer and there are no gaps or openwork details, they are used for shopping baskets);
- openwork(light airy weave with large quantity empty gaps, this option is applicable for decorative vases or bread bins, the most flexible material is needed here);
- twisted(branches are immediately woven and twisted together, usually it is used to decorate furniture);
- curly(when the product has a somewhat free fantasy shape).
Weaving a box from a vine
Already if we talk about weaving from a vine for beginners, then it is best to get acquainted with the box:
- We start from the bottom. The extreme bases will be made of pine slats, we set everything in a plank to ensure a smooth edge.
- We start weaving with a rope. We fold a thin rod in half and braid the base step by step.
- Each time we add a long rod and make double racks.
- For those who are interested in wicker weaving for beginners, it is important to remember one rule. When working, you will have to build up the twig, here we work according to the following scheme: you should always build up the butt to the butt or top to top, and be sure to make an additional turn on the extreme racks every three rows.
- We do the extension only on the outside of the weave.
- We will finish the bottom again by weaving with a rope in two twigs.
- We got the bottom, prepared the rods for the racks.
- The base for the box is a rigid frame made of pine sticks with a round cross section. The better you assemble the frame on nails, the smoother and more accurate the final appearance of the box will turn out.
- We will decorate each corner element and at the same time strengthen it with the so-called glossy tape.
- We drive in a nail to start work and gradually begin to wrap around each of the three bases, we fill the end.
- The first part of the work has been completed.
- And now on the wet bottom with an awl we make holes for the twigs and insert them.
- Next, we raise each rod to the upper crossbar, twist it around it.


 |