Photography lessons for beginners are simple and clear. Photography from scratch
In my opinion, to call photo lessons or photo courses - lessons / courses "for beginners" is quite funny... after all, professionals often do without much training. However, for professionals and the most "advanced" amateurs there are master classes, which will also be presented on our website - in the future.
Choose a camera (whether reflex camera or another), and then learn how to use it, understand the intricacies of building a composition in a frame, process them in Photoshop - figure it all out - our site will help you. Looking for DSLR photography lessons? Written in simple and understandable language? Is free? You found them! Want to get 100% use of your compact camera? And we will try to help you with this! After all, not everything depends on technology!
Of course, our recommendations and tips are not a panacea, and anyone who decides to devote their time to studying photography should understand this! However, purposefulness, perseverance, and a thirst for creativity will be your assistants!
The main idea of this section is that the art of digital photography for beginners to learn it should be presented to the student in the best possible way - accessible, popular, systematized. All lessons on our website are free, on the one hand it's good, on the other hand, self-motivation is needed. I hope that you have it and the free lessons will only be a plus!
AT this moment- Lessons cover the following topics:
Camera selection- a selection of articles will help you figure out which camera is right for you! Of course, here attention is also paid to the choice of lens (if you decide to purchase a "DSLR") and other photographic accessories.
Photography Basics, shooting technique - this section combines materials intended primarily for "dummies" who are not yet very familiar with their camera and the "basics" of shooting, it is recommended for study - first of all! Information for users of SLR cameras will be especially relevant. Here you will find information on how to work with your camera (SLR, or digital camera), about the basics of composition.
Composition- a subsection devoted to the issues of composition in photography. Having studied the lessons of digital photography in this section, you can find out - what beautiful picture- different from not very beautiful, and how to fix it! How to position the subject in the frame, from which side to shoot, and from which - for nothing in the world! Composition is the most important part of photography!
Practical Tips for the Photographer- this part of the digital photography lessons - will help both beginners and more experienced photographers - learn how to put their knowledge into practice, bring their photo ideas to life! Richly illustrated articles - we hope that they will be understandable and interesting for you!
Later on our site there will be articles devoted to photo processing in graphic editors.
A reflex camera can take amazing pictures in its beauty. However, without knowledge of the basics of photography, the chance of creating a real masterpiece is small. Practice and theoretical foundations will allow you to learn how to take pictures with a SLR camera in the most as soon as possible from absolute zero.
- It is better if you photograph an uncountable number of objects. This will ensure harmony and good perception of the picture by the audience;
- Use the widest aperture possible. It allows you to achieve a clear display of the main subjects of the shooting and blur the general background;
- Draw three imaginary stripes across the frame, and three vertically. For correct composition, it would be better if the subject is located at the intersection of these imaginary lines;
- Try not to have anything superfluous in the frame. This will draw more attention to the subject itself;
- For a harmonious composition, you can place the subject right in the center, leaving free space without secondary details on the sides;
- Try to have an S-curve in the photo. It can be roads, sculptures, the coast, and so on. It will make the picture more saturated, dynamic and expressive;
- When shooting distant plans (horizon, sea), capture a small object from the foreground in the frame. This measure makes photos more voluminous, addictive;
- A good effect in photography is the complete filling of the frame. Thus, the image becomes more personal deep. On one side you can leave free space;
- Look for a frame in the frame (from branches, architectural arches). With it, your picture will simply change;
- Try to achieve maximum balance. It should not be that one part of the photo is overloaded with houses, cars and people, and the second part remains pristinely empty;
- Watch for contrast. The subject being photographed must not blend into the background. The general background, in turn, should be lighter or darker than the object being photographed;
- Choose the right shooting point. When photographing a portrait, as when photographing children, the lens must be held at the level of the model's eyes. When shooting in full height- at waist level.
DSLR autofocus
 Autofocus can work in two modes: selective and automatic mode. It usually has three to nine focus points. In different modes, shooting is also done in different ways:
- In automatic mode, as the name implies, the camera itself determines which point to focus on. Priority is given to points closer to the center of the frame. Autofocus is aimed at an object that contrasts sharply with the general background. If there are no points on the central part of the scene that you can catch on, autofocus is directed to points located on the periphery. With a paired plot, the possibility of incorrect focusing is very likely;
- To avoid errors, you can adjust the focus yourself, on the center point. If the point you want to focus on is located on the periphery, you need to place the subject in the center of the frame, slightly, not completely, pressing the shutter button. Autofocus will appear in front of your eyes. Point it at the object you want and start composing the frame according to your ideas. Then just press the shutter button. Wherever the subject is located, it will turn out clear;
- Very handy tracking mode. The camera constantly focuses on the subject, whether you are shooting something or not. Thus, there is no need to wait until the autofocus is focused, and the shooting time is reduced. Tracking mode is very convenient when shooting moving objects. Focus accompanies the subject as it moves, and you can take a picture at any moment;
- In Liv mode for SLR cameras, you can turn on the face detection function. This makes it easier to shoot, because the focus is automatically set on the face of a person if he is in the frame.
There are three types of creative modes: Aperture Priority, Shutter Priority, and Manual. They make life much easier for the photographer, but only if the person knows how to use them correctly:
- aperture priority. Denoted by symbols Av or A. The aperture value is set independently, but the shutter speed for obtaining a standard exposure is set in automatic mode. Used for portraits, landscapes, and generally all scenes where control over depth of field is important;
- Shutter priority. Denoted by symbols TV or S. The shutter speed is set independently, but the aperture for obtaining a standard exposure is set in automatic mode. Used for shooting sports competitions, children's parties and any other dynamic scenes;
- Manual mode. The camera prompts you exactly what shutter speed, aperture and sensitivity settings are needed, and the photographer independently chooses what to add to the exposure. You can increase or decrease the values as needed. Used in conditions of stable illumination, when the camera's metering may be wrong, for example, when shooting at night or when shooting lightning. Manual mode is often used in studio shooting.
Flash operation
 For those who are just learning to photograph with a SLR camera with a flash, the following 3 tricks will be of interest:
- Flash on the forehead. The most primitive approach. Can be used when shooting people and interiors. With a flash in the forehead, there is a high probability of undesirable effects: too black background, red eyes;
- Illumination of the object being photographed. Ideal for portraits and night time photography;
- Flash to the ceiling or wall. Universal reception. As a result, we get a soft, diffused light that softens the shadows and gives a natural light pattern.
Common mistakes beginner photographers make
- Often cropped legs and arms, tree branches sticking out directly from the head of the person being photographed get into the frame. In order to avoid mistakes, try to ensure that the frame does not include anything superfluous;
- When shooting a group of people, novice photographers often walk too far, which makes the expression on the faces illegible, the photograph itself is poorly perceived. Try to get as close as possible to take the photo;
- In the photo - a whole heap of objects, the real one is mixed, there is not even anything to catch the eye. To prevent mistakes, focus on one object, while the general background should not be too colorful;
- Flare appears in photographs - spots and circles arising from sunlight. To prevent an error, make sure that too much sunlight enters the camera lens;
- If the emphasis in the plot of the composition is on horizontal lines (houses, architectural objects), often beginners allow a slight, as it seems when shooting, tilt, which turns into a photograph as an example of how not to shoot. Hold the camera straight, otherwise there will be an effect as if the photographed objects roll down;
- Photos are blurry. To prevent a problem, make sure that the focus area is on the subject you are shooting.
Conclusion
With knowledge theoretical foundations you can save a lot of time that you do not have to spend on understanding and correcting your mistakes. Do not try to scrupulously learn all the recommendations. Information is better absorbed if it is constantly used in practice.
A happy day has come and you have purchased a SLR camera. There are many inspirations and plans, but only the power button is familiar. In fact, the camera is quite trainable and anyone can handle it. If you plan to shoot a little more than your friends for avatars, then all roads for learning are open to you. The article will help you understand the terminology and embark on a creative voyage.
First steps
SLR photography basics
Let's start with some simple explanations about capturing your new camera. The right hand should lie on the handle, and the left hand below, as if supporting the lens. The position of the hand on the lens allows you to quickly change the zoom in case you use a lens with a variable focal length. The index finger of the right hand rests on the shutter button.
How to set up a SLR camera
For simplicity, we will use the “3 whales” theory. Only we will put on them not the planet Earth, but a photograph. For a good shot, you need to be able to use each of the “whales”. Let me introduce! Kit number one is the diaphragm. Kit number two - excerpt. Kit number three is ISO. And now, in turn, about each.
Diaphragm
Know that photography is drawing with light. And this light penetrates the camera matrix through a hole, which is called the aperture (F). You can adjust its size. Possible options are from F-1.2 to F-22 (sometimes higher). This pattern works: the smaller the number F, the larger the hole. It is clear that with a value of F-2.8, the hole will be larger than with F-8, which means there will also be more light. practical method it is necessary to set the desired aperture value for a high-quality frame without overexposure. You need to set the aperture so that the right amount of light enters the camera.

Excerpt
Another tool in the management of light. Shutter speed (t) is the time the aperture is open. Everything is simple. The longer the hole is open, the more light hit the matrix. Therefore, the brighter the frame turned out.
ISO
These three letters indicate the sensitivity of the matrix of your camera. Light sensitivity - the ability of the matrix to change its parameters under the influence of light. The ISO value can range from 100 to 6400. If you set the ISO to 400, then in this case the matrix will receive less light than in an equal period of time, but at a value of 1600. on health. Oh, if everything was so simple ... Only now, if you strongly "raise" the level of sensitivity, noise (graininess) will appear in the photo, and if this gave a certain charm to the film photo, then there is nothing particularly aesthetic here on the "digit" . On modern cameras, you can set the ISO automatically. At first, you can use this option, but, with the advent of experience, try to set the sensitivity level yourself, relying on your own knowledge and intuition. 
Tip: Most importantly, practice a lot by changing these three camera settings. Then you will understand what and when to switch.
Shooting modes
If you want to get high-quality pictures, forget about modes like "Portrait", "Landscape", "Flower" and so on. The camera has 4 main modes, we will talk about them in more detail. Note: Camera manufacturers use different designations. What letter denotes a particular mode, the instruction will help you determine. This is a very useful book that was sold to you with the equipment. We advise you to read it. Find a lot of useful information.
A (Av) Aperture priority mode
Under such conditions, a person sets the aperture value, and the camera independently chooses the shutter speed.
Aperture is one of the main parameters in the settings, it is indicated in the camera by the letter F. This shooting mode is suitable for portraits. You open the aperture as much as possible and get beautiful bokeh (Bokeh is an artistic background blur).
S (Tv) Shutter priority mode
In this case, the photographer sets the shutter speed, and the camera itself chooses the aperture value. We remember that shutter speed is the time for which the aperture is opened to let the light through. Time is measured in fractions (for example, 1/1000 - 0.001 seconds, 1/100 - 0.01 seconds, 1/10 - 0.1 seconds, and so on). If you want to “freeze” an object in motion, you should set a fast shutter speed, if, according to the artistic idea, it is necessary to blur an object, for example, water, then increase the time and the moving object will be blurred.
M Manual mode
This is the standalone mode. You choose aperture and shutter speed settings. Photographers - professionals shoot only in manual mode, as the camera is not able to fully understand your idea and realize it. But if you're just starting out on your creative journey, practice on A and S modes. As you gain experience, switch to manual.

And a few more important points that will come in handy.
Focusing
In photography, quality matters. One of the indicators is the correct focus. Focus is the sharpest part of the frame. When you look through the viewfinder, you see the focus points. Depending on the camera model, their number may vary. When you lightly press the shutter button, one (or more, depending on the settings) dot will glow red. This means that it is in this place of the frame that the focus will work.

It is possible to focus on several points at once, but we advise you to choose one. As a big secret, we tell you that the central focus point has the best quality. Always work with her. But what if the subject is on the side, for example? There is an exit. Focus on the center point and, without releasing the shutter button, build the desired composition. That is, even if you take the focus away, but do not release the button, the place where you initially focused will remain sharp.
The lens can focus in automatic and manual modes. It is clear that it is easier to work with automation. If shooting requires taking pictures quickly, then there is no time to focus. So, for example, it happens in reportage work. When 5 frames are taken per second. But for the experiment and to get a good feel for your workhorse, it is better to be friends with manual focus. By the way, some cameras only have it. But this is more of an exception.
File type
The photographer can work with two types of files, these are JPEG and RAW.
JPEG is a compressed file type. Such a photo will be ready for printing directly from the camera and its weight is much less, unlike RAW.
RAW (raw) is a file type that necessarily requires post-processing in special programs. It contains more information about the photo, so it weighs a lot more.
If you have just picked up a SLR camera, it is better to start working with JPEG. As soon as you practice photography, switch to RAW. All professional photographers shoot only in this format, as it allows you to make more corrections, while not losing image quality.
white balance
This is one of the parameters of the color image temperature transmission method, which determines whether the colors Images. The human eye automatically adjusts the white balance, so we perceive the color of an object correctly in any light. It doesn't work that way with a camera. He needs a hint what type of light you are currently working with. It can be the sun or an incandescent lamp. Then the camera will not lie in the colors.

In a bad case, you will just get a very yellow or very blue photo, which is not a repetition of reality. At the beginning of your journey as a photographer, you can set this parameter to “auto” mode, but it does not always guess. Therefore, we do not recommend using it all the time, the camera is just a device that can make mistakes and thereby spoil your picture.
Having a SLR camera, you open up a lot of new opportunities for creating high-quality photographs. Become a pro and don't shoot in automatic modes. This is convenient, but then do not be surprised why the result does not please you at all. Why didn't it work out the way you wanted. Once you understand all the settings and learn how to manage them with your eyes closed, things will go uphill.
Then you can think about the artistic side of photography. But it shouldn't take you long to find a mode switch or an aperture increase. Risk of missing out important point. We hope that our answers to the question “How to use a DSLR” will be useful to you.
This article is intended primarily for those who first came to the site with a desire to learn how to photograph. It will act as a kind of guide to the rest of the site's materials, which you should pay attention to if you suddenly decide to "pump" your photographer's skill.
Before listing the sequence of your actions, I will say that photography consists of two large areas - technical and creative.
The creative part is born from your imagination and vision of the plot.
The technical part is a sequence of button presses, mode selection, setting shooting parameters in order to realize a creative idea. Creative and technical photography part cannot exist without each other, they complement each other. The proportion can be different and depends only on your decision - which camera will you take pictures with (DSLR or smartphone), in what mode (auto or), in what format (), will you later or leave it as it is?
Learning to photograph means learning to determine what work you do yourself and what you entrust to technology. A real photographer is not the one who shoots only in manual mode, but the one who knows and knows how to direct the technical capabilities of the camera in the right direction and get the result that he planned to get.
Understanding the word "Photography"
This is the “zero” level, without mastering which it makes no sense to move on. Photography is "painting with light". The same object in different lighting looks completely different. Light is relevant in any genre of photography. You will be able to catch an interesting light - shoot a beautiful frame. And it doesn't matter what you have in your hands - an amateur compact device or a professional SLR.
Choice of technique
You don't have to buy expensive equipment to learn photography. Now amateur technology has developed so much that it satisfies the requirements of not only amateurs, but also advanced photographers with a large margin. It also makes no sense to strive to buy the most modern camera model, since everything you need for high-quality photography in cameras appeared 10 years ago. Most of the innovations in modern models are only indirectly related to photography. For example, a huge number of focus sensors, Wi-Fi control, GPS sensor, touch screen ultra high resolution- all this improves only usability, without affecting the quality of the result.
I do not urge you to buy "junk", but I recommend a more sober approach to the choice between a new product and a previous generation camera. Prices for novelties are unreasonably high, while the number of really useful innovations may not be so great.
Introduction to basic camera features
It is advisable to be patient and study the instructions for the camera. Unfortunately, it is far from always written simply and clearly, however, this does not eliminate the need to study the location and purpose of the main controls. As a rule, there are not so many controls - a mode dial, one or two dials for setting parameters, several function buttons, a zoom control, an autofocus and shutter button. It is also worth learning the main menu items in order to be able to configure things like . image style. All this comes with experience, but over time, you should not have a single incomprehensible item in the camera menu.
Getting to know the exposition
It's time to take the camera in hand and try to portray something with it. First, turn on the auto mode and try to take pictures in it. In most cases, the result will be quite normal, but sometimes photos turn out too light or, conversely, too dark for some reason. It's time to get acquainted with such a thing as. Exposure is the total light flux that the matrix caught during the shutter release. The higher the exposure level, the brighter the photo will be. Too much bright photos called overexposed, too dark - underexposed. The exposure level can be adjusted manually, but this cannot be done in auto mode. To be able to "brighten up or down", you need to switch to P (programmed exposure) mode.
Programmed exposure mode
This is the simplest "creative" mode, which combines the simplicity of auto mode and at the same time allows you to correct the operation of the machine - to make photos forced lighter or darker. This is done using exposure compensation. Exposure compensation is usually applied when either light or dark objects dominate the frame. Automation works in such a way that it tries to bring the average exposure level of the image to 18% gray tone (the so-called "gray card"). Please note that when we take more of the bright sky into the frame, the ground turns out to be darker in the photo. And vice versa, we take more land into the frame - the sky brightens, sometimes even whitens. The exposure compensation function helps to compensate for shadows and highlights that go beyond the boundaries of absolute black and absolute white.
What is exposure?
No matter how good and convenient it is, alas, it does not always allow you to get high quality photos. A striking example is shooting moving objects. Try to go outside to take pictures of cars passing by. On a bright sunny day, this is likely to work out, but as soon as the sun goes behind a cloud, the cars will turn out to be slightly smeared. Moreover, the less light, the stronger this blur will be. Why is this happening?
The picture is exposed when the shutter opens. If fast moving objects enter the frame, then during the time the shutter is opened, they have time to move and the photos turn out to be slightly blurry. The time for which the shutter opens is called endurance.
Shutter speed allows you to get the effect of "frozen motion" (example below), or, conversely, blur moving objects.
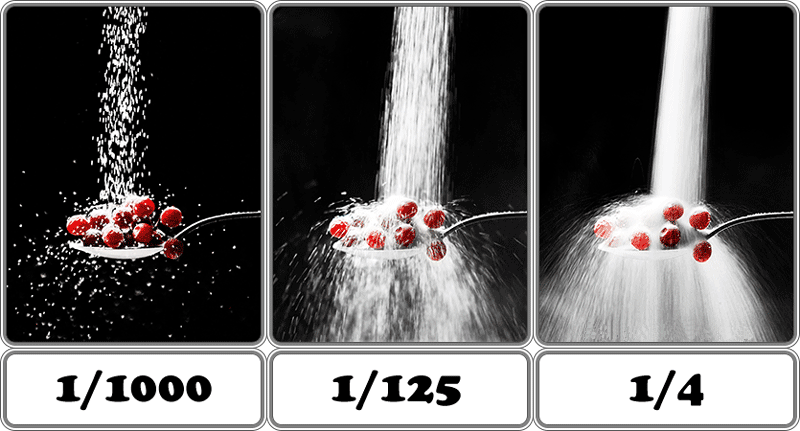
The shutter speed is displayed as a unit divided by some number, for example, 1/500 - this means that the shutter will open for 1/500 of a second. This is a fast enough shutter speed at which driving cars and walking pedestrians will be clear in the photo. The faster the shutter speed, the faster the movement can be "frozen".
If you increase the shutter speed to, say, 1/125 second, the pedestrians will still be clear, but the cars will already be noticeably smeared. If the shutter speed is 1/50 or longer, the risk of getting blurry photos due to the shaking of the hands of the photographer increases and it is recommended to install the camera on a tripod , or use an image stabilizer (if available).
Night photos are taken with very slow shutter speeds of several seconds and even minutes. Here it is already impossible to do without a tripod.
To be able to fix the shutter speed, the camera has a shutter priority mode. It is designated TV or S. In addition to a fixed shutter speed, it also allows you to use exposure compensation. Shutter speed has a direct effect on the level of exposure - the longer the shutter speed, the brighter the photo.
What is a diaphragm?
Another mode that can be useful is aperture priority mode.
Diaphragm- this is the "pupil" of the lens, a hole of variable diameter. The narrower this aperture, the more IPIG- the depth of the sharply depicted space. Aperture is indicated by a dimensionless number from the series 1.4, 2, 2.8, 4, 5.6, 8, 11, 16, 22, etc. In modern cameras, you can choose intermediate values, for example, 3.5, 7.1, 13, etc.
The larger the f-number, the greater the depth of field. Large depth of field is relevant for when you need everything to be sharp - both foreground and background. Landscapes are usually shot at apertures of 8 or more.

A typical example of a photograph with a large depth of field is the zone of sharpness from the grass under your feet to infinity.
The meaning of a small depth of field is to focus the viewer's attention on the subject, and blur all the background objects. This technique is commonly used in . To blur the background in a portrait, open the aperture to 2.8, 2, sometimes even up to 1.4 - the main thing is to know the measure, otherwise we risk blurring part of the face.

Small depth of field is a great way to switch the viewer's attention from the colorful background to the main subject.
To control aperture, you need to switch the control dial to aperture priority mode (AV or A). At the same time, you tell the device what aperture you want to take pictures with, and it selects all the other parameters itself. Exposure compensation is also available in aperture priority mode.
Aperture has the opposite effect on the exposure level - the larger the f-number, the darker the picture is obtained (a pinched pupil lets in less light than an open one).
What is ISO sensitivity?
You have probably noticed that photos sometimes have ripples, grain, or, as it is also called, digital noise. Noise is especially pronounced in photographs taken in low light. For the presence / absence of ripples in the photographs, such a parameter is responsible as ISO sensitivity. This is the degree of susceptibility of the matrix to light. It is denoted by dimensionless units - 100, 200, 400, 800, 1600, 3200, etc.
When shooting at the lowest sensitivity (for example, ISO 100), the picture quality is the best, but you have to shoot with a slower shutter speed. With good lighting, for example, during the day on the street, this is not a problem. But if we go into a room in which there is much less light, then it will no longer be possible to shoot at the minimum sensitivity - the shutter speed will be, for example, 1/5 second and at the same time the risk is very high. shakers”, so called because of the trembling of the hands.
Here is an example of a photo taken at low ISO with a long exposure on a tripod:

Note that the swell on the river washed out in motion and gave the impression that the river was not ice. But there is almost no noise in the photo.
To avoid "shake" in low light, you need to either increase the ISO sensitivity in order to reduce the shutter speed to at least 1/50 second, or continue shooting at the minimum ISO and use. When shooting with a tripod at slow shutter speeds, moving objects are very blurred. This is especially noticeable when shooting at night. ISO sensitivity has a direct effect on the exposure level. The higher the ISO number, the brighter the picture will be at a fixed shutter speed and aperture.
Below is an example of a shot taken outdoors at ISO6400 late in the evening without a tripod:

Even in web size, it is noticeable that the photo turned out to be quite noisy. On the other hand, the grain effect is often used as an artistic technique, giving the photograph a "film" look.
Relationship between shutter speed, aperture and ISO
So, as you may have guessed, there are three parameters that affect the level of exposure - shutter speed, aperture and ISO sensitivity. There is such a thing as “exposure step” or EV (Exposure Value). Each next step corresponds to an exposure 2 times greater than the previous one. These three parameters are interrelated.
- if we open the aperture by 1 stop, the shutter speed is reduced by 1 stop
- if we open the aperture by 1 stop, the sensitivity decreases by one stop
- if we reduce the shutter speed by 1 step, the ISO sensitivity increases by one step
Manual mode
In manual mode, the photographer has the ability to control. This is necessary when we need to rigidly fix the exposure level and prevent the camera from being "amateur". For example, darken or lighten the foreground when more or less sky enters the frame, respectively.
Suitable for shooting under the same conditions, such as walking around the city on a sunny day. Once adjusted and in all the photos the same exposure level. The inconvenience in manual mode begins when you have to move between light and dark locations. If we go from the street, for example, to a cafe and shoot there at “street” settings, the photos will turn out to be too dark, since there is less light in the cafe.
Manual mode is indispensable when shooting panoramas and all thanks to the same property - to maintain a constant exposure level. When using auto exposure, the exposure level will depend heavily on the amount of light and dark objects. We caught a large dark object in the frame - we got sky flare. And vice versa, if light objects predominate in the frame, the shadows have gone into blackness. To glue such a panorama then one torment! So, to avoid this mistake, shoot panoramas in M mode, setting the exposure in advance so that all fragments are correctly exposed.

The result - when merging, there will be no "steps" of brightness between frames, which are likely to appear when shooting in any other mode.
Zoom and focal length
This is a characteristic that determines the angle of the lens' field of view. The shorter the focal length, the more wide angle covers the lens, the longer the focal length, the more it looks like a telescope in its action.
Often the concept of "focal length" in everyday life is replaced by "zoom". This is wrong, since zoom is just a ratio of change in focal length. If the maximum focal length is divided by the minimum, we get the zoom factor.
Focal length is measured in millimeters. Now the term "equivalent focal length" has become widespread, it is used for cameras with a crop factor, of which the majority. Its purpose is to evaluate the angle of coverage of a particular lens / sensor combination and bring them to a full-frame equivalent. The formula is simple:
EGF \u003d FR * Kf
FR - real focal length, Kf (crop factor) - coefficient showing how many times the matrix of this device is smaller than full-frame (36 * 24 mm).
So the equivalent focal length of an 18-55mm lens on a 1.5 crop would be 27-82mm. Below is a sample list of focal length settings. I will be writing in full frame. If you have a camera with a crop factor, simply divide these numbers by the crop factor and you get the actual focal lengths you need to set on your lens.
- 24 mm or less- "wide angle". The coverage angle allows you to capture a fairly large sector of space in the frame. This allows you to well convey the depth of the frame and the distribution of plans. 24mm is characterized by a pronounced perspective effect, which tends to distort the proportions of objects at the edges of the frame. Often, it looks impressive.

At 24mm, it is better not to photograph group portraits, since the extreme people can get slightly elongated diagonal heads. A focal length of 24mm or less is good for shooting landscapes dominated by sky and water.
- 35 mm- "short focus". Also good for landscape, as well as shooting people in the background of the landscape. The coverage angle is quite wide, but the perspective is less pronounced. At 35 mm, you can shoot full-length portraits, portraits in the situation.

- 50 mm- "normal lens". The focal length is mainly for shooting people not the most close-up. Single, group portrait, "street photography". The perspective roughly corresponds to what we are used to seeing with our own eyes. You can take pictures of the landscape, but not everyone - the angle of the field of view is no longer so large and does not allow you to convey depth and space.

- 85-100 mm- "portrait". The 85-100mm lens is well-suited for waist-length and larger portraits, mostly in a vertical frame. The most interesting picture allows you to get fast lenses with a fixed focal length, such as 85mm F:1.8. When shooting at an open aperture, "eighty-five" blurs the background very well, thereby emphasizing the main subject. For other genres, an 85 mm lens, if suitable, is a stretch. It is almost impossible to shoot the landscape on it, indoors most of the interior is outside its field of vision.

- 135 mm- "close-up portrait". Focal length for close-up portraits in which the face takes up most of the frame. The so-called close-up portrait.
- 200 mm or more- "telephoto lens". Allows you to take close-up shots of distant objects. A woodpecker on a trunk, a roe deer at a watering hole, a football player with a ball in the middle of the field. Not bad for shooting small objects close-up - for example, a flower in a flower bed. The effect of perspective is practically absent. For portraits, it is better not to use such lenses, as the faces are visually wider and flatter. Below is an example of a photograph taken at a focal length of 600 mm - there is practically no perspective. Near and far objects at the same scale:

The focal (real!) distance, in addition to the scale of the image, affects the depth of the sharply depicted space (together with the aperture). The longer the focal length, the smaller the depth of field, respectively, the blurring of the background is stronger. This is another reason not to use a wide-angle lens for portraits if you want background blur. Here lies the answer and the question is why "" and smartphones do not blur the background well in portraits. Their real focal length is several times less than that of SLR and system cameras (mirrorless).
Composition in photography
Now that we're in in general terms Having dealt with the technical part, it's time to talk about such a thing as composition. In a nutshell, composition in photography is the mutual arrangement and interaction of objects and light sources in the frame, thanks to which the photographic work looks harmonious and complete. There are a lot of rules, I will list the main ones, those that need to be learned first.
Light is your most important visual medium. Depending on the angle of incidence of light on an object, it can look completely different. Black and white drawing - practically the only way convey volume in the photograph. Frontal light (flash, sun behind) hides the volume, objects look flat. If the light source is shifted slightly to the side, this is already better, a play of light and shadow appears. Counter (backlight) light makes pictures contrasting and dramatic, but you must first learn how to work with such light.

Do not try to fit the frame all at once, photograph only the essence. When photographing something in the foreground, keep an eye on the background - it often contains unwanted objects. Poles, traffic lights, garbage cans, and the like - all these extra objects clog the composition and distract attention, they are called "photo debris".
Do not place the main subject in the center of the frame, move it slightly to the side. Leave more space in the frame in the direction where the main subject "looks". Try whenever possible different variants, choose the best.

"Zoom in" and "get closer" are not the same thing. The zoom increases the focal length of the lens, as a result of which the background is stretched and blurred - this is good for a portrait (within reason).
We shoot the portrait from the level of the eyes of the model from a distance of at least 2 meters. Lack of zoom by increasing the focal length (zoom in). If we photograph children, we don’t need to do it from the height of our height, we will get a portrait against the background of the floor, asphalt, grass. Sit down!

Try not to shoot a portrait from a frontal angle (like a passport). Turning the model's face towards the main light source is always beneficial. You can try other angles as well. The main thing is light!
Make the most of natural light - it's more artistic and "alive" than flash lighting. Remember that a window is a great source of soft, diffused light, almost like a softbox. With the help of curtains and tulle, you can change the intensity of light and its softness. The closer the model is to the window, the more contrast the lighting.
When shooting "in the crowd" it is almost always advantageous to take a high point of view, when the camera is held on outstretched arms. Some photographers even use a ladder.
Try to keep the horizon line from cutting the frame into two equal halves. If there is more interesting in the foreground, place the horizon at a level of approximately 2/3 from the bottom edge (earth - 2/3, sky - 1/3), if in the background - respectively, at 1/3 level (earth - 1/3, sky - 2/3). It's also called the "rule of thirds". If you can't bind the key objects exactly to the "thirds", place them symmetrically to each other relative to the center:

To process or not to process?
For many, this is a sore point - is a photo processed in Photoshop considered "live" and "real". In this opinion, people are divided into two camps - some are categorically against processing, others - for the fact that there is nothing wrong with processing photos. Personally, my opinion about the processing is as follows:
- Any photographer should have at least basic photo processing skills - correct the horizon, crop, cover up a speck of dust on the matrix, adjust the exposure level, white balance.
- Learn to take pictures so that you don't edit them later. This saves a lot of time!
- If the picture initially turned out well, think a hundred times before you somehow programmatically "improve" it.
- Converting a photo to b/w, toning, graininess, applying filters does not automatically make it artistic, but there is a chance to slip into bad taste.
- When processing a photo, you need to know what you want to get. No need to do processing for the sake of processing.
- Explore the features of the programs you use. There are probably features that you do not know about that will allow you to achieve the result faster and better.
- Don't get carried away with color grading without a quality calibrated monitor. Just because an image looks good on your laptop screen doesn't mean it will look good on other screens or when printed.
- The processed photo should be "aged". Before you publish it and give it to print, leave it for a couple of days, and then look with a fresh eye - it is quite possible that you want to redo a lot.
Conclusion
I hope you understand that learning to photograph by reading one article will not work. Yes, I, in fact, did not set such a goal - to “lay out” everything that I know in it. The purpose of the article is only to briefly talk about the simple truths of photography, without going into subtleties and details, but simply to open the veil. I tried to write in a concise and accessible language, but even so, the article turned out to be quite voluminous - and this is just the tip of the iceberg!
If you are interested in a deeper study of the topic, I can offer my paid materials on photography. They are presented in the form e-books in PDF format. You can get acquainted with their list and trial versions here -.
Despite the abundance of information, the question often arises of giving some advice to beginners, or rather to those people who just want to get into photography. So, what can we say to those who really want to do photography, but do not know how to approach this matter?
Do not chase expensive equipment
One of the most common misconceptions is that in order to remove good photo, you definitely need a good expensive camera and a bunch of other expensive things. This is not true. Remember once and for all. The photograph is taken by the photographer, the camera is just a tool in his hands. Masterpieces of wooden architecture were created with just one axe. So it is with photography.
Having the most sophisticated camera, you will shoot the same "dull g ...", as if you had only a cheap mobile phone in your hands. Yes, technical quality pictures may be higher. But technical quality is not the main thing in photography.
Therefore, do not try to spend the last money on a new DSLR that has just appeared on the market. New models digital cameras change so quickly that by the time you figure out how to shoot, your top-end DSLR is likely to be hopelessly outdated.
In order to start learning the basics of photography and very significantly raise the level of your pictures, a simple “advanced” soap dish with an extended set of settings and even a “smartphone” with a good camera is enough. I have seen very pictures famous photographers, which they did on their iPhones and Androids, simply because the camera was not at hand. And they were great shots. Precisely because these people understood how and what to shoot, and what is a secondary issue.
At worst, look on the forums and on the ads reflex camera used. A 2-3 year old DSLR in excellent condition, quite suitable for learning to photograph, can be bought 2-3 times cheaper than the one that just entered the market.
Do not chase "megapixels". They won't make your pictures better.
Therefore, the first advice is to start with a simple technique, learning the basics of photography itself as a process. When you begin to understand what you are definitely missing, buy another camera, but understanding exactly what you are buying and why.
Let's talk sharpness
For beginners, the sharpness of the frame is one of the main indicators of a quality picture. So be it.
Basically, blurry footage can have 4 main causes
- "Shake" - camera shake at slow shutter speeds when you shoot in low light conditions. Moreover, the effect of the stir can affect when already at a shutter speed of 1/10 second.
- Subject movement - not every subject is absolutely static, and even a small movement can “smear” the frame, if again
You are shooting at a fairly slow shutter speed. - Autofocus miss - Autofocus systems are not perfect and can sometimes miss focusing on a different subject.
- Wrong depth of field
There are other reasons, more specific, but this is a separate conversation.
In 90% of cases, the cause of blurry pictures is precisely the shake. Remember the main thing - the longer the shutter speed, the more still your camera and subject should be.
If you are tired of constantly "blurred" pictures, . Even an inexpensive tripod can make a dramatic difference.
Also, how can you fix the camera without a tripod if you don't have one with you.

Keep your camera with you
The opportunity to take a good shot often comes when you least expect it. Therefore, try not to forget the camera at home.
Don't purposefully try to "take pictures" like a job, hoping to get a good shot. Just keep your camera with you if you go for a walk, go to some interesting place, or even meet friends. Maybe that's when the chance to make a great shot will appear. For such cases, a small compact camera than a hefty professional-grade DSLR.
Think about what you want to photograph
Pay attention to interesting objects and scenes for shooting. Even when you don't have a camera with you. Note objects, think about how to photograph them so that you get an interesting picture. This can be done all the time, on the way to work or school, and even while in the store.
If you find an interesting object, take a few minutes to make a note on your notebook or on your phone - what, where and how you would like to photograph.
Perhaps another time, even in a few months, you will have a free minute to purposefully return to this place and take a picture.

Are you sure that there is no object for an interesting shot right at hand? Maybe it's a flower on the windowsill, a view from the window, a bowl of fruit in the kitchen.
Train your photographic thinking. Try to look at familiar things in a different way, not the way you do it every day.
Yes, there are new techniques and shooting techniques, but the basics have not changed for decades. And without knowing the basics, do not rush to move on to more advanced shooting techniques.
Shoot regularly
This is probably the most main advice. Shoot, shoot and shoot again. This does not mean that you, like a madman, should photograph everything in a row, trying to replace quality with quantity. But the more you shoot and analyze the footage, the faster you will understand what needs to be done.
The basics learned will be forgotten without regular practice. And your goal is to drive them into your subconscious so that your hands automatically set the necessary parameters on the camera, while the brain is busy with which angle is better.