You need an external flash. How to take pictures with an external flash
6309 I am a young photographer! 0
Greetings, our young friends! Have you already figured out a little about the device of your camera and the "terrible" three whales of photography in our previous lessons? Sure? Then let's move on! And today you will learn about such a simple and at the same time complex device as a flash.
Simple - because you do not know how to use the flash built into your camera - in automatic mode it worked without your participation, and most likely you did not pay detailed attention to the results of such shooting. Truth? Not scary! Let's find out!
And about the fact that there are external flashes that are installed on the same "hot shoe" (remember this one from our first lesson?) - they were seen by professional photographers? - you never thought about it. Yes? It’s not scary either, it’s for this knowledge that you and I will go now!
Built-in and external flash. About good and bad
It's time for us to deal with this device of your camera. - flash And we'll start with a simple one - with the built-in flash.
Everyone imagines what a built-in flash looks like and even most people use it to take pictures.
It either looks like this:


or even like this:

Let's try to say what advantages it has:
The built-in flash is primarily a source of illumination. If you really need to take a picture in a dark room, but you don’t have fast lens or increased ISO gives terrible noise, then the built-in flash will help here! (did you forget what ISO and aperture are? If necessary, look again at lessons 2 and 3);
- when shooting with the built-in flash, the camera adjusts automatically, although it does this, frankly, poorly;
- compactness is the biggest "plus" of the built-in flash.
So why don't cool photographers use built-in flash? (And we’ll tell you a secret that some professional cameras don’t have a built-in flash at all!)
Yes, because it has more disadvantages than benefits:
- due to the small area of the light source, strong highlights and deep shadows are obtained in the photo. Look at your photos with the built-in flash: they are faces with a greasy sheen on the face, with harsh shadows near the nose and under the chin, and some areas of the skin are overexposed. Like? not really!

- the flash cannot be rotated, its position cannot be changed. This is sometimes referred to as a "head-on flash". Together with the first drawback, a flat picture is obtained at close range. It's horrible!
And those red eyes? Have you seen these vampires in your photos? And she is to blame for them, the built-in flash!
- the low power of the built-in flash leads to the fact that the light does not reach distant objects and allows you to shoot only at close range. And this, in turn, leads to a dark background and overexposed faces;

- oh, the battery quickly ran out in the camera, and at the right time .... And again, the fault of the built-in flash.
What to do? The answer is simple: you need to learn how to shoot using an external flash and be sure to buy one. Of course, problems may arise with the purchase: parents will have to spend money on this expensive accessory.

Let's try to convince them:
Dear parents! If your child is interested in photography and you support him in this endeavor: your help is needed! You already have a camera, that's great. If you can install an external flash on it, please consider purchasing it. This is a very useful and interesting tool that will open up a new world of unexplored possibilities in photography for your child! It will be a wonderful gift, for example, for a birthday or New Year.
What kind of flash is needed for your camera - consult the nearest photo store or ask us this question on the site's forum. :) Deal?
Important warning! Although you can put any flash on a camera with a standard hot shoe, even the old one from the parent Zenith, do not use them with modern devices! In older flashes, too much voltage is applied to the hot shoe, which can damage the camera electronics. It is safe to use only modern flashes.
And now let's figure out why it is so needed, this built-in flash.
A modern external flash is not just a battery-powered lamp, but a complex device that you need to learn how to work with. As with the built-in one, let's take a look at all the pros and cons (and they also exist) of an external flash. Let's start with the good:
- an external flash is much more powerful than the built-in one. With it, you can shoot distant objects or fill large areas with light. The power of different models of external flashes varies - you will learn about this a little later in this lesson;
- external flashes recharge much faster, which means you can quickly take the next shot and even use burst mode (shutter clack-clack-clack!);
- an external flash, if your camera allows it, does not have to be put on a "hot" shoe - it can stand on a stand or be in your hand at a distance from the camera and illuminate the subject at the right angle. This is a very exciting property!

- external flashes allow you to control almost all of your parameters (power, viewing angle), select various modes of operation of automation (or turn it off altogether). For now, we'll leave these options to adults;
- most external flashes allow you to point your head in the right direction. This is one of its main advantages. A little later we will figure out why they do this;

- external flash - runs on its own batteries, so it will not drain the battery of the device;
And forget the red eyes! Down with vampires without aspen stake!
Wow, so many good things! And what about the disadvantages? Well, first of all, it's an expensive purchase. Secondly, this purchase requires space in your bag and it is heavy. Thirdly, you need to monitor the charge of not only the camera battery, but also the flash. And this means that you will have to take another charger on a trip. But all these cons are forgotten when you see how great it is to shoot with an external flash!
Learning to use an external flash
The main difference between an external flash and a built-in one is, as we have already learned, in the rotating head. Thanks to it, you can implement a technique that will significantly improve your photos: we are talking about the “flash to the ceiling” technique.
The essence of the reception is simple: the flash is not directed "on the forehead", but on the ceiling. When it works, the light will first hit the ceiling, which will act as a giant diffuser. And only after that, soft, diffused light from the ceiling will fall on the one you are photographing.

Thus, we kill two birds with one stone. First, the light becomes diffuse, without contrasting shadows. Secondly, it falls on the object not frontally, but from top to bottom: such lighting is more familiar to the eye, and better emphasizes the volume of objects.
The automation of modern flashes does not require any additional settings from you: just lift the flash head up and it will automatically adjust all the parameters accordingly. The only limitation of this technique is that it is applicable only where ... there is a ceiling!
Please note that if your ceiling is not white color(they are black, brown) or it is very high, the technique may not work. When the ceiling is higher than usual, the impulse calculated by the automatic flash may not be enough, and the frames will turn out dark. To avoid this, you can slightly increase the ISO on the camera.
Instead of the ceiling, you can try using other surfaces to reflect the flash. For example, walls. It is important here that the reflective surface be white: this is the only way in the photo you will get a color without distortion.
Many models have a built-in white reflective card. It can be used when you are shooting with the flash pointed at the ceiling, but you will also get light from the front, not just from above. Why is this needed? When shooting a portrait, for example, this will even out the shadows and give a glimmer in the blowouts. Give it a try!

The kit also comes with diffusers: either built-in or removable. They can be used when shooting "head on" when you need to shoot a wide panorama.
Flash characteristics
Often, when reading about outbreaks, you will see a name such as "Guide Number". What is it? This is its main characteristic, this is the distance (in meters) to which the flash can give an impulse, and at the same time you will get a normal frame. The leading number of built-in flashes usually ranges from 10 ... 12, and for external ones - from 20 to 60. And so you can compare the power of various flashes when buying. Once you buy a flash and start shooting, you will most likely forget about any guide numbers.
The zoom range is also important. Advanced flash models can automatically change the angle of the light beam, depending on the focal length of your lens. The wider the range of focal lengths that the flash can work with, the better. Of course, no one prevents you from shooting with lenses of other focal lengths, which are longer than the flash can provide. It's just that the angle of light given by the flash will be slightly different than the angle of view of the lens.
That's all you need to know and not scare you with numbers and calculations. Find out later when you grow up.
Buying a Flash
So, you and I managed to persuade your parents to buy you an external flash. It's so cool! To do it right, we have already learned a lot. But it is very easy for a novice photographer to get confused in this information, and even more so for such "dummies" as your parents. Therefore, we will devote the final part of our lesson to tips on choosing a flash. What to pay attention to first of all?
First. Compatible with your camera. Of course, in order to work effectively with a flash, it must be 100% compatible with the camera, i.e. if you have a Canon camera, it should say "for Canon". In this regard, buying a "native" flash will be a win-win option. Dear parents! Yes, a branded flash is more expensive than a Chinese counterpart, but do not be afraid to overpay for it - you will get excellent quality, reliability and warranty service.
Second. Rotating head. It will allow you to use the “flash to the ceiling” technique, creating high-quality, soft lighting in the pictures. We advise you not to buy flashes without a rotary head.
Third. Availability of automatic and manual settings. If everything is clear with the first point - this will solve all the difficulties of a novice flash photographer, then manual settings is a reserve for future study when you grow up.
Fourth - zoom and guide number. As you have already learned - the wider and larger these values, the better.
And the last - the possibility of remote control. If your camera supports such a function (you can find out about this in the instructions), then this characteristic will not be superfluous.
That's all you, our young photographers, need to know about flashes. And now, yes - yes, homework! It promises to be interesting!
Homework:
1. Take a few shots at home with the built-in flash. Let it be a portrait of your mother or grandmother: ask them to pose for you a little.
If you do not know how the flash turns on, read the instructions for your camera. Get help from your parents if needed.
Now take a close look at your photos and find on them all the negative points that we talked about in this lesson. Found? Show them to your parents. You have to buy an external one!
2. For those who already have an external flash.
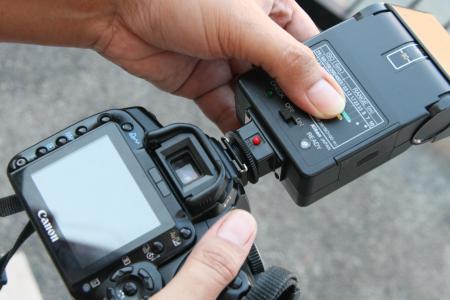
First of all, pay attention to how to correctly insert the batteries into the flash, learn how to carefully close the fragile cover of the compartment where the batteries are and correctly put the flash on the camera. Learn to turn the flash head in different directions. To do this, carefully yourself, or with your parents, study the instructions and practice.
3. Now with the flash on the camera, take the same shots as with the built-in flash, but with the flash head pointing towards the ceiling. Happened? Amazing! Find in the pictures all the advantages of external flashes that we have studied with you and compare with pictures taken with the built-in flash. See how different they are? And again, show these pictures to your parents so that they understand that they did not give you this gift in vain. :) Uraaaa! Happened!
4. Now remove the white reflective card of the external flash from the slot and take a couple more shots. Look carefully at the photos and try to find the difference with and without the card.
5. Try using a diffuser. Take photos with and without him: panorama of the room, portrait. Compare pictures. Understand what it is for.
Until the next lesson in our photo school, friends, where you will learn about the secrets of composition! All you photographic!
And don't forget your questions, we are waiting for you on the site.
Why do photographers use an external flash? Any photographer sooner or later faces such a problem as lack of lighting. And often the conditions are such that you can’t do without a good flash. Of course, almost all cameras have a built-in flash. Moreover, in many DSLRs, the flash has a convenient and flexible system of settings that allows you to significantly expand its capabilities. And yet, at
The built-in flash has a number of important advantages over the built-in:
- the location of the external flash can be changed;
- external flash does not make the image flat;
- often the power of the built-in flash is not enough (because of this, the foreground may be overexposed, and the background, on the contrary, too dark);
- an external flash puts the work of a photographer in poor lighting to a whole new level;
- an external flash allows you to control the light flux (for example, you can point the flash at the ceiling, so that the object will be illuminated by reflected light);
- you can adjust the brightness, range and other parameters yourself;
- the external flash has its own power, so its operation will not affect the battery charge in any way;
 |
Bright Photo Market | 6550 R. | |
 |
Bright Photo Market | 490 R. | |
 |
Kotofoto | 4490 R. | |
 |
maritim.su | 1 R. | |
 |
maritim.su | 2675 R. | |
 |
maritim.su | 10025 R. | |
| More offers | |||
There are a few stereotypes that put you off buying an external flash. The first is the misconception that only professionals can use an external flash. However, anyone can set up a flash, even those who are not friends with technology.
Another stereotype concerns the price of flashes - many people think they are very expensive. Now there are both expensive and cheap external flashes on the market. At the same time, they are focused mainly on beginner photographers. Therefore, before choosing an external flash, it would be nice to find out what they are.
What are external flashes
In this article, we will not talk about all the classifications of flash units and will not go into detail about studio and special flash units. We will only talk about those built-in flashes that are attached directly to the camera. And at the same time we classify them according to one parameter - by price.
Inexpensive External Flashes
The price of such external flashes starts at an average of 2000 rubles. Often they are called "amateur". Their main advantage is high power and the ability to work at a very decent distance. They can even be used with telephoto lenses. Otherwise, cheap external flashes are not far from built-in flashes. And besides, they are almost always powered by a camera. In cheap flashes, there is no way to redirect the flow of light (for example, to the ceiling or to the side to illuminate the object with reflected light). For this reason, you should only buy cheap external flashes if you know for sure that you need a bright flash for a long distance. For this reason, such flash units cannot be called "amateur" ones. Rather, they are intended for a narrow circle of people or simply for certain situations.
External flashes semi-professional and professional
Let's say right away that the definitions "semi-professional" and "professional" were invented by marketers so that the buyer would dream of buying an expensive professional flash whether he needs it or not. In fact, the difference between professional and semi-professional flashes is due to the price, which is driven by performance. It is on them that you need to pay attention before choosing an external flash.

Characteristics of flashes of external type for cameras:
- The guide number is the most important indicator. It is responsible for power and is measured in meters. The guide number is equal to that distance from the subject to the flash. In this case, the object at the aperture value
- F=1 and ISO 100 has the correct exposure. In other words, this is the maximum possible distance at which the object will not be overexposed and will be evenly lit. In almost all flashes, this value can be adjusted.
- The minimum time for the flash to charge. This parameter is responsible for the recharge time between shots. If you want to shoot static objects, then it is not important. And if you plan to make dynamic reports, then this parameter is perhaps the most important. The seconds you lose between shots can sometimes be fatal. It is worth mentioning one caveat: the higher the power of the flash, the longer it takes to recharge. As a rule, the documentation indicates the maximum possible time at maximum power.
- TTL (Through-The-Lens) is a special system that allows an external flash to measure the desired exposure (auto power setting). For a beginner, this is a very useful feature. Therefore, before choosing an external flash, you should pay attention to this parameter. There are other systems in which exposure metering is calculated not only taking into account the number of light rays, but also taking into account the distance to the subject. And of course, such flashes are more expensive.
- Auto zoom is a useful feature that comes in handy if the focal length changes (zooming in or out). If there is an auto zoom, then the external flash itself adjusts to the changed angle. The advantage of such a flash is both in obtaining high-quality images and in economical energy consumption.
If you want to photograph static scenes with an external flash, then the most important thing you really need is the presence of a rotary head. Therefore, cheap external flashes are suitable for such a task. If the subject of photography will be small children or animals, then you will have to spend money. First, you need an external flash with high power and the shortest possible recycle time. But the price of such flashes starts from 10,000 rubles.
Lighting is one of the most difficult aspects of photography and one of the most important. An external flash is one of the most effective ways to ensure proper exposure, but using it correctly is also quite tricky. In this article, we'll go over some of the flash techniques, accessories, and more. We will also offer you a cheat sheet, which contains the most common lighting methods.
The main feature of built-in flashes is that the quality of their light leaves much to be desired. Because the flash is a high-intensity light source and the light comes from a small area close to the lens, it produces flat, hard lighting that creates deep, unattractive shadows.
It also kills fine texture, whitens skin tones, and causes red-eye. A complete set to make any shot look terrible.
External flashes mounted on the camera are not much better. The light emitting area is slightly larger, the flash is further away from the lens, but it also produces hard light.
This type of lighting, where the flash is fired directly at the subject, is known as head-on flash. Although the image usually looks artificial and ugly with direct flash, the competent use of such light can give an absolutely stunning effect.
However, most of the time you will need to avoid such lighting.
Shooting with an off-camera flash

The key to significantly improving the quality of lighting: increasing the size of the light source and changing its direction for a more natural effect.
To do this, you need to completely untie the flash from the camera, for example, using a sync cable. This will give you much more freedom in setting the light and completely eliminate red-eye.
Nikon and Canon are releasing TTL - sync cables that allow you to completely transfer all information from the camera to the flash.
For some cameras, you will need to purchase additional adapters for the hot shoe and for the flash, and a cable to connect them.
If you want to be hands-free, you can buy a flash bracket that attaches through the tripod socket on your camera and allows you to point the flash at different angles.
Powerful hammer flashes are used to illuminate large objects such as buildings, usually in combination with a bracket.
Studio lighting simulation with two flashes.

Using the built-in flash to illuminate objects closer than 60 cm from the camera is a bad idea, as the power of the built-in flash is too high.
Positioning the flash above the lens causes most of the light to come over the subject. At short distances, it is better to use an external flash with a diffuser and a wide-angle adapter.
Make sure that the telephoto lens does not block the light from the flash, and also tilt the flash head down slightly.
This solution is far from ideal. You'll get a much better result if you use off-camera flash with a reflector on the opposite side of the subject to fill in the shadows. You can also use a ring flash for macro shots or, as in this case, a pair of TTL flashes placed on either side of the subject.

First picture.
Here we are illuminating the subject with a single Canon Speedlite 550EX flash mounted on the camera, without a diffuser. It can be seen that the lighting is flat, and an unpleasant shadow appears behind the figurine.

Second picture.
This time we used two Canon flashes. One on the camera as a control. The other is located slightly to the side of the subject and is controlled by the master flash from the camera. Its light reflects off a large white sheet. This gives softer lighting and emphasizes volume.

Third picture.
Here we additionally set a reflector on the left to fill in the shadows. The difference is small, but the improvements are still noticeable.
Shooting with reflected light

The direct light from the flash is very hard and looks artificial. He needs softening.
There are several ways to do this, and one of the most effective is the bounce method. This is very easy to do if your flash has a flash head that can be pointed up and rotated horizontally.
The idea is to direct the light onto a reflective surface such as a ceiling, wall or even a mirror, which will spread the light over a large area and increase the effective size of the light source.
This brightens the shadows and gives a soft, natural light, as opposed to a direct flash. To achieve the best results, you need to choose the optimal angle of the flash head. The disadvantage is somewhat flat lighting and lack of glare in the eyes.
Also shooting at close range can accentuate bags under the eyes and create shadows under the nose and chin. Also, this method significantly attenuates the light of the flash, usually by two or three steps.
Flash in TTL mode automatically compensates for the weakening of light by increasing the power, but if the power is already not enough, you need to open the aperture more, increase the ISO, or get closer to the subject.
If you use a manual flash, you will have to manually adjust its power.
One more important point- the reflective surface where you aim the flash must be neutral, otherwise you will get an extraneous cast in the image.
Using the white card

Good flashes have a retractable white card built into the flash head. This allows a small amount of light to be reflected towards the subject when the flash head is pointing up.
Using a white card, you can add highlights to the subject's eyes and fill in shadows.
Some flashes have a low power second flash that can illuminate shadows when the main flash head is pointed upwards.

If your flash doesn't have a white card or a second flash, try using a piece of paper instead of a white card, securing it with a rubber band.
Bounce flash cannot be used outdoors or indoors with colored ceilings and walls.
One solution is also to buy a mini reflector that fits around the flash head to soften the light and direct it forward. These can be, for example, LumiQuest reflectors.
If your flash does not have a swivel head, removing it from the camera will allow you to direct the light in any direction. You can also use it on an umbrella stand for almost studio lighting.
Using a diffuser
The diffuser is a good alternative to bounce flash. It distributes the light over a larger area and directs it towards the subject, softening it.

This minimizes red-eye, softens harsh shadows, and creates softer lighting. Using a diffuser with flash off-camera gives an even better result.
Can buy different types diffusers such as Sto-Fen Omni-Bounce, LumiQuest and others.
You can also diffuse the light through fabric or paper, or make a homemade diffuser for your flash.
For better softening of light, it is advisable to use mini softboxes, for example, LumiQuest, Lastolite, etc. Lastolite makes three Micro Apollo mini softboxes different sizes, they are attached to the flash with Velcro.
For the softest, shadow-free lighting possible, you can combine the use of diffuser and bounce light by pulling out the wide-angle adapter from the flash head for even more even illumination.
This method is great for big plans and portraits. Diffusers also reduce light output by up to two stops, and if shooting in bounce light, the total light loss can be up to five stops.
Products such as LumiQuest UltraSoft overcome this problem by combining a mini-reflector and diffuser in one closed design, resulting in only about two stops of light loss.
Using the wireless control

Using two or more flashes will greatly expand your options. To avoid problems with wires, it is better to use wireless flash control.
Nikon and Canon support TTL wireless control of up to nine remote flash units via a master flash unit. However, they can be divided into three groups.
The flash mode, output, and power compensation value can be set individually for each group and for the commander flash. If you want to use all your flashes, you can fire them using the infrared trigger on the camera's hot shoe.
This gives you the freedom to create any type of lighting, emphasizing the shapes, textures, tones and colors of objects. The disadvantage is the limitation on the distance to 10 meters.
As a rule, only high-end flash models can be used as commanders. If your flash does not allow this, you can use more simple ways, for example, connect a light trap to its PC connector.
Crib
The portraits below were shot using an 80mm lens and one Nikon flashes SB-800. We used various ways lighting. Thus, you can choose the right one for you.
Beginning amateur photographers when shooting in low light conditions often encounter situations where they fail to get an acceptable image quality. In most cases, the main reason for the unsatisfactory quality of photographs lies in the limited functionality and technical capabilities of the flashes built into the camera. Significantly improve the quality of images and greatly expand the creative techniques when shooting can be achieved through the use of external on-camera flashes. What does an external flash give?
1. High power
Flashes built into the camera do not have a very large guide number (usually no more than 15). In contrast, on-camera flashes have a significantly higher power (guide number 36 and higher on average). Using an external flash allows you to significantly increase the distance to the subject being shot without the need to increase sensitivity, as well as reduce the time interval between shots required for recharging. This is one of the purposes for which an external flash is needed.
2.Rotating reflector
Most on-camera flash units are equipped with a rotating reflector. In simple flash models, it can only deviate in the vertical plane, in more "advanced" models - both in the vertical and horizontal planes. Directing the light from the flash not at the subject itself, but at some diffuse surface (it is most effective to use a white ceiling indoors) provides uniform illumination of the entire frame, reducing the contrast in the illumination of the scene-important object and the background.
3. Large number of impulses
Shooting intensively using the built-in flash may result in a significant decrease in camera operating time due to the rapid battery drain. On-camera flashes, with very rare exceptions, have a power source independent of the camera. Typically, this is from two to four standard AA cells, which allows the photographer to choose the type of power source himself: alkaline batteries or rechargeable batteries. Autonomous power supply provides a large number of flash pulses and eliminates the dependence of the duration of the camera on the frequency of its use.
 |
 |
4. Zoom reflector
The flashes built into the camera have a fixed illumination angle. As a rule, it corresponds to the angle of view of an 18 mm lens (for APS-C cameras). This solution provides compactness, but is not very effective when using long lenses, since most of the flash power is spent on illuminating the area that does not fall into the frame. On-camera flashes, except for very low-power ones, have a zoom reflector that allows you to adjust the angle of illumination of the flash so that it matches the focal length of the lens. This increases the number of flashes the flash can fire on a single set of batteries and increases its maximum range. In many models, this external flash setting occurs automatically when the flash is attached to the camera and when changing the focal length when using a zoom lens.
5. Nozzles for creative lighting
Flashes built into cameras have limited ability to change the nature of the light produced. They give a hard light, which is why the image is very contrasty and flat. On-camera flashes, thanks to a wide range of light-shaping attachments, allow for a more flexible approach to organizing lighting. For a specific task, you can choose the necessary accessories.
6.How to use external flash with remote control?
The set of used lighting schemes can be significantly expanded if you mount the flash not on the camera itself, but at some distance from it. In combination with various light shaping attachments and accessories, this can greatly enrich your arsenal. techniques photographer, helping him to solve even very complex creative tasks. How to connect an external flash remotely? Remote control of the flash can be both wired and wireless. In the latter case, it is easy to organize the control of not one, but several flashes from the camera, creating lighting schemes with several light sources.
7. High speed sync
The minimum shutter speeds at which the built-in flash operates, depending on the camera model, are in the range of 1/60 - 1/250 s. These shutter speeds allow you to use the flash in most situations, but are completely unsuitable for illuminating the subject in high light. How to shoot with an external flash in bright sunlight? On camera flash models with high output, for such situations, there is a special mode– high-speed synchronization. It ensures correct flash operation in a wide range of camera shutter speeds, including the shortest ones. This allows you to use fill flash even in bright sunlight.
Branded flashes allow you to shoot in TTL mode, they are more reliable but also quite expensive. For most tasks, you can use third-party products. It will be much cheaper than using branded products. For example, for strobism you need at least 2 flashes. On the modern market Yongnyo is a well-established company that produces inexpensive and reliable flashes.
Selecting an external flash
Photographers-gurus often like to ask beginners philosophical question: "Without what there can be no photography?" Beginners begin to assume that without a camera (in fact, a picture can also be taken using a camera obscura) or without a photographer (there are a lot of experiments when an automatic camera was tied to animals, real masterpieces were obtained), but the correct answer to this question is light. No photo can be taken without light.
It is good when there is a lot of natural light - from the sun, moon, stars or artificial - from lamps, lanterns, searchlights. But there are not always such shooting conditions, often the photographer himself needs to provide himself with the right amount of light. And this is where flares come into play. However, they can come in handy in other situations - for highlighting and leveling the illumination of the frame.
Why you need an external flash
The question is not surprising, given that most cameras have a built-in flash. Why change a small, light and “free” flash to a large, bulky one, which, moreover, needs to be bought additionally? There are more than enough reasons.
First, power. External flashes are more powerful than built-in ones. If for the simplest external flashes the difference in power with the built-in ones is small, then for the top ones it is very noticeable. The guide number (a parameter that will allow you to measure flash power, we will discuss it in detail below) of built-in flashes rarely exceeds 12, while external flashes can reach up to 50-60. If the built-in flash can only illuminate a small spot near the camera, then the external one can “hit” into the distance, within reasonable limits, of course.
Secondly, the design. The simplest built-in flashes are located right in the camera body, a little more advanced ones rise on a special mechanism, but they are still close enough to the lens. This is bad, because the higher the flash is above the lens, the less likely it is that red-eye will appear in the photo. External flashes are located higher and "shine" much further from the lens. In addition, they have a larger diffused surface area. The eye of the built-in flash is usually very small, so it “beats”, almost without scattering the light (it can be compared with a flashlight), the light of an external flash is softer (although it is also desirable to further scatter it). And from the built-in flash in the photo, a shadow from the lens can remain (this is true for cameras with interchangeable lenses, on which you can install large and bulky "glasses"), external flashes are free of this drawback.

External flash units are positioned high above the lens to reduce the chance of red-eye
Thirdly, the swivel head. This is one of the main advantages of external flashes (which, however, not all models have). If you can take pictures with the built-in flash, illuminating the object only at a right angle, which is why sharp ugly shadows remain in the picture, then the external one allows you to shoot with diffused light: from the ceiling, walls, and so on. The probability of a shadow appearing in this case is small, and certainly it will not be so sharp and deep.
Fourth, an external flash is more flexible in operation. If the built-in one is firmly attached to the camera and can only take pictures from one point, then the external one can be moved forward or to the side, creating creative shots with unusual lighting. Only external flashes are used for studio shooting.
Fifthly, good external flashes in the dark can highlight autofocus. The function is not available for all models, but for many and is especially relevant for Canon cameras, which do not have a separate light bulb on the camera for illumination. However, for devices of other brands, autofocus illumination with an external flash allows you to increase the accuracy of focusing.
Sixth, external flashes have their own batteries and do not consume the camera's "battery", unlike the built-in ones.
If external flashes have so many advantages, then why don't all photographers use them? First of all, it's about cost. The simplest models cost 4-5 thousand rubles, but it makes no sense to buy them (why - we will explain below), just good flashes cost 9-11 thousand rubles, and top ones - 15-17 thousand rubles. But buying an external flash will help to significantly improve the quality of photos, not only for experienced photographers, but also for beginners, so its cost fully pays for itself.
What is the difference between external flashes
External flashes are a rather extensive class of devices, in which the difference in functionality between expensive and cheap models is very large.
The most important criterion by which flashes are divided is whether there is an automatic mode or not. A non-automatic flash cannot independently determine the pulse power - it can only be done manually; automatic - maybe for this it must support TTL mode. It works like this. Before the main pulse, the flash makes one more - very short and imperceptible to the human eye. This pulse is picked up by exposure metering sensors in the camera and, based on the information received, they calculate how much power the main “puff” should be in order for the picture to be well exposed. Each manufacturer has its own versions of this system (P-TTL, I-TTL, E-TTL), which differ in nuances, but, in general, work on the same principle. If you buy one flash for everyday use, then it is better, of course, to prefer automatic. Manual flashes are convenient to use in studio shooting, as auxiliary lighting devices.

Nikon Speedlight SB-400 (left) and Nikon Speedlight SB-900 (right) - the difference is clear
We have already mentioned that external flashes can vary considerably in power. Flash power is described by such a parameter as a guide number. In general, the guide number is the product of the aperture and the distance to the subject in meters, provided that the lighting is sufficient for a normal exposure. That is, if you take the guide number of the flash and divide by the aperture, you get the distance in meters that the flash can illuminate.
It is clear that this is a very abstract parameter, more suitable not for obtaining an absolute value, but for comparing flashes with each other. Let's say a simple flash Nikon Speedlight SB-400 has a guide number of 21, and a top-end Nikon Speedlight SB-910 has 34. However, compare products by guide number different manufacturers not entirely correct, because they can test with different settings. For example, the guide number of the top-end Canon Speedlite 580EX II flash is 58, which is one and a half times more than that of the best Nikon flash. At the same time, these are almost the same in terms of flash capabilities, it’s just that Nikon and Canon think differently. However, whatever the calculations, it is obvious that in the lines of any manufacturer there are flashes of different capacities.
The third very significant difference is the presence of a swivel head. The simplest external flares either do not have it at all (they can “puff” only straight ahead), or it is greatly reduced and can only rotate in one direction. In medium and advanced models, the head can rotate in two directions, which gives great opportunities for the use of reflected light.
External flashes also differ in zoom range. Yes, yes, flashes also have zoom. Diffusing elements can move in the flash body, changing their position. This is necessary in order to better form the light flux, because it is clear that in the wide-angle position of the lens you need the widest possible beam of light, and in the body - a long and narrow one. The simplest flashes have no zoom at all, medium flashes usually have about 3x, top ones up to 5-6x, they can best shoot distant objects. When using modern lenses, the flash receives information about the focal length from the camera; to use old mechanical lenses, manual setting of the desired focal length is available.

Shooting with two flashes
External flashes are pre-designed to work not only one by one, but also in a group. According to this indicator, outbreaks can be divided into leading and driven. The master flash is installed on the camera and sends “instructions” to others when and with what power it is necessary to give an impulse, the slave ones can only execute commands. Almost all manufacturers can only have a top-end flash as a leader, and the rest as slaves the lineup. As you might guess, only flashes from the same manufacturer can interact with each other without additional equipment.
The higher the cost of the flash, the more additional features it has. Advanced models may have a light catcher for triggering from any impulse, have bracketing and additional batteries for faster recharge, be equipped with an overheating sensor and big amount user settings.
Brands and prices of external flashes
Describing the difference in functionality, we did not accidentally talk about simple, medium and advanced flashes. Usually manufacturers have the same gradation. Nikon, for example, has Nissin, Sigma, Yongnuo, Acmepower and many others. Each manufacturer has its own range. Not everyone has the “standard” three models, but at least two are present.
Metz 50AF-1
Metz is considered the best and high-quality "independent" manufacturer - its products are slightly more expensive. Sigma flashes are very popular in Russia, they are available and widespread. Nissin and Acmepower are even cheaper, but the products of these companies are slightly less functional, in addition, they are not sold everywhere. Very actively gaining Russian market Yongnuo, which is also the cheapest of the brands. Many people order flashes of this brand from China. Even with shipping, simple models cost a couple of thousand rubles.
Buying a third party flash is very attractive in terms of cost. Top-end flashes cost 9-11 thousand rubles, medium ones can be bought for 6-7 thousand. But the choice between original and non-original flashes for home use is not so simple. On the one hand, you can save money on non-original ones, on the other hand, they may have compatibility problems with cameras of the next generations, they are less stable in operation and have a noticeably shorter resource. To save or not to save this issue choice on the conscience of each photographer.