Sketches of animals for woodcarving. Slotted wood carving, stencils
All photos from the article
Artistic wood carving for beginners can seem like a rather complicated process. In principle, at first it is so, but having mastered the basic techniques and methods of processing the workpiece, we will be able to gradually improve our skills, each time creating much more complex jewelry.
Naturally, this requires various devices, and among them you should definitely include templates, stencils and patterns for woodcarving. It will be much easier for a master mastering the technique to navigate the finished drawing than to try to improvise.
General information about sketches and stencils
Image creation
Before proceeding to, we need to decide what exactly we will cut. An ornament for woodcarving can be very different, and if we are talking about creating a plot composition (flat or three-dimensional), then the list of available options will be endless in principle.

Note!
You can find a variety of sketches on the net, but stencils for woodcarving for beginners, i.e. not distinguished by complexity, among them are quite rare.
Much more often, authors lay out schemes for mid-level crafts, but they should be used only after mastering the basic techniques.
When making a sketch, it is best to follow this algorithm:
- First, we select the workpiece and decide what exactly we will cut out of it.. Beginners should give preference to carving on a plane or making a simple figurine.
- Then we create a sketch of the future sketch, highlighting the main parts and marking the places where the ornament will be applied..

- At the next stage, using a compass and a ruler, transfer the sketch to graph paper. If the item will have enough big sizes, then graph paper can be abandoned in favor of tracing paper, on which we apply a scale grid for the convenience of work.
- If there are several repeating elements in the ornament, then for them you can make separate stencils from thick cardboard by cutting the part along the contour.
Separately, it is worth mentioning the technology of mechanized carving using milling machines. In principle, milling cutters quite allow you to select by marking, but most often metal or polymer stencils for wood carving with a milling cutter are used to decorate flat parts. They limit the movement of the cutting edge, and therefore practically exclude the influence of the human factor.
Note!
Such products are quite difficult to manufacture, because their price is appropriate.
So it's worth buying them only if you need to perform a large number of similar images.
Transfer to workpiece
So, we already have a template or sketch, now we need to understand how to transfer the image to the blank.
The instruction involves the use of several methods:
- Templates for wood carving with a router are the easiest to use - just fix the plate on the surface of the product so that the grooves are exactly opposite the location of the ornament.
- Cardboard templates are also not difficult to use: we apply them according to the markup and carefully trace with a pencil along the contour.

- When transferring simple geometric shapes, you can use the puncturing technique. To do this, we fix the sketch on the part and mark all the key points with a needle / awl. Then we connect the marks on the wood with straight lines.
- Finally, you can use carbon paper: put it under the sketch and circle the lines in the drawing, transferring the image to the tree.

Threading technology according to the finished contour
When the drawing is transferred to the workpiece, the most difficult part of the work begins, namely, the woodworking process.

- If our task is a through thread, then first you need to make a starting hole in each element. This is done using a drill with a drill, the diameter of which corresponds to the width of the canvas used.
- After that, a saw is inserted into the hole, and part of the wood is sawn out. The edges of the hole are then leveled either with a knife or using files and abrasives.
Flat and volumetric threads are performed differently:

- First, the contours of future recesses are cut with a sharp knife.
Note!
It is advisable to draw a cutting line along the inside of the contour, since usually the area of the treated area increases slightly during operation.
- Then, with the edge of the jamb or cutter, we perform the central slot of the deepest part. After that, we begin to form the recesses, choosing the wood between the contour and the central recess.
- Small details and textures are formed using a chisel. Ideally, it should be sharp enough to cut through the material without the use of a mallet, but sometimes (especially if you have to cut oak, beech or maple) you cannot do without additional effort.

- It is convenient to choose deep grooves with chisels with a curved blade - the so-called cranberries. At the same time, efforts should be made to cutting edge did not dive below the selected level.
- After completing the carving, it is worth once again walking along the contours with a knife, restoring even edges. When this stage is completed, you can proceed to grinding the surfaces.
Conclusion
Do-it-yourself woodcarving will be much easier to master if you use suitable sketches and stencils at the initial stages of work. To understand the intricacies of using these devices, we recommend that you carefully study the video in this article.
The art of woodcarving. How long ago did it occur? Nobody will say now. Since ancient times, wood has been the closest material to the worldview for a person. It often seems that, they say, this knot needs to be slightly corrected, the excess removed, and it will become a work of art. But no, in fact, woodcarving is painstaking professional work. Skillfully, you can make a masterpiece!
- First, desire creativity and good mood.
- Second, the material. In principle, you can cut on any kind of wood. But it is easiest to work with birch, linden, aspen, pine, spruce and cherry. The tree must be well dried. In addition, wood needs paper for sketches, a template for smooth transitions of lines, a ruler, a compass, a triangle and a pencil.
- Third, tools. In general, a large set of tools is used for cutting. But for a beginner carver, a jigsaw, an awl and a knife will suffice.
- fourth, workplace. Before picking up a cutter, be sure to create a workplace for yourself. For this, you will need a table or bench. They must be stable and durable. But it's better to make a workbench. It is more convenient and reliable.
- Fifth, you need to create sketches for woodcarving.
Let's get acquainted with the main types of carving. We note 2 commonly encountered species: sculpture and relief.
- Sculpture - these are free-standing works and plots. Usually these are people, animals and abstract forms.
- With relief wood carving, images are made on the surface (background). For example, a bird soaring against the backdrop of a mountain landscape.
To get started, we need sketches. Where can you get them? This is your fantasy! Whatever you think of and put on the tree. But, if fantasy is tight, then you can find ready-made sketches on the Internet. The main thing is to start with simple sketches for stencils.
Found a sketch for woodcarving. You need to turn it into a stencil. What is a stencil? This is the transfer of a drawing to paper. The paper must be strong. It can be tracing paper or carbon paper. With the help of them, we simply transfer the drawing to the surface. Or create a stencil out of cardboard. After that, we attach it to the tree and outline the outline.
And if you use geometric carving, then you can simply draw a pattern on a blank. First of all, you need to select areas for yourself and determine which of them will be convex and which will be concave. Only in this case will the correct drawing on the tree be obtained. By the way, this is the easiest type of carving. It is great for making boxes, boards, frames.
Gallery: stencil woodcarving (25 photos)


Stencils for contour carving
 It is also easy contour thread. Here, the main thing is the ability to correctly cut grooves of the same thickness and depth. Why do we use a variety of chisels. After cutting the canvas in this style, usually the inside of the grooves is tinted. Then the sketch is perfectly visible and looks very picturesque. . The advantage of this type sawing is the ability to take virtually any stencil and transfer to a blank. But there are many ready-made templates for those who want to try themselves just in this form cutting. Animals, plants and landscapes look very good in this technique.
Geometric patterns for woodcarving
The simplest patterns are geometric shapes, floral ornaments (leaves, twigs), butterflies. They are often used in the manufacture of carved platbands for windows. In ancient times, it was believed that platbands protect the house from evil spirits. Therefore, they were often decorated with patterns in the form of laurel leaves, oak, lotus flowers and lilies. They also used Celtic (Scandinavian) braid. This is a braid pattern., various weaves.
Stencils for planar technology
And with the help of planar technology, you can create interesting figures of various animals. For example, put a wooden bear or a swimming swan in your garden. You can make fairy-tale heroes - formidable dragon or Serpent Gorynych. Or scare guests with masks of some mythical characters. By the way, the masks are made in three-dimensional technique. This carving requires skill and skill. Their sizes are different: from 25 to 50 cm in length. You can come up with sketches for mask stencils yourself or take ancient Slavic heroes from books, for example.
Stencils in Flat Relief Cut Styles
 Here the process will not be easy.. Here you need to make a deep background, it is located, as it were, under the relief. The relief itself, as a rule, collapses. Transitions are created smooth with a file or emery. We make the background even or leave it slightly textured. To artistic carving came out truly luxurious, we can’t do without a stencil either.
The ability to cut wood allows you to create many things that are amazing in beauty and inner energy. Developing technique and constantly learning, you can make real masterpieces of art. For example, you can start cutting out icons and paintings. It is very laborious and an exciting activity. Such canvases are quite expensive.
And having imagination, you can make original gifts to your relatives and friends. For example, a wooden medallion engraved or carved clock. The latter can be both wall-mounted and floor-mounted.
So wood carving can be not only an exciting but also a profitable hobby. The main thing is to have imagination, creativity and put your soul into the work. Then the products will not only delight you and your friends, but also protect you from negativity.
The presented wood carving lessons will introduce beginners to this craft so that you can create objects from natural material with your own hands.
The history of the craft and types
Wood carving is a type of arts and crafts that originated in antiquity. In Russia, woodcarving was called carving, and the drawing performed in this technique was called a sign, a pattern, or a pattern. In this technique, masters made braids, teeth, grooves, poppy seeds, fungi, etc. on a flat surface. You can see such samples in the Assumption Cathedral by visiting the royal place.
Russia owes the development of woodcarving to the monk Ambrose, a novice of the Trinity-Sergius Lavra, who at the end of the 15th century combined Russian ornament with Western and Eastern in his works.
In 1660, the masters decorated the royal dining room with German carvings, which were figured, with Gothic motifs. This is how German elements appeared in Russian carving, including new tools and terms.
Thread types are conditionally divided into:
- through;
- deaf;
- brownie;
- sculptural;
- chainsaw thread.

Here's how they differ:
- The through thread is subdivided into consignment note and through thread. This includes slotted carving, when through sections are cut with chisels and chisels; and profile carving, where such sections are cut with a jigsaw or saw. If these types of carving are performed using a relief ornament, then this is called openwork.
- If there is not a single through hole in the processed tree, such a thread is called blind.
- Facades of buildings are decorated with house carvings.
- Sculptural - one of the most complex types of carving, requires great skill. In this technique, figures of animals, sculptures of people are made.
- With the help of carving with a chainsaw, global work is performed. This requires strength, therefore it is more suitable for men, while women also successfully master other types of carving.
Woodworking tool, cutting blanks
Beginners can use only 2 tools - a well-honed penknife and a joint knife.
When you learn how to perform simple elements with them, you want to improve, then you can buy wood tools, for example, such a set.

There may be even more tools, but only professional carvers who perform complex work need such a number.

See what types of recesses you can make with semi-circular cutters of different sizes, sharp-angled.

But what set of tools should a cabinetmaker have in order to produce the following types woodwork:
- carving;
- sawing off;
- splitting and trimming;
- planing;
- turning;
- chiselling.

- Pay attention to the cutters that are used for manual turning of wood. In addition to the semicircular, there is also a flat oblique, angular, detachable, beveled, angular, etc.
- Saws are used to saw off the workpiece. They can be transverse, longitudinal, universal. The teeth of the rip saws are chisel-shaped; in the transverse they are triangular, sharp. Universal are equipped with teeth having a right angle. Such a tool can cut fibers both along and across and at an angle. Each of these saws can be hacksaws, simple, one-handed.
- If the workpiece is made from a ridge, beam or trunk, then axes or cleavers are used. Adze - a kind of ax, the blade here is located perpendicular to the handle, used to create figured and concave products.
- To remove chips from the workpiece, turning or hand tools are used, planers can be used.

The most popular carving tools are chisels. They usually consist of:
- steel rods;
- cutting blades;
- shank.
- Wide and straight are used for cutting or stripping flat or convex workpieces.
- With round blades - for working with horn knots or hardwood.
- With the help of narrow workpieces are processed in narrow places.
- A chisel with a thick steel rod is used to clean a deep cavity or workpiece with a hollow. Deepen the chisel into the wood with a mallet.
- Cranberries make gutters of various depths and radii.
- Corner chisels make grooves and triangular recesses.
Wood carving: sketches and master classes
After you have learned a lot of useful things, got the necessary, let's try to cut a flower. To make it, you need the following:
- flat wooden blank;
- pencil;
- transparent paper;
- v-shaped chisel-corner;
- narrow and wide semicircular chisels.
If you don't already have a v-shaped chisel, you can use a sharp knife for this pattern.
Attach a sheet of paper to the screen, redraw the diagram.

Then transfer it to a wooden blank. Start by cutting along the outline of the center circle, then cut towards the center from the outer circle using a large semi-circular chisel.

Mark up the flower petals.

Using a v-shaped chisel, cut the petals along the outline.

With the same tool, remove the excess wood between the petals (“triangles”).

Take the next woodworking tool in your hand - a semicircular chisel to cut out the outer contour of the petal. In doing so, it will become similar to the upper part of the heart.

With a large semi-circular chisel, make cuts inside the contour of the petal.

With a small semicircular chisel, make two cuts on this contour from the center of the flower.

To increase the cut area, just cut again.

Unfold the chisel and round the center of the flower.

Now you need to take the next carving tool - a v-shaped chisel and make such cuts in the center of the flower.

Everything, you can admire the result of the work.

If you want to carve a fox, the following sketches will come in handy.

If you want to make butterflies, wood carving sketches are also included.

If you want to make a mold for printed cookies with the image of the Snow Maiden, then prepare:
- beech plank;
- ruler;
- jigsaw;
- simple pencil;
- ruler;
- sandpaper;
- eraser;
- linseed oil.
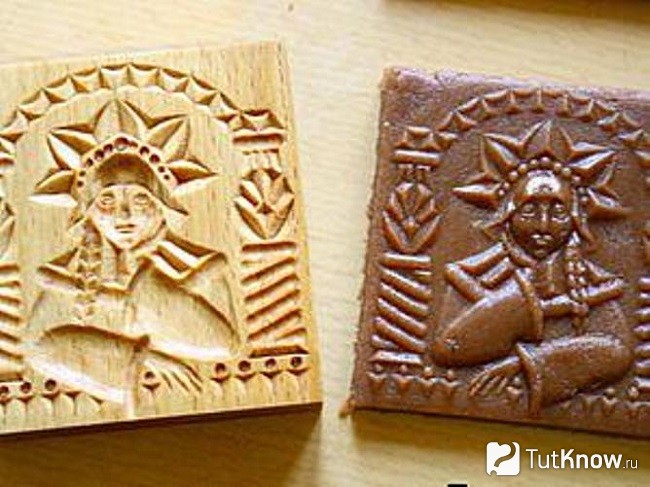
Draw a rectangle on the board. Drink it up.

If you do not have an electric jigsaw, then you can cut the workpiece with a saw or an ordinary manual jigsaw.
Make the surface of the cuts even with sandpaper. If the farm has a grinder, use it for this procedure. Transfer the drawing to the workpiece using a simple pencil.

With the help of a semicircular chisel, we make a recess in place of the face, then we again apply its contours here.

The ongoing wood carving sketches will help you carve out the facial features correctly. At this stage, we also make a cape on the head of the Snow Maiden. Note that it is at a level above the face.

Based on the sketch, cut out other elements of the workpiece.

Now you need to erase the pencil with an eraser-rubber, then with the finest sandpaper. If you immediately do this with sandpaper, then part of the stylus will rub into the tree.
Pour linseed oil into a container, dip our wooden mold into it for an hour. If you are doing great job then saturate it with oil using a swab or squirrel brush and leave to dry for 3-4 days.

Everything, you can roll out the dough, cut it into rectangles, apply a pattern using a wooden blank and bake.

To prevent the cookies from burning in some places, you need to cut a stamp out of wood so that there are no too prominent elements on it.
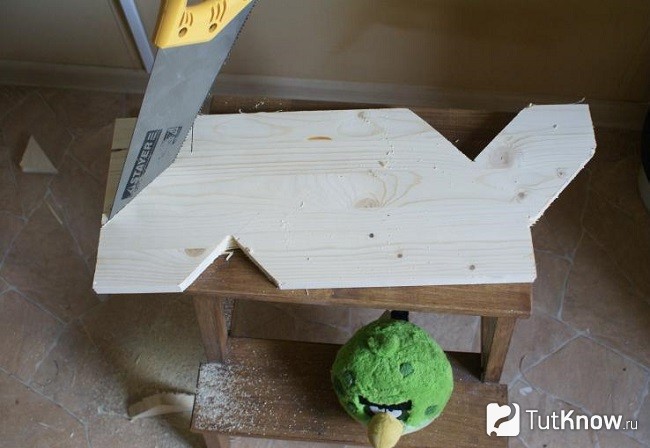
How to cut a sign for a bath?
For her, take:
- a board (in this case, a coniferous wood step was used);
- triangular ruler;
- simple pencil;
- saw;
- furniture varnish in a can;
- stain;
- brush;
- sandpaper.
To draw letters, download the letters you like from the Internet, then redraw them on wood. You can use this sample.
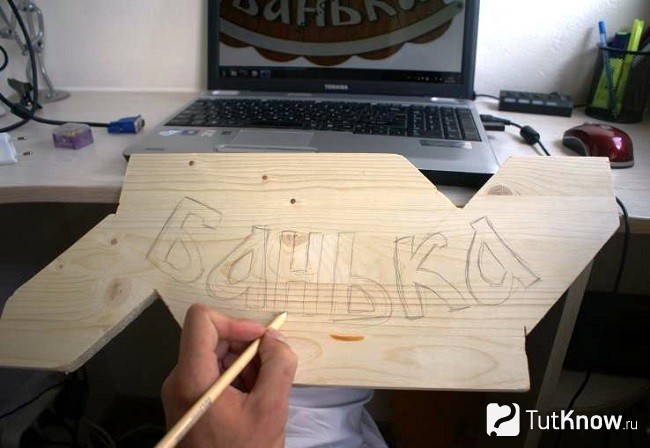
Draw oak leaves on the right and left on the plate.

Next, the carving begins. For beginners, such tasks are great, because they do not require long training and a lot of tools. Here, 3 types of cutters were used: a joint-cutter and chisels "Tatyanka". Make cuts according to the pattern with a chisel cutter along the outlined contours, cut it under the contour with a chisel to highlight the pattern above the background.

Next, the carved surface is sanded sandpaper No. 180 and No. 220. Draw clouds at the top and bottom of the tablet, cut them out with a chisel and a chisel, and then sand them.

It remains to cover the product with stain. For this plate, it was applied in 1 layer, and when it dried, the recesses were painted a second time. After that, you need to go through the letters with sandpaper to give the effect of a three-dimensional image.

After coating with varnish from a spray can, you need to let it dry for 12 hours and you can hang the sign in place.

How to turn soap into beautiful flowers with your own hands?
You can cut not only on wood, but also using soap. This is a softer material and at first you can “stuff” your hand on it.

This soap will be a nice present for friends. After all handmade much appreciated. In order to make a rose out of soap, you will need a little, namely:
- a piece of soap;
- cutter;
- tassel.

Then you need to cut out the second and subsequent petals. At the same time, move from left to right in a circle.

This is what the job should look like after you make the first circle.

Perform the second and subsequent ones in a checkerboard pattern in relation to the previous ones.

Here's how to decorate soap with your own hands by combining carving and woodcarving.
In conclusion, 3 plots are offered to you. From the first one you will learn in detail about wood carving, about tools for beginners.
After viewing the second, you will be able to carve a spoon with a beautiful carved handle.
From the third, you will learn how to carve a charming rose from wood.
The most ancient art is woodcarving. It can decorate the house and interior elements. Many different simple patterns have become excellent, which attract with their elegance and precision.
Woodcarving ornaments have been used as a decor for a long time. An ornament is a pattern that has combinations of various forms: geometric, plant, animal, bird, human, etc. The elements that make it up can be repeated or alternated. More complex components can be simplified for a better perception of detail.
The geometric ornament is characterized by various simple patterns., when combined, you can get amazing drawings that fascinate with their beauty. Most often presented as decorations are stripes, stars, rosettes, etc. Other wooden elements also make sense and give a great look. Among others geometric patterns allocate:
- A dot is an element that is used separately, but is reused as a decor.
- The line is a frequently used pattern, intended mainly for separation.
- The zigzag or broken line symbolizes water.
- A rhombus or square delimits a space filled with patterns.
- Polygons (hexagons, octagons, etc.) are often used in oriental woodcarving.
- Crosses mean the creation, construction of something, etc.
- Twisted or spiral, or other curved elements.
- The circle is filled with a pattern and is responsible for a separate composition.
Description of floral ornaments
Performed in different varieties or repeated separately. They can be an excellent composition, on which there can be drawings of a tree, a fruit plant, a flower, etc. Floristry is depicted naturally or in a simplified or stylized form. It is considered the most popular after the type of geometric ornament. Since ancient times, the most commonly used were wooden grapes, oaks, laurels, lotuses, ivy, etc.
Gallery: woodcarving (25 photos)


Properties of an animal (zoomorphological) ornament
 This carving shows drawings of various animals, which may be fictional as well as real. They are often stylized. These are very old drawings. Among the patterns there are not only whole wooden elements, but also individual parts of the body of animals (heads, wings, paws, etc.). Often used in combination with different types ornaments. Can be used for various threads.
Ornament with the image of a man
In wood carving, a wooden man can be depicted schematically or more realistically. Use it for decorative details interior. It goes well with different types of patterns.
Among all the ornaments of woodcarving, one can distinguish such wooden decorative or symbolic image types, for example:
- Hieroglyphs, inscriptions, etc.
- Emblems, emblems, etc. (heraldry).
- Miscellaneous symbols (yin-yang, lotus, cross, etc.)
The main forms of different patterns
It all depends on which one is used. There are the following forms:
- A ribbon shape or border that runs along the edge or frames the product.
- Garland - wavy shape (mainly used with floral ornaments).
- Socket - independent form in the form of a flower, polygon, etc.
- Palmette - fan shape with decoration.
- Arabette is a complex patterned element made up of geometric, plant shapes.
- The wreath is used in the plant form of ornaments.
- The braid is made with interlacing components (strips, ribbons, stems, etc.).
- An openwork ornament requires the implementation of a sawn carving technique (making a through background image).
Sketches (album) for the formation of patterns
 Initially, before starting wood carving, you need to make a sketch on paper (you can in your workbook) of the same size. You can do this on a printer or copier (reduce, enlarge, etc.). You can also draw freehand using cells for linear scaling. On a tree, this carved ornament is duplicated using plain carbon paper. For a through thread, you can make a simple template by cutting it out with scissors so that you can apply it further and trace it with a pencil on the workpiece. You can buy special patterns or find images on the Internet; the Slavic pattern is very beautiful and ancient.
Beginners in this business should not choose a super-complex template, and you need to select it for a specific carving technique. Stencils from the album must be transferred to the workpiece as accurately and correctly as possible, as this will allow you to create a really beautiful drawing. Woodcarving is a separate direction that arose quite a long time ago and each time it has improved more and more and brings to all of us a feeling of beautiful and eternal unity with nature.
Volumetric, contour and geometric wood carving are one of the most ancient methods of decorating a wide variety of products. By and large, nothing is needed for work, except for a wooden blank and a fairly sharp knife: with proper skill, a carved casing, a beautiful toy, or any other product can be obtained.
Of course, you will get masterpieces only after many years of practice. But you can start mastering carving from the simplest details: just study this article and understand the basics.
Thread types

Despite the fact that the simplest tools are used in working with a tree, and the processing techniques are not difficult, the result can be very different. Depending on the appearance the machined surface is distinguished by the following types of thread:

- contour thread- perhaps the simplest (outwardly, not in terms of execution technique). The pattern is applied to a flat surface with shallow lines, forming the contours of the pattern.
- Geometric carving- the most common due to ease of development. Unlike contour, patterns are formed not by lines, but by a combination of geometric shapes, most often wedge-shaped recesses.

- Flat serrated thread - the technology of applying an ornament or pattern on a flat board. At the same time, recesses are cut out on a flat background, which form the pattern we need.

A variation of this technique is also considered a through thread, in which not only recesses, but also holes are formed in the workpiece.
- sculptural carving(volumetric) - the most difficult technique. A chock, branch or root is taken as a blank, after which the part is given the desired shape. Here it is important not only the skill of the carver, but also how competently the wood is selected.

Of course, this classification is very arbitrary, but it gives an idea of where you can strive to improve your skills.
What do you need to work?
Carver's tools
To make wooden toys, carved frames, architraves and other decorative objects, the craftsman needs the right tools. In addition to the usual carpentry (saw, drill, file), you need to use special tools:
| Illustration | Tool | Purpose |
 |
joint knife | A versatile tool that is used for both geometric carving woodwork and sculpture. |
 |
Chisels | The most extensive group of tools used to form recesses. Depending on the shape of the edge, the following varieties are distinguished:
|
 |
Cranberries | Special chisels with curved working part. With their help, relief carving with strong penetration. |
 |
Spoon cutters | As the name suggests, special tools for making wooden spoons. The special shape of the blade (ring or semi-ring with one-sided sharpening) allows you to effectively select large volumes of wood. |
The price of professional cutting tools is quite high. And yet, a novice master should not save money: it is better to purchase several knives and chisels of decent quality. Then the first experience will not be spoiled, and it will be possible to focus on mastering the techniques and techniques of carving.
Choice of wood

Artistic carving requires the formation of a fairly clear relief. And for this you need not only suitable tools, but also the appropriate material. Not every wood is suitable for carving, and if you are just starting to master the technique, then you need to be very meticulous in choosing:

- Linden- Ideal for the beginner. The material is soft and homogeneous, therefore it is better to master the most complex patterns for woodcarving on linden.
- Alder (red and black)- also a very good option, albeit more dense. Ideally cut, almost does not warp when dried. The main downside is hard to find!

- Birch- firmer and more resilient, but at the same time quite suitable for learning the basics of carving. When dried, it can be deformed, therefore, small products are usually cut from birch.
- Oak- a great option, but only for an experienced master. The relief is perfect, but you need a very sharp tool and a confident hand.

- Pear- wood with high density and good uniformity. The structure of the material allows you to make the thinnest products.

From a tree of these species, it is first necessary to cut blanks, dry them, and, if necessary, process them rough. Only after that, drawings and sketches are applied to them, according to which carving is carried out.

Techniques and techniques for geometric carving
In fact, all work on a carved detail comes down to three operations:
- Training- selection and roughing of the workpiece, transferring the pattern.
- Actually carving- drawing a relief pattern.
- Finishing- elimination of defects, grinding, varnishing, etc.
Instructions for performing basic threading operations are shown in the table:
| Illustration | Stage of work |
 |
Drawing drawing.
We transfer the contours of the pattern to the workpiece of the desired size for processing. You can build a drawing yourself, using a ruler and a compass, or you can use ready-made sketches for woodcarving. In the second case, we print the sketch and transfer it to the base, making punctures with an awl at the intersection points of the lines. |
 |
Cutting contours.
Focusing on the drawing, we cut the contour lines with a cutter. At the same time, we observe the depth and direction of cutting. |
 |
Cutting out triangular elements.
After the basic cutting, we move on to the main part of the work. We cut each triangle into a wedge on both sides. After that, we cut out the third side, removing a piece of wood. |
 |
Cut out other elements.
After all the triangles are selected, we move on to other details of the thread - bevels, planes, arcs, etc. We cut them, trying not to damage the already processed area. |
 |
Clear cut.
After completing the main operations with a sharp cutter, we process problem areas, removing defects and forming even, clear lines. We carefully grind the planes, trying not to remove the relief. |
 |
Staining / varnishing
We process the product with stain or varnish, or apply decorative impregnation with a tinting effect. |
Conclusion
By no means do I want to say that woodcarving is easy. To achieve results, you need to study and practice, preferably under the guidance of a mentor. But the tips and videos in this article will help you take the first steps, and in the comments you can get answers to all your questions.