Photographing in unusual conditions. How white balance affects lighting
38219 We improve our skills 0
The landscape, and especially the sunset, is one of those subjects from which many amateur photographers have taken and are taking their first steps in photography. In principle, it is not difficult to explain this - nature draws a beautiful picture, the task of the photographer is just to press the button and the photo, it seems, should turn out to be interesting automatically. We have already talked about shooting the natural landscape in the course "Improving Knowledge". What is the difficulty of shooting a sunset? Let's figure it out.
The point is that there is back side this natural phenomenon. Let's remember a children's toy - a kaleidoscope. Every time you look into his eyepiece, every time you see a new picture. But no matter how much you shake the kaleidoscope, you will not see anything fundamentally new in it. It's the same with sunset photography. No matter how many times you shoot, the plot is hackneyed and banal. Search engines The internet finds millions of images when querying "sunset", most of them looking like this:
Well, what to do now? Don't shoot sunsets at all? Of course not! I just recommend that you take shooting more responsibly, in this case you will have a chance to photograph the sunset in a really beautiful and original way. And since you are reading this lesson, it is precisely this task that you set for yourself.
Like all our lessons, we begin the analysis by considering the technical side of the issue.
Sunset equipment
The first challenge is that sunset requires good dynamic range from your camera. It is necessary to work out both the light sky and the dark earth at the same time. Alas, only SLR Cameras and the latest models of mirrorless system cameras, and even then not all. But even on a full-frame device (it is believed that they have the maximum dynamic range), it is very difficult to achieve simultaneous high-quality study of both the sky and the earth when shooting a sunset. Is it worth talking about soap dishes that confidently "paint" everything below the horizon in a "radical black color"?
When shooting a sunset over water, this problem seems to disappear - the mirror of the reservoir reflects the sky and looks bright. However, the coast at the same time falls even more into blackness.

The lens has a huge impact on the quality of the photo. The critical parameter in this case is the glare resistance of the lens. When the sun enters the frame inside the optical system, the number of light reflections from the lens surfaces increases significantly, due to which the picture loses contrast and "blooms" with many sunbeams.

As you can see in this photo, the glare resistance let us down - a yellow "veil" around the sun turned out and the photo came out not as high quality as the author would like.
When shooting a sunset, very often there is a phenomenon such as the flow of charge from "exposed" pixels to neighboring ones. This phenomenon is called blooming. The result is the "expansion" of the sun in size and the appearance of a colored border around it.

As you can see, the sun took on a strange oblong shape - most likely, the glow of the clouds near the solar disk also affected. If you "turn" the levels to failure, then the color component of blooming will be clearly visible - the green edging.

The above photo, of course, is extreme, but it shows why sunset photos are difficult to process. Nevertheless, there are plenty of fans in this way to "exaggerate" and put their creation on the Internet. Do not do this, I beg you, if you do not want to hear a lot of critical arrows addressed to you.
Setting the Camera for Sunset Shooting
In what mode to take pictures, what shutter speed, aperture and ISO sensitivity to set when shooting a sunset - quite frequently asked question, which is set by novice amateur photographers. I will try to answer them. In principle, the general principles of exposition are not much different from those generally accepted in landscape photography, namely:
1. Sunset photography is better in aperture priority mode (AV, A). There are several reasons. The most important thing is that each lens has a certain aperture range at which it produces the best image quality, as a rule, this is f / 5.6-11. Landscape (including sunset) is not a "DOF-dependent" genre (no need to separate planes with blur, as in a portrait), so you can safely clamp the aperture.

When the aperture is clamped to 22 or more, the overall detail of the image is slightly reduced, but the effect of diverging rays from the sun appears, this was discussed above - perhaps this will be a reason to sacrifice technicality for the sake of artistry. It makes no sense to shoot a sunset with an open aperture - the detail is low, the depth of field will be small and not all objects will most likely fall into the depth of field (although this may be an artistic intent - these are already special cases). In principle, you can use the fully manual mode, setting the shutter speed manually as well, but this will take more time.
2. The shutter speed should be at least one divided by the focal length (in film equivalent), this will reduce the likelihood of getting a non-sharp frame due to hand shake - this is one of general principles"field" photos. If you have a 50 mm lens, then the "safe" shutter speed will be 1/50 second, if 300 mm, then 1/300 second. This explains the need to use a tripod when shooting with a telephoto lens. The shutter speed is selected automatically by the camera when shooting in aperture priority mode. If the picture is too dark or too light, use the exposure compensation function, or switch to manual mode.
3. ISO sensitivity - the lowest possible, but at the same time, ensuring the absence of "stirring". A low sensitivity slows the shutter speed, but produces smoother tones and reduces noise. It is worth raising the ISO sensitivity only if the shooting is with a telephoto lens without a stabilizer and a tripod - in this case, the likelihood of blurring the picture due to hand tremor increases. By increasing the sensitivity by 2 times, we reduce the shutter speed by 2 times.
4. It is impossible to give an unambiguous recommendation on which white balance to set, probably the most correct recommendation would be to shoot in RAW and then set the desired light temperature during post-processing in the editor, depending on your "vision" of the plot - some photo will look better in cold colors, some warm.
 5. Exposure metering. The thing is that we have to shoot the sunset against the sun. As a result, the built-in exposure meter of the camera can let you down. The secret is not to point the camera at the sun, but to take the exposure reading slightly above the sun's disk. Aim your camera lens at this point (just make sure you can't see the sun in the viewfinder) and press the shutter button halfway. As a result, the camera will select the ideal shutter speed and aperture settings for sunset photography. After fixing the selected values in this way, aim the camera at the scene you want to photograph. When the composition in the viewfinder is perfect for you, press the shutter button all the way down to take the picture at the previously selected exposure values. The sunset scene in the photo will be almost perfect. If the camera allows - use the exposure lock button.
Rules for the artistic side of the landscape at sunset
1. Don't make the sun the only key object in the frame.
The sun in photography has much more value as a light source than as a subject - so use it for its intended purpose! Find a subject that would play in the sunset light and photograph it. Many people shoot a sunset over the sea or a large body of water in windy weather, obsessing over the sunny path and completely forgetting that splashes from the surf in the backlight sometimes look just magical! Find a pier, a dam against which the waves break and try to shoot them - I'm sure it's much more interesting than the sunny paths that have set your teeth on edge.

2. The most interesting sunsets happen when the weather changes.
Sunsets in good weather are monotonous, boring and represent a simple picture like - a white circle (sun) in a pink or yellow sky, and an almost black bottom. But when the weather changes, you can observe clouds in the sky, often of a bizarre shape. When the sun sets below the horizon, these clouds glow bright red for a short time - don't miss this moment!

3. The more the aperture is clamped, the longer the rays from the sun are obtained
The rays from the light source are produced due to the diffraction of light at the corners of the aperture. When the diaphragm is open, its shape is close to a circle, when closed - to a polygon (by the number of petals). On the one hand, diffraction on a heavily covered aperture slightly reduces the detail of the picture, on the other hand, it allows you to get an interesting optical effect.

4. Use a ND filter.
5. Composition of the picture.
In order to get a beautiful, memorable sunset shot, it’s not enough to choose the optimal exposure settings, the photo must be subjective. Try experimenting with different focal lengths to capture all sorts of landscape scenes. If you want the sun to take up more of the frame, use a smaller angle when shooting. Correctly photographing a sunset means highlighting the center of attention in the frame. They can be mountains, a tree, a cliff, a person, etc. When choosing the center of the image, be guided by the basic rules of composition in photography. So, for example, to highlight the main subjects of the survey, use the rule of thirds. This will allow you to correctly build the composition of the photo and make its perception as comfortable as possible for the viewer.

6. Photo processing.
If you are faced with the task of photographing a sunset, then be prepared for the fact that the captured photos will require additional processing. After all, it is far from always possible to provide ideal shooting conditions and choose the right camera settings. Often, subsequently, you have to correct the finished images in order to improve their quality.
Well, with the rest of the subtleties, you will figure it out already practicing shooting. If you want to learn how to photograph a sunset, then don't be afraid to use different camera settings, choose non-standard compositions and focal lengths. Thus, in order to photograph a sunset correctly, it is not enough only to know the basic rules of landscape photography, but also the ability to experiment, obeying subtle changes in nature, is necessary. This is the main deposit good photos and Have a good mood from the work done.
All you photographic!
The sun is the main source of light for outdoor photography. Sunlight can make wonderful portraits. In addition, in these conditions, you can practice taking pictures in backlit conditions. Although the backlight gives a wonderful light pattern, it is quite difficult to get good results in such conditions.
Let's see what backlighting is. back lighting- this is when the light source is behind the subject. When shooting outdoors, this source is most often the sun. Such light is good to use in the morning or in the evening when the sun is low on the horizon. For example, if you want to shoot a couple in love against the backdrop of a disk of a setting sun, then backlighting will give your picture a wonderful romantic mood. will seem mysterious and mysterious.

How to learn to use backlight?

In this case, as already mentioned, it is best to shoot in the early morning or evening, at sunset. During these hours, or rather, minutes, the sunlight becomes much softer, as if golden. It lies flat on the subject, creating a very beautiful halo above it. This effect is obtained when the camera lens is directed against the sun, and the person being portrayed is between the light source and the camera. Simply put, the model, as it were, covers the sun.


Backlit outdoor portrait


In backlight, experienced photographers recommend using lens hoods different size. It will be interesting to work with optics. Try shooting with several different lenses. You can experiment and take pictures at different angles in relation to the sun.
In some situations, you have to photograph a person or some object with a light source behind him. In this case, it is easy to get into trouble and make mistakes by getting a shadow or unpleasant glare in the frame. How to use backlight correctly to get successful, beautiful pictures? This will be discussed further.
Backlight
Backlighting in photography is created when a light source, artificial or natural, is placed behind the subject being photographed. In this case, the source may not be located directly behind the object, but somewhere slightly to the side. But in any case, the light falls on the photographed object from behind. In other words, the photographer and the light source "look" at each other during the shooting.
If the light source is located directly behind the back of the model, it creates a light halo at the borders, as a result of which the person begins to literally “glow” at the edges. Moreover, by changing the angle "light source - object - camera" you can achieve different illumination of individual parts of the object in the frame. This light should never be confused with background lighting, which is used simply to softly illuminate background elements.

One might wonder - why use light at all to illuminate that side of an object or model that is not visible in the photograph? Moreover, when the source is located behind the model, the photographer invariably has problems choosing the right exposure - the picture turns out to be darkened, individual details are lost in hard shadows.
In fact, backlight can be successfully used for:
- emphasizing the depth of the photo image due to the shadows that are cast by objects;
- creating the effect of a "glowing silhouette";
- shooting in fog, when backlighting makes the pictures very attractive and interesting;
- photographing glass, transparent and translucent objects, shiny surfaces, since backlight very well reveals the texture of such objects;
- separating the subject from the background and enhancing the drama of the image in portrait photography;
- Highlighting a model's hair in a portrait shot to make it look more fluffy and voluminous in the picture.
Features of shooting a portrait in backlight
Backlighting works well for portrait photography because it creates contrast. For example, backlighting draws a light outline through the model's hair that contrasts with the head and background, helping to create an angelic or romantic look. But a backlit portrait is not an easy task for a beginner photographer. Firstly, it is necessary to correctly build lighting. When positioning the light source behind the model or subject, it is recommended to use fill flash to match the brightness of the subject's face with the background. Fill flash will add extra light to underexposed areas of the frame in backlit situations. It will remove any shadows from the model's face, and you will get a great portrait shot.
Second important point- correct exposure metering and camera settings. Camera automation does not like conditions when you have to take pictures against the light, and often make mistakes. When photographing backlit, it is best to use spot metering. Then the camera will measure the amount of light in a small area of the subject, according to which it will set the exposure of the frame.

You can also apply positive exposure compensation, choosing a value experimentally to better work out the details that have gone into the shadows. To ensure that both the model and the background are correctly exposed, it is worth using exposure bracketing. That is, shoot several frames with different exposures, and then combine them. Sometimes you have to sacrifice the brightness of the background - it may turn out to be a little overexposed, but this is quite normal and natural for backlit photography. .
If you are shooting a group portrait, then try to make sure that the silhouettes of people do not merge with each other. If you are photographing a model outdoors in natural light, then you need to make sure that the sunlight falls on him from behind at a low angle. That is, early morning or evening hours, when the sun is near the horizon, are better suited for shooting. If the weather is windy, then position the model so that the wind blows towards the sun and beautifully disheveled the hair. At the same time, in order for a beautiful luminous contour to appear on the model’s hair, you should find some kind of background that will be quite dark.
Backlight for landscape photography

Backlighting is often used in landscape photography as well, as the sun's rays breaking through clouds can make the surrounding scenery even more spectacular and dramatic. The clouds themselves are transformed and become an extremely interesting subject for shooting. The main problem that a backlit photographer faces when shooting a landscape is the banal lack of dynamic range of the sensor. As a result, the picture is either overexposed or too dark. In the latter case, the situation can be somewhat corrected by means of graphic editor by pulling details out of the shadows. In addition to negative exposure compensation, you can use the HDR mode when shooting backlit landscapes, combining several shots into one.
Photo processing
Often, when shooting against a bright light source, it is difficult to avoid exposure errors. In addition, the dynamic range of the sensor does not always cope with the correct display of such a spread in brightness. Usually the pictures are darkened, but with subsequent post-processing, as we have already noted, you can correct the flaws and draw out individual details from the shadow areas.

On the example of the Photoshop editor, it looks like this:
- Open the photo and make a copy of the layer.
- Use the menu Image - Adjustment - Shadows/Highlights to adjust the shadows. The parameters will have to be selected empirically. As a result, the photo image should lighten up a little. However, we do not want the whole picture to be brightened, but only its individual areas that turned out to be too dark.
- Therefore, we use the menu Selection - Color Range. We mark with a pipette the dark areas that need to be clarified.
- Next, we create a layer mask in accordance with the selected area, so that the effect we need appears selectively.
- At the end, you can give the picture greater contrast and saturation of colors. To do this, you need to change the blending mode of the top layer to Screen and adjust the opacity. Create a copy of the top layer and change the blending mode to Soft Light. As a result, the subject or certain areas of the image that looked too dark were not only lightened, but also acquired richness of colors and depth.

In this simple way, you can correct the photographs taken when shooting in the backlight, achieving the desired study of light and dark areas.
Moscow Kremlin at dawn, view from the Patriarchal Bridge. ISO200 50mm f/11 10s
We have all seen sunrises and sunsets many times in our lives. Sometimes the sun timidly illuminates only a few individual clouds or a strip above the horizon. Sometimes the whole sky lights up from edge to edge, and the heart stops in amazement. Anyone who has tried to capture such moments on their camera knows how difficult it is to capture the beauty of a sunset. In this article, I tried to systematize the knowledge needed to successfully shoot sunrises and sunsets.
Phases of regime time
The sunset itself usually only lasts a few minutes, and is part of what is known as “mode time,” when the sunlight is at its softest and most conducive to shooting natural light scenes. Consider the main phases of regime time. For simplicity, I will only talk about sunsets, for sunrises everything is the same, only the regime time phases go in reverse order.
As you know, midday light is white, very hard (if we consider summer time at mid-latitude). As the sun approaches the horizon, its rays pass through more and more of the atmosphere, and the light gradually becomes warmer. The moment when the light significantly changes its temperature compared to noon can be considered the beginning of regime time. As a rule, it is about an hour before sunset. This time is good for shooting scenes in which the main subject (such as a mountain peak or building) is lit from the side. The light is still bright enough that you can shoot handheld if you forgot to bring a tripod with you.
 The main building of Moscow State University (Moscow), illuminated from the side by the soft light of the rising sun. ISO100 12mm f/11 1/2.5s, 2 horizontal frame panorama
 Further, the light gets warmer - first orange, then red, and then black (as the sun sets below the horizon). Having gone beyond the horizon, our luminary ceases to illuminate terrestrial objects, but it can very effectively illuminate the clouds. This is the time for shooting in backlight, when the camera is pointed approximately where the sun has set. There is already little light, you can still shoot with your hands, but at the same time get sharp frame quite difficult.
 The building of the Russian Academy of Sciences (Moscow), shooting in backlight shortly before sunset over the horizon. ISO100 11mm f/8 1/20s
 After sunset, when the clouds "go out", dusk sets in. Usually this time is unremarkable. There is very little light and exposure can reach tens of seconds (especially when using filters), which makes it impossible to shoot handheld. But do not rush to turn off your technique. Because sometimes real magic begins at dusk - the water in the lake calms down, the sky begins to smolder with purple light, and it seems that everything around is filled with extraordinary peace and harmony.
 Evening twilight on Srednemultinskoye Lake, Altai. A 30-second exposure smoothed out small ripples in the water, making the work more relaxed. The colors are real. ISO200 20mm f/8 30s, 2 horizontal frame panorama
 Features of shooting in regime time
One of the main problems when shooting in regime time is the lack of light. As a result, when shooting handheld, many frames can turn out blurry due to “shake”. The situation becomes more complicated when using light filters (for example, polarizing or gradient filters), which can increase the required shutter speed by several times. The only effective solution to the problem is to use a tripod. If you don't have a tripod, you can try placing the camera on some hard surface; for example, the following panorama was shot like this (here the camera was lying on a granite slab):
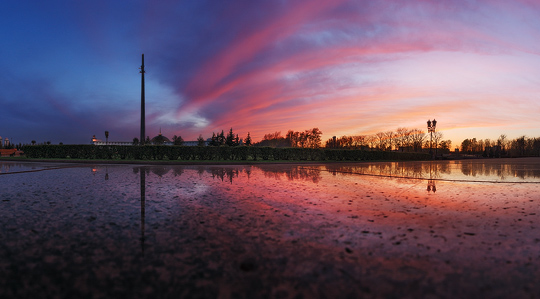 Sunset panorama in Victory Park (Moscow), reflected in a granite slab.
 The main problem when shooting sunsets and sunrises is the large dynamic range (DD) of the scene being shot. DD depends on the shooting direction: the maximum in the backlight (the camera is directed to the setting sun) and the minimum in the opposite direction. Modern DSLRs tend to handle long distance scenes easily when shooting scenes with side lighting. But for this you need to shoot in RAW and be able to accurately set the exposure. The RAW format stores much more information (compared to JPG, for example) and allows you to somewhat "pull out" small overexposures and underexposures during processing.
An error in determining the exposure can lead to loss of information and the appearance of serious "underexposure" or "overexposure" in the picture, even when shooting in RAW. Therefore, I recommend shooting in manual mode (M) to avoid camera errors.
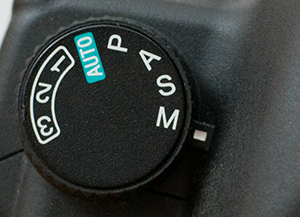
There is nothing difficult in this. Put the camera on a tripod; set the minimum ISO value; set the aperture so that there is enough depth of field (usually f / 5.6 ... f / 11); set the shutter speed to automatic camera. Even in manual mode reflex cameras automatic exposure metering works - look into the viewfinder and you will see a strip with numbers -3,2,1,0,1,2,3+, and at risk above it - this is the exposure meter (it may look different in your camera) :
If the risk is over “0”, then the shutter speed you set is the same as the one chosen by the camera automation. If the risk is shifted towards negative / positive numbers, then the camera considers that the shutter speed is too short / long, respectively. First, set the shutter speed so that the risk is above "0". Then take a test frame and look at its histogram. If the histogram is strongly shifted to the left, then increase the shutter speed, if to the right, then decrease it. Take the next test frame and look at the histogram again. And so on until you get a frame with a good histogram, without overexposure and underexposure. You can read more about the histogram, for example,.
Don't forget to keep an eye on the histogram of the individual channels! When shooting in normal time, there may be overexposure (clipping) in individual channels in the absence of overexposure in brightness. This results in color distortion. When shooting sunsets / sunrises, there is often clipping in the red channel, at dusk - in the blue channel.
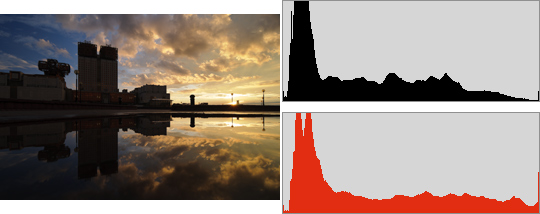
An example of clipping in the red channel with a slight overall overexposure
Shooting with bracketing
In the case of backlight, the situation with the dynamic range is usually more complicated. It may happen that at any shutter speed there are overexposures or underexposures in the frame - the camera cannot cope with too large a dynamic range. In this case, you can shoot with exposure bracketing. As an example, here are the original frames of the sunset shown above, taken at shutter speeds of 1/80, 1/40, 1/20, 1/10 and 1/5 s:
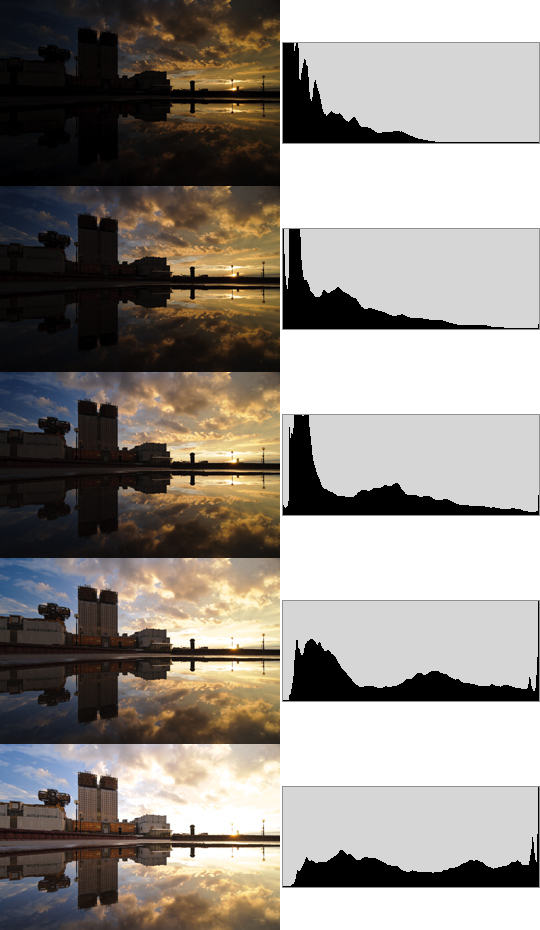
Here in the upper frames there are underexposures, and in the lower frames there are overexposures. I blended these shots by layering them with masks in Photoshop, so there are no over or under highlights in the final work (see above). This method is called "tonmapping", I will talk about it in detail in one of the future articles.
Bracketed shooting can be useful even if you don't know how to do tone mapping. If you make a little mistake in determining the shutter speed, you can always be sure that at least one of the bracketing frames came out with the correct shutter speed. In addition, perhaps in the future you will learn how to do tone mapping, and then you can return to the sunset you shot earlier.
Shooting with Gradient Filters
In some cases, scene DD can be reduced using gradient filters.

Gradient filters Singh-ray (4×6”)
Such filters allow you to darken part of the image. For example, if the top of the image is significantly lighter than the bottom:
 When shooting without a filter, a significant part of the sky turned out to be overexposed
then with the help of a gradient filter, you can darken the upper part, so that there will be no overexposure in the picture:
 This shot was shot with a 3-stop ND filter with a soft border. Lake Svetloe, Ergaki Natural Park, Krasnoyarsk Territory. ISO100 20mm f/11 1/15s
 A gradient filter in some cases allows you to shoot a scene in one frame, without bracketing. This is the beauty of such filters: one click on the shutter button, a minimum of processing, and the result is a very natural photo. However, gradient filters are not a panacea. In the case of a more or less complex border between dark and light areas of the scene, the gradient will darken not only the light area, but also the dark one. This is clearly seen in the images presented in this section, where the gradient darkened the mountains along with the sky.
If you don't know where to start, buy one 2-stop ND gradient filter with a soft border (see left filter in the photo above). It will be useful in 90% of the scenes, and it will not be visible in the pictures (in the sense that the picture will look completely natural). 3-4 stop filters are needed much less often, and you can easily overdo it, darkening the upper part of the frame too much. 1 stop filters are generally completely useless.
The sun in the frame
A photograph of early morning or late evening can become much more interesting and dynamic if you include the sun in the composition. Here are some simple tips to help make your shot look better.
Then in Photoshop, you can overlay one frame on another with a mask, thus getting rid of highlights:
 Dawn on the river Cross Multa, Altai (in this place the river flows under the stones). Here, two frames with the same exposure (see above) are superimposed to get rid of glare. Then a frame with a lower shutter speed was superimposed to get rid of overexposure in the sky. All shots were taken at f/22 when the sun was just peeking out from behind the mountain. ISO100 20mm f/22 0.4s
 There is one difficulty here - the sun can significantly reduce the contrast of the entire frame as a whole, and therefore a simple overlay of frames will not work, because. they will vary greatly in contrast. This problem can be avoided if you shoot at the moment of sunset behind some object (for example, behind a tree, mountain or building), when most of the solar disk is covered by this object. Then the application will be painless.
Equilibrium moment
Shooting a sunset in the city has its own characteristics. A big city is full of light sources - building lights, lampposts, car headlights - and this light can be used to make the most effective shots. As the sun sets, its light gradually weakens, while the lighting in the city gradually turns on. When the intensity of sunlight and artificial light are approximately equal (30-45 minutes after sunset), there comes a moment of balance - the optimal time to shoot a sunset in the city. This balance does not last long, 5-10 minutes. At this time, the dynamic range of the scene is minimal, so you can shoot without exposure bracketing.
 Sunset, 20 minutes to balance, city lights just starting to come on. Due to the large DR, a significant part of the image turned out to be underexposed. ISO200 90mm f/11 4min
  At the moment of equilibrium, the brightness of natural and artificial illumination is equalized, the DD of the scene is minimal. Here is one frame, without bracketing. ISO200 100mm f/16 2min
 Composition
Much can be said about composition, it is an extensive topic worthy of a separate article. Shooting sunset and sunrise is not special, the usual composition rules apply here. However, it is worth considering common mistakes.
No matter how gorgeous the sunset is, you should not make the sky the main subject of the frame. The main object should be earthy, and the sunset should only complement the frame, emphasizing the beauty of this object. Imagine that there is no sunset, but instead of it - a clear blue sky; the frame should remain interesting, albeit less spectacular.
A common plot among amateurs: the sea below, the sunset above. As beautiful as it is, the plot is extremely hackneyed. The advice here is simple - include in the composition the foreground, for example, stones on the shore, a pier, a boat - anything that seems personally interesting to you. Aim the camera so that the horizon is above the middle of the frame - this way you focus on the foreground, and not on the sunset.
 The foreground makes the photo much more expressive. Lake Svetloe, Ergaki Natural Park, Krasnoyarsk Territory. ISO100 24mm f/16 3.2s
 When shooting silhouettes in backlight, the silhouette should not dominate - its area should not exceed 30-40% of the frame. Of course, the shape of the silhouette should be interesting in itself.
 The setting sun behind three spiers: two Kremlin and one hotel Ukraine. One frame, no processing. ISO200 300mm f/8 1/4000s
 Shooting preparation
Let's take a look at how you can prepare for shooting in regime time. Let's say that it's the month of May and you want to take a picture of the Moscow Kremlin during normal hours. First you need to study the chosen object: find its photos on the Internet and / or come to the center of Moscow at any convenient time and go around it from all sides, choosing interesting angles. In the case of the Kremlin, one of the most spectacular (and popular) angles is obtained when shooting from the Patriarchal Bridge.
After we have chosen a shooting point, we open the The Photographer's Ephemeris program and see if this point is suitable for shooting during peak hours. We are looking for the Patriarchal Bridge on the map and put a marker on it. The program shows the direction of sunrise / sunset and moon:

As you can see, the direction to the sunrise roughly coincides with the direction to the Kremlin (it is located under the inscription "Moscow"), which means that the scene we have chosen can be shot at dawn. The sunset will burn in the other direction, so we will not come to this bridge at sunset. Now we look at what time the sun rises. Let's say it's May 1st. The program on the panel on the right shows the time of sunrise and sunset of our luminaries. In this case, the sun rises at 5:46.

As we already know, the picture will be most spectacular if you shoot it when the clouds are already illuminated by the awakening sun, and the Kremlin's illumination has not yet turned off (the moment of equilibrium), this is about 40 minutes before sunrise. It is clear that you need to come to the shooting point a little earlier, say at 4:45. It remains only to wait for good weather and find the strength to get up at 4 o'clock in the morning. Most likely, you will have to come to the chosen place several times before you can catch a beautiful sunrise, but it's worth it.
Moscow Kremlin at dawn, view from the Patriarchal Bridge. ISO200 50mm f/11 10s
It is unlikely that you want to limit yourself to one plot. It makes sense to make for yourself a list of scenes that you would like to shoot, and with each of them to do the described procedure - to determine at what time and under what weather conditions they can be removed. This list might look like this:
The Kremlin, view from the Patriarchal Bridge - an hour before dawn, clouds are needed (spring, summer)
The Kremlin, view from the Bolshaya Moskvoretsky bridge - half an hour after sunset, clouds are needed (mid-spring, late summer, early autumn)
Moscow State University, reflected in the fountain - half an hour after dawn, after rain (beginning of spring, beginning of autumn)
etc.
After compiling the list, it remains to wait for the right weather. If you are shooting outdoors, then you will have to honestly walk to selected points every day in the hope of catching the light. But in the city, your task can be greatly facilitated, since mankind has learned to more or less accurately predict the weather, at least for the day ahead. In my opinion, the most accurate and detailed weather forecast is provided by the Intellicast service. If the forecast says that during normal hours there will be 20-80% of clouds (column "Clouds"), then on this day there is a good chance of beautiful light. And if a thunderstorm is predicted a couple of hours before sunset, then you must go, because the light show can be simply grandiose, the main thing is not to forget to take an umbrella.

An example of a weather forecast at www.intellicast.com
If you're unlucky with the weather
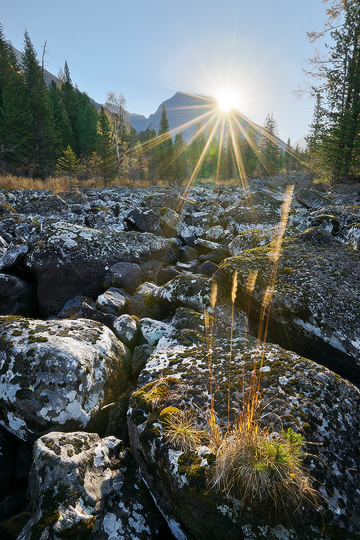
Colorful sunsets don't happen every day. If you came to shoot, but there is no light, then you should not be upset. First, you can explore the area and try to find interesting places to shoot. Secondly, you can look for scenes that do not require good light. If the sky is clear, you can try shooting a scene with the sun in the frame. In dense clouds, you can look for scenes without the sky. For example, in the forest you can photograph trees, streams and streams. Let the plot be not so interesting, but then you will not return from the shooting disappointed. This means that next time you will be more motivated to get up early in the morning to shoot the sunrise.
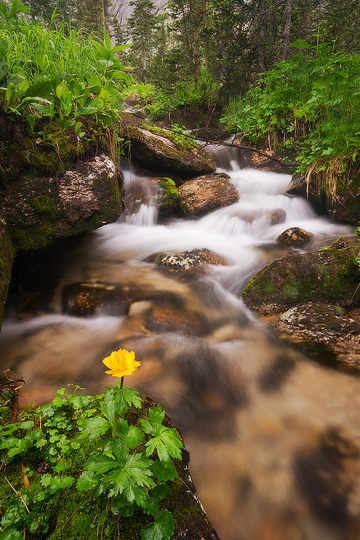 Cloudy weather, drizzling rain - excellent conditions for shooting vegetation in the forest. Ergaki Natural Park, Krasnoyarsk Territory. ISO100 24mm f/16 1.3s