What nodes do you need to know. How to knit a counter knot? Tourist knots
"The knot will be tied, the knot will be untied ..."- this is how the Russian singer Alena Apina sings in the once popular song. Only in mountaineering, the knot must be tied so that there is no unforeseen “untied”, but at the same time, if necessary, it should be easily untied.
Most of the climbing knots are of marine origin. In the beginning it was ... Hence the marine names of many knots.
Quite often we use various nodes in everyday life, without even thinking about their name, origin and use in mountaineering or navigation.
When classifying nodes in mountaineering, they most often rely on their purpose and distinguish 3 categories:
- binding (or for binding);
- strapping (or for strapping and loops);
- auxiliary.
Knots for tying ribbons and ropes
Used for tying ribbons and ropes, both the same diameter and different.
In the first case, most often used:
- direct (marine);
- clew;
- weaving.
In the second:
- counter;
- bramshkotovy;
- academic.
straight knot
 The straight knot is very simple to perform: both ends of the rope are parallel on one side.
Its main drawback is spontaneous "sliding", i.e. propensity for self-unleashing.
In this regard, for additional strength, its ends are strengthened with control safety knots (“controls”), although in everyday life this is most often not necessary. These "controls" under extreme loads on the rope will prevent it from slipping and untying the main knot.
How to tie a straight knot step by step


Grapevine
 The grapevine knot is considered reliable and beautiful. It is used not only for tying ribbons and ropes, but also for knitting loops for bookmarks and guy loops.
It is extremely practical when tying a lanyard loop.
The advantage of this node is the ability to adjust the length of the loop.
Under the influence of the load, it is able to tighten strongly.
Step-by-step instructions for knitting a grapevine knot


Counter node
 The counter knot is ideal if you need to tie completely different materials, for example, a ribbon with a rope, a rope with a cord, etc.
It not only holds well and does not creep, but is also easily untied after removing the load. At the same time, it tightens perfectly under load.
The counter node has a second name - looped. In the practice of mountaineering, loops of braid of different widths are often used. To tie them, only a counter knot is used. That's where the second name comes from.
Step-by-step instructions for knitting an oncoming knot


clew knot
 The clew knot creeps only under variable loads, but at the same time it does not tighten.
This knot belongs to the category of reliable and knitting easily.
Tying "controls" is a must.
Knitting a clew knot step by step


weaving knot
 The weaving knot is very simple in execution, but it is able to tighten strongly under heavy loads and crawl under variable loads.
It is often used during rescue operations in the mountains while providing assistance to victims.
Step by step instructions for knitting a weaving knot
Bramstring knot
 Bramshkotovy knot is single and double.
Perfectly binds ropes of different diameters. When performing, you need to monitor the parallel arrangement of the strands and the correctness of the knot pattern.
academic node
 The academic node is a relative direct node.
Ideal for tying ropes of different diameters.
A loop is made with a thick rope, and a loop is wrapped with a thin one. Be sure to tie control knots for reliability.
Knots for tying and loops
These knots are used to tie the climber when organizing insurance and to form non-tightening loops.
Remember the beginning of the movie with Sylvester Stallone?
Bowline
 Bowline is used for tying to the main rope.
There are two options for knitting a knot. Traditional sequence and knitting with one end of the rope. The second option is more suitable for tying the chest harness harness.
A simple bowline needs to be fixed with a control knot, as it is prone to unraveling. This knot must always be tightly tightened.
Bowline knot step by step instructions


double bowline
 The double bowline was proposed by the mountaineering instructor Emelyanov E.B. for binding as particularly reliable.
When knitting it, a soft rope or half-rope about 5 meters or a 20 mm tape is used.
The knot is characterized by the presence of two self-insurance loops:
- At the end of the rope that enters the loops of the chest harness.
- This one is longer, at the end of which it connects the gazebo loops.
This knot allows, in the presence of self-insurance on a short loop, not only to dissolve the lower part of the gazebo, but also to remove it. This technique is used when there is a need to change clothes while moving along the rock (for example, take off).
Node Explorer
 The conductor knot has one indisputable advantage - the extraordinary simplicity of its knitting.
Sometimes we often use it in everyday life, not even suspecting that the knot is climbing!
Since the conductor tends to be strongly tightened under the influence of a load, it is recommended to insert a metal object into the plexus, which will simplify its further untying.
This simple knot can be made either at the end or in the middle of a rope. One of the nodes often used in rescue work.
Application:
- in the absence of a harness for tying to the middle of the rope;
- for tying ropes.
figure eight knot
 The figure eight knot is one of those knots that does not require control knots.
It is characteristic that it does not drag on and does not creep.
This knot is obtained as a result of an additional half-turn of the loop after knitting the initial stage of the conductor.
Step-by-step instructions for knitting a figure eight knot


Auxiliary nodes
This includes a number of nodes that are necessary when pulling the crossing and railings, when lifting a load or a person.
Knot (loop) Garda
 Knot (loop) Garda is applicable on a rope of any condition. Very easy to tie.
Used:
- when transporting the victim;
- for insurance.
Grasping knot
 The grasping knot has lost its position in the category of the main ones used for insurance.
This is due to the fact that in practice and during tests under extreme conditions, melting often occurred, or even worse, a break in the assembly. However, it does a great job when there is not much friction when moving very fast on the rope.
It is knitted from an auxiliary rope to the main one. There are two ways to knit it:
- loop;
- one end of the cord.
Tip: to increase reliability, you can knit three turns.
Bachmann knot and carabiner knot
 The Bachmann knot (Fig. a - c) can be easily pulled along the rope in the absence of load. Its reliability is manifested in any kind of work on the transportation of victims.
You can knit on single and double rope.
Step-by-step instructions for knitting a Bachmann knot
The carabiner knot (Fig. d, e) has the same characteristics and application as the Bachmann knot.
Stirrup
 The stirrup can be called universal knot, which is very easy to tie even at the end of the rope, even in the middle.
Once upon a time, the skill of a rigger was valued on a par with experienced navigators. They hunted for specialists in knots maritime companies, and on the ship such a person was valued much more than an ordinary sailor. Today, the skill of knitting knots is slowly becoming a thing of the past, but even the most basic skills of this ancient craft - knitting sea knots - can be invaluable in different situations.
Here are 10 knots that are indispensable both in the sea crossing and in everyday life.
straight knot
This knot was used by the ancient Egyptians as early as three thousand years BC, as well as the ancient Greeks and ancient Romans. A straight knot is two half-knots, sequentially tied one above the other in different directions. If the load on the connected cables is very large or the cables are wet, the knot is strongly tightened, but even wet and tightly tightened, it is untied very simply, in 1-2 seconds.

flat knot
It has long been considered one of the most reliable knots for tying cables of different thicknesses. Having eight weaves, the flat knot never tightens too much, does not creep and does not spoil the cable, since it does not have sharp bends, and the load on the cables is evenly distributed over the knot. After removing the load on the cable, this knot is easy to untie.

Eight
This classic knot forms the basis of a dozen other, more complex knots for various purposes. It can be used as a stopper at the end of the cable (unlike a simple knot, it does not damage the cable even with strong pull and can always be easily untied) or, for example, for rope handles of a wooden bucket or tub. You can even fasten the strings to the tuning pegs of violins, guitars and other musical instruments with a figure eight.

Portuguese bowline
It is used when you need to tie two loops at one end at once. For example, to lift a wounded person, his legs are threaded into loops, and with the root end (when knitting knots, they act as the so-called running ends of the cables, and those ends around which the running ends are wrapped are called root) around the chest under the armpits a half bayonet is knitted. In this case, the person will not fall out, even if he is unconscious.

Improved Dagger Knot
It is considered one of the best knots for tying two large diameter cables, as it is very simple in its scheme and quite compact when tightened. When tightened, the two running ends of both cables stick out in different directions. The dagger knot is easy to untie if you loosen one of the extreme loops.

Flemish loop
It is a strong and easily untied loop at the end of the cable, being tied in a figure eight on a cable folded in half. The Flemish loop is suitable for knitting on both thick and thin cables. It almost does not weaken the strength of the cable. In addition to maritime affairs, it can also be used for fastening the strings of musical instruments.

flemish knot
In fact, this is the same figure eight, but tied with two ends. The Flemish knot is one of the oldest maritime knots used on ships to connect two cables, both thin and thick. Even when tightly tightened, it does not damage the cable, and it is relatively easy to untie it.

Stop knot
This type of marine knot is designed to increase the diameter of the cable to prevent it from slipping out of the block, as it does not slip and holds securely. To make the stop knot even larger (for example, when the diameter of the hole through which the cable passes is much larger than the diameter of the cable), you can tie a knot with three loops. It can also come in handy when you need to make a convenient handle at the end of the cable.

noose
It has long been one of the most indispensable units in the sailing fleet. Logs were tied with a noose in the water for towing, it was used to load objects cylindrical in shape, loaded rails and telegraph poles. Moreover, this knot, proven by centuries of experience at sea, has long been used on the shore - not in vain on many foreign languages it is called "forest knot" or "log knot". The noose with half bayonets is a reliable and very strong knot, which is extremely tightened around the object being lifted.
In this article, we will start showing and talking about rope knots, their types and different ways their knitting, The information will be translated and updated as new video instructions are filmed. Sometimes knots haunt a person at every step, leaving the house, we tie a tie and shoes, in everyday life and in nature, we have to knit knots. Any fisherman or hunter already knows how to tie various knots for their needs. And in mountaineering or in the marine business, people simply have to be able to tie a dozen knots.
Knots exist for a variety of purposes and purposes, making loops that tighten or not, connecting ropes of the same or different diameters, for tying rope to various objects, and so on. But it takes practice to tie knots correctly. And it is better to abandon the knot, and use another one if you have any doubts about its knitting. We will start with the simplest knots, and with each new knot we will get closer to more complex knots.
simple knot
A simple knot used to connect ropes and is constituent element many knots, it can also be tied at the end of the rope to prevent it from unraveling. Perhaps this is the simplest of all knots and the smallest. But when the cable is pulled, the knot is strongly tightened and sometimes it is difficult to untie it. A simple knot strongly bends the rope, which reduces the strength of the cable by more than 2 times. But, nevertheless, this is the most popular node.

Straight Knot (Reef)
A straight knot is used to connect ropes of approximately the same diameter. It is not safe to tie ropes of different diameters with this knot, as a thin rope will tear a thicker rope. The direct knot was known as early as five thousand years BC in Egypt. And the ancient Greeks and Romans called him Hercules, because this is how the mythical hero Hercules tied the skin of a lion on his chest. The straight knot has four knitting options, but it is enough to know and be able to knit one of them. Control nodes are required at the root ends.

Hunter's Knot (Hunter's Knot)
In 1968, English doctor Edward Hunter (Edward Hunter) accidentally invented a knot that holds perfectly on cables and even on synthetic fishing line. In essence, it was a successful interlacing of two simple knots tied at the ends of two ropes. This invention caused a sensation in certain circles, and British patent experts issued a patent for this invention to Edward. The Hunter knot is held on all ropes, especially on soft ones, as well as on ribbons and fishing lines. Book author " Marine knots» L. N. Skryagin gave this knot a different name - “Hunting knot”, since the name Hunter is translated from English as a hunter.

counter eight
Another of the oldest knots for tying two ropes. This knot has another name "Flemish knot". This is a reliable and durable knot, it practically does not reduce the strength of the rope. To begin with, a figure eight is knitted at the end of one of the ropes, and then all the bends of the figure eight on the first rope are repeated with the running end of the second rope and passed towards the root end. After that, tighten. The counter eight is relatively easy to untie.

knot grapevine
Grapevine is the strongest of the knots designed for tying ropes of the same diameter. This knot has the lowest rope loosening ratio of 5%, other knots do not have such indicators. When tying the Grapevine knot, you can do without control knots, it still remains quite safe.

Knot Bayonet
This knot is a non-tightening loop that can hold a load acting in almost any direction. Another main advantage of this knot is that it can be easily untied even under load, which is very convenient. Make one and a half turns of the rope around a tree, post or even a stone. Lead the running end over the root end, bring it down and pass from under the root end into the loop formed (this is how you got the hose). Tighten and make another hose, and at the end be sure to tie a control knot.

Knot Quick Untie
The next knot can be named: pirate knot, bucket knot. This knot is quite secure if properly tied, and it can also be untied very easily and quickly by pulling on the running end. Recommended for temporary fastening, where you need to quickly untie the knot. Or it can be used in descending situations where you need to return the rope after descending by pulling on the running end.

Grasping Prusik knot
This knot is mainly used as a belay when descending or ascending a rope. In the event of a person falling off during the descent, this knot is tightened and prevents him from falling. And when climbing a rope, this knot can be used as a jumar. Pulling the knot up from the bottom, when loaded, the knot will tighten and hold the person. The knot was invented by Karl Prusik, president of the Austrian Alpine Club in 1931, and has proven itself in mountaineering and mountain tourism. But the knot does not work well on a wet and icy rope.

Austrian conductor
The knot is used when you need to make a loop in the middle of the rope, to create an anchor point in case of belaying, or if you need to separate the frayed section of the rope. This node also has other names: Alpine Butterfly, Middle Node, Median Conductor, Median Conductor.

Bowline knot ( Arbor knot)
This is one of the oldest and most popular knots. Bowline can be safely called the "king of knots" for its simplicity and reliability. This knot is knitted at the end of the rope and is a secure, non-tightening loop. The gazebo is used in maritime, mountaineering and tourism. It will also be very useful to be able to tie this knot with one hand, which can be useful to you in an emergency.

Shkotovy and Bramshkotovy knot
These knots are used to tie ropes, both of different diameters, and the same. Knots are fast and easy to tie. Control nodes are also required for these nodes.

Bunny Ears (Double Conductor)
This is a knot that resembles a double bowline. Hare ears form two non-tightening loops. This knot does not require control knots, but after a heavy load it is difficult to untie. It is used mainly in mountaineering and in the case when it is necessary to transport the victim down to a shallow depth.
Rope bottom harness
To overcome obstacles (descents, ascents, crossings, traverses, etc.) in travel, especially mountain trips, ropes, carabiners, safety systems and various knots are used. It is important for every tourist to know how it fits and where this or that knot is used. Nodes can be classified according to their purpose.
1. Knots for tying ropes of the same diameter: “straight”, “weaving”, “oncoming”, “grapevine”.
2. Knots for tying ropes of different diameters: "academic", "bramshkotovy".
3. Knots for insurance (non-tightening loops): “simple conductor”, “eight”, “middle Austrian conductor”, “double conductor”.
4. Knots for tying ropes to a support: “noose”, “bowline”, “stirrup”.
5. Auxiliary nodes: "grasping", "stirrup". The stirrup knot can be used in two cases, but the knitting methods will be different.
A “straight” knot can be knitted in two ways.
1. A loop is made with one rope (a), and the necessary turns are made with the second rope to get the knot, as in the figure (b). The running ends should be 15-20 cm long so that control knots can be tied (d). If one running end is on top and the other is on the bottom, or vice versa, then the knot is tied incorrectly. The running ends should come out either only from above, or only from below.
2. Two ropes are superimposed on each other and two simple knots are tied in different directions (c, d). If the knots are tied in one direction, then a "woman's knot" (e) is obtained. Next, control knots (d) are tied at the ends.
"Weaving" knot
Two ropes of the same diameter are taken, superimposed on each other, then the control knot is knitted first on one side (a), then on the other (6). Next, the knots are pulled together and control knots (c) are tied at the ends.

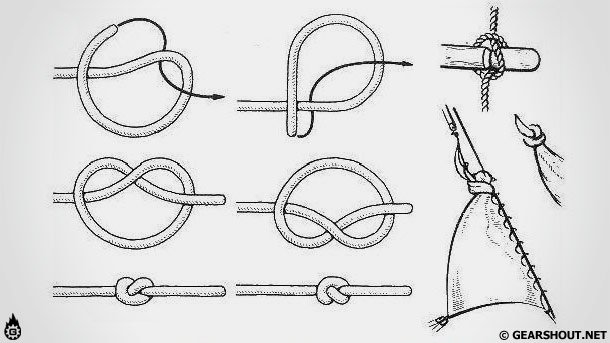
"Counter" node
We take two ropes of the same diameter, a simple knot is knitted at the end of one (Fig. 56, a), then with the second rope towards the running end of the first rope we completely repeat the knot so that it turns out to be double and the running ends come out in different directions (Fig. 56, b). After that, the knot is tightened, the control knots usually do not fit (Fig. 56, c).

Knot "grapevine"
Two ropes of the same diameter are superimposed on each other, a double control knot is tied, as it were, on one side (a), then the same on the other (b). The knots are pulled together (c). Control knots do not fit. The correct drawing of the node is shown in Figure (d).

"Bramshkotovy" knot
We take two ropes of different diameters, make a loop from a thicker rope, and wrap it with a thin running end as shown in the figure (a, b). Then the knot is tightened, straightened, and control knots (c) are knitted at both ends.

"Academic" node
We take two ropes of different diameters, make a loop thicker, and wrap the loop with the running end of a thin rope as shown in the figure (a, b). The knot is tightened, straightened, control knots (c) are knitted at both ends.

Node “simple conductor”
It is knitted with one rope, which is folded in half and a simple knot is tied at the end of it (a, b) to make a loop. A control knot is tied below (c).

Knot "eight"
Knitted with one rope. It is folded in half and a knot is tied at the end, resembling the number eight (a, b). The knot straightens, tightens. The control knot does not fit (c).

Knot “middle Austrian conductor”
The knot is knitted on one rope. The rope is taken by the middle, then, by turning 360 °, a figure eight (a) is formed from it, the top of which goes down and is dragged, as shown by the arrow in figure (b), so that the loop comes out. In order to get the correct knot (c), you need to stretch the ends of the rope in different directions. The control knot does not fit.

Knot "double conductor", or "hare ears"
Knitted on one rope. The rope is folded in half, a “dummy” is knitted on it (a), tightened (c) and tied so that it is untied if you pull it by the loop. In the case when the "dummy" is tied the other way around, the "double conductor" knot will not work. Then the lower loop is passed, as shown by the arrow in figure (b), so that two upper loops pass through it, and is pulled together by the upper loops to the knot (c).
A correctly tied knot is shown in figure (d). It is necessary to ensure that when tying the knot there is no overlap of the ropes. "Double Conductor" has no control nodes.

Node "noose"
The knot is knitted with one rope around the support. The support refers first to the running end, which serves to attach the rope, and then to its working end, which is directly used by the tourist (a). Next, the running end of the rope makes several turns around the working end (at least three and the control knot (b) is tied. Then the knot is tightened.

Stirrup Knot
The knot is tied with one end of the rope around the support. The running end of the rope is wrapped around the support, then knitted as shown in figure (a). After that, the knot is tightened and fixed with a control knot (b). If a stirrup knot is used when attaching to a support, it is tightened as tight as possible and the control knot is knitted as close to the support as possible.

The stirrup knot can be used as a fulcrum for the leg when lifting from cracks. It is more convenient than the "guide" and "eight", because it is easier to untie and it can be tied even with one hand (a, b).

Bowline knot
Knitted with one end of the rope around the support. Having retreated the required distance from the edge of the rope, make a loop by turning the rope 180 ° clockwise, then the support is surrounded by the running end (shown as a cross in the figure) and the end is threaded into the loop formed (a). Next step: a working rope is wrapped around the running end and threaded into a loop with reverse side(b). The knot is tightened and a control knot (c) is tied.

"Bowline" can be tied in another way, with the help of a "pacifier". To do this, instead of a loop, a “dummy” is tied so that it is untied when jerking at the working end, and not at the running one. The support is surrounded by the running end (a). Then it is carried into the “dummy” loop, and when the working end is pulled, the “dummy” loop, together with the running end, passes through the knot (b). On the resulting bowline knot, it remains only to tie the control knot (c).

"Grab" knot
The knot is tied with a cord (6 mm) on the main rope (diameter 10-12 mm). The cord is folded in half, the rope is wrapped around it (a, b). Then the operation is repeated (c, d). After that, the knot is tightened, straightened and a control knot (e) is tied. The control knot is not needed if the cord is previously tied into a loop with an “oncoming” or “grapevine” knot.

Sometimes a "grasping" knot is tied at one end of the cord. The rope is wrapped with one end of the cord twice in one direction, then in the other (a, b, c). Then the knot is tightened, straightened and necessarily fixed with a control knot (d).

Additional nodes
Node “dummy”
This knot can be used when tying bowline and double conductor knots, as well as an independent knot (for example, when tightening the top of a backpack). It is quickly and easily untied if you pull the ends in different directions.
Knitting method. The rope is taken by the middle and a simple knot (a) is tied, but instead of tightening the ends, a tightening loop is made (6).

"Marking" node
This knot is used to tie the rope after it is coiled.

"Bachman Knot"
The knot is a kind of "grasping" knot and can be used for the same purposes. For the carabiner, the knot can be led up and down, and with a sharp jerk, the knot is tightened. It is easily untied after unloading.
The cord is snapped into the carabiner (a), with the carabiner open, 3-4 turns are made (b), then the carabiner sleeve is twisted, the knot is straightened and tightened (c).
The knot is used to tie a rope to a support. It is used when the rope needs to be pulled off after a descent, for example.
A figure eight is tied at the end of the rope, a carabiner (a) is snapped into it, then the rope is wrapped around the support and the carabiner is snapped into the working (load) end of the rope. The clutch of the carabiner is twisted, and the knot is tightened (b).

Tourist knots
To overcome obstacles (descents, ascents, crossings, traverses, etc.) in travel, especially mountain trips, ropes, carabiners, safety systems and various knots are used. It is important for every tourist to know how it fits and where this or that knot is used. Nodes can be classified according to their purpose.
1. Knots for tying ropes of the same diameter: “straight”, “weaving”, “oncoming”, “grapevine”.
2. Knots for tying ropes of different diameters: "academic", "bram-sheet".
3. Knots for insurance (non-tightening loops): “simple conductor”, “eight”, “middle Austrian conductor”, “double conductor”.
4. Knots for tying ropes to a support: “noose”, “bowline”, “stirrup”.
5. Auxiliary nodes: "grasping", "stirrup". The stirrup knot can be used in two cases, but the knitting methods will be different.
"Direct" node can be knitted in two ways.
1. A loop is made with one rope (Fig. 54, a), and with the second rope the necessary turns to get the knot, as in Figure 54, b. The running ends should be 15-20 cm long so that control knots can be tied (Fig. 54). If one running end is on top and the other is on the bottom, or vice versa, then the knot is tied incorrectly. The running ends should come out either only from above, or only from below.
2. Two ropes are superimposed on each other and two simple knots are tied in different directions (Fig. 54, c, d). If the knots are tied in one direction, then a “woman’s knot” is obtained (Fig. 54, e). Next, control knots are tied at the ends (Fig. 54).
"Weaving" knot
Two ropes of the same diameter are taken, superimposed on each other, then the control knot is knitted first on one side (Fig. 55, a), then on the other (Fig. 55, 6). Next, the knots are pulled together and control knots are tied at the ends (Fig. 55, c).
"Counter" node
We take two ropes of the same diameter, a simple knot is knitted at the end of one (Fig. 56, a), then with the second rope towards the running end of the first rope we completely repeat the knot so that it turns out to be double and the running ends come out in different directions (Fig. 56, b). After that, the knot is tightened, the control knots usually do not fit (Fig. 56, in).
Knot "grapevine"
Two ropes of the same diameter are superimposed on each other, as if a double control knot is tied on one side (Fig. 57, a), then the same with the other (Fig. 57, b). The nodes are pulled together (Fig. 57, in). Control knots do not fit. The correct drawing of the node is shown in Figure 57, d.
"Bram-sheet" knot
We take two ropes of different diameters, make a loop from a thicker rope, and wrap it with a thin running end as shown in Figure 58, a, b. Then the knot is tightened, straightened, and control knots are knitted at both ends (Fig. 58, in).
"Academic" node
We take two ropes of different diameters, make a loop thicker, and wrap the loop with the running end of a thin rope as shown in Figure 59, a, b. The knot is tightened, straightened, control knots are knitted at both ends (Fig. 59, c).
Node "simple conductor"
It is knitted with one rope, which is folded in half and a simple knot is tied at the end of it (Fig. 60, a, b) to make a loop. A control knot is tied below (Fig. 60, in).
Knot "eight"
Knitted with one rope. It is folded in half and a knot is tied at the end, resembling the number eight (Fig. 61, a, b). The knot straightens, tightens. The control knot does not fit (Fig. 61, c).
Knot "middle Austrian conductor"
The knot is knitted on one rope. The rope is taken by the middle, then by turning 360 ° a figure eight is formed from it (Fig. 62, a), the top of which goes down and is dragged, as shown by the arrow in Figure 62, b, to make a loop. In order to get the correct knot (Fig. 62, in), you need to stretch the ends of the rope in different directions. The control knot does not fit.
Knot "double conductor", or "hare ears"
Knitted on one rope. The rope is folded in half, a “dummy” is knitted on it (Fig. 63, a), tightened (Fig. 63, in) and is tied so that it is untied if you pull it by the loop. In the case when the "dummy" is tied the other way around, the "double conductor" knot will not work. Then the lower loop is carried, as shown by the arrow in Figure 63, b, so that the two upper loops pass through it, and is pulled together by the upper loops to the knot (Fig. 63, in).
A correctly tied knot is shown in Figure 63, d. It is necessary to ensure that when tying the knot there is no overlap of the ropes. "Double Conductor" has no control nodes.
Node "noose"
The knot is knitted with one rope around the support. The support refers first to the running end, which serves to attach the rope, and then to its working end, which is directly used by the tourist (Fig. 64, a). Next, the running end of the rope makes several turns around the working end (at least three and a control knot is tied (Fig. 64, b). Then the knot is tightened.
Knot "stirrup"
The knot is tied with one end of the rope around the support. Running: the end of the rope is wrapped around the support, then knitted as shown in Figure 65, a. After that, the knot is tightened and fixed with a control knot (Fig. 65, b). If a stirrup knot is used when attaching to a support, it is tightened as tight as possible and the control knot is knitted as close to the support as possible.
The stirrup knot can be used as a fulcrum for the leg when lifting from cracks. It is more convenient than the "guide" and "eight", because it is easier to untie and it can be tied even with one hand (Fig. 66, a, b).
Bowline knot
Knitted with one end of the rope around the support. Having retreated the required distance from the edge of the rope, make a loop by turning the rope 180 ° clockwise, then the support is surrounded by the running end (shown as a cross in the figure) and the end is threaded into the loop formed (Fig. 67, a). Next step: the working rope is wrapped around the running end and threaded into the loop from the back side (Fig. 67, b). The knot is tightened and a control knot is tied (Fig. 67, in).
"Bowline" can be tied in another way, with the help of a "pacifier". To do this, instead of a loop, a “dummy” is tied so that it is untied when jerking at the working end, and not at the running one. The support is surrounded by a running end (Fig. 68, a). Then it is carried into the “dummy” loop, and when the working end is pulled, the “dummy” loop, together with the running end, passes through the knot (Fig. 68, b). On the resulting bowline knot, it remains only to tie the control knot (Fig. 68, in).
"Grab" knot
The knot is tied with a cord (6 mm) on the main rope (diameter 10-12 mm). The cord is folded in half, the rope is wrapped around it (Fig. 69, a, b). Then the operation is repeated (Fig. 69, c, d). After that, the knot is tightened, straightened and a control knot is tied (Fig. 69, e). The control knot is not needed if the cord is previously tied into a loop with an “oncoming” or “grapevine” knot.
Sometimes a "grasping" knot is tied at one end of the cord. The rope is wrapped with one end of the cord twice in one direction, then in the other (Fig. 70, a B C). Then the knot is tightened, straightened and necessarily fixed with a control knot (Fig. 70, d).
Additional nodes
Node "dummy"
This knot can be used when tying bowline and double conductor knots, as well as an independent knot (for example, when tightening the top of a backpack). It is quickly and easily untied by pulling the ends in different directions.
Knitting method. The rope is taken by the middle and a simple knot is tied (Fig. 71, a), but instead of tightening the ends, a tightening loop is made (Fig. 71.6).
"Marking" node
This knot serves to tie the rope after it is coiled (Fig. 72).
"Bachman Knot"
The knot is a kind of "grasping" knot and can be used for the same purposes. For the carabiner, the knot can be led up and down, and with a sharp jerk, the knot is tightened. It is easily untied after unloading.
The cord snaps into the carabiner (Fig. 73, a), with the carabiner open, 3-4 turns are made (Fig. 73, b), then the carabiner sleeve is twisted, the knot is straightened and tightened (Fig. 73, c).
"Carbine choke"
The knot is used to tie a rope to a support. It is used when the rope needs to be pulled off after a descent, for example.
A figure eight is tied at the end of the rope, a carabiner is snapped into it (Fig. 74, and then
the rope is wrapped around the support and the carabiner snaps into the working (load) end of the rope. The clutch of the carabiner is twisted, and the knot is tightened (Fig. 74, b).