Connection to remote access 1s. Connecting in the "Remote Desktop" mode
You can work with 1C:Accounting while at home, on vacation or on a business trip. Moreover, for this it is not necessary to buy expensive equipment, store the database in the "clouds" or carry it with you on a flash drive. You can organize access to your programs of the 1C:Enterprise 8 system using the new 1C:Link service.
The ability to connect to an accounting or trading program at any time and from anywhere is an advantage that needs no comment. With this opportunity, the accountant will be able to work while at home or in the country, the “mobile” employee will be able to place customer orders and write out documents directly “in the fields”, and the manager, leaving on vacation or a business trip, will control the work in the office.
To organize such remote access, you can transfer your databases to a virtual server, that is, use "cloud" technologies. But this method is not suitable for everyone. Firstly, traditional "cloud" services do not always support individual settings and improvements to programs, you have to abandon the usual ways of working and adapt to the stringent requirements of the Internet solution.
Secondly, users may worry about the safety of their information bases. And although most often these doubts have no real basis, for some enterprises they become a stumbling block. Not every company will agree to give business-relevant information to the "cloud". Focusing on the needs of such enterprises, 1C has developed an alternative solution to cloud technologies - the 1C: Link service.
How 1C-Link differs from cloud solutions
The 1C:Link service allows you to work via the Internet with applications installed in the office or at home. There is no need to transfer your databases to the "clouds", all information is stored on users' computers, and all improvements and settings of 1C:Enterprise 8 are saved. To quickly connect to the database, you only need a computer with access to the network.
The security issue is resolved as follows: the computer where 1C applications are installed is invisible over the regular Internet; user data is not stored on external servers. The transmitted data is protected by individual keys and certificates, which are stored only by users. The service provides a secure communication channel - a network tunnel through which the user gets access to his information. In addition, you can organize additional protection. To do this, you can independently set access for different categories employees. It is also possible at any time to disable access for one or all users at once. You can work through "1C: Link" with the programs "1C: Accounting 8, edition 3", "1C: Trade Management 8, edition 11", "1C: Document Management 8", "1C: Management small firm 8", as well as solutions created on their basis or independently in the "managed application" mode. Access can be configured simultaneously for several users, to several software products or infobases at the same time. You can do it yourself, or you can contact a partner of 1C.
How to independently connect the service "1C: Link"
Connecting the 1C:Link service is very simple - just register on the website www.link.1c.ru, download a special application and select the databases you want to work with remotely. The entire sequence of actions consists of five steps.
Step 1. Register on the site link.1c.ru and confirm the registration by clicking on the link that you will receive on your email address.

Rice. 1. Registration on the site
Step 2 On the computer where your 1C:Enterprise 8 is installed, download the 1C:Link Publishing Wizard installation file, and then open it from the 1C program.

Rice. 2. Installing "Publishing Wizard 1C: Link"
Step 3 Accept the terms of the user agreement and click the button Further. The wizard will offer to download the components necessary for the operation of Agent 1C: Link. Agree to the download by ticking the appropriate box.
After that, select a place to install Agent 1C: Link or agree with the suggestion. Click the button Further.
Step 4. In the new window, enter the username and password that you specified when registering for the program.

Rice. 3. Connecting the site to the service "1C: Link"
Then select the name of the site through which you will connect to your applications via the Internet (the site name is entered in the format "xxxxx.link.1c.ru"). Click Forward.
Step 5 In the window that opens, specify the name of the infobase to which Internet access is required.

Rice. 4. Selecting an infobase
Step 6 The wizard will report that it is ready to load the components necessary for the operation of Agent 1C: Link. Allow the download by clicking the button Install.
You will soon receive a notification that the installation is complete. A notification will appear on your computer screen.
Pushing a button Forward, you will see a list of databases that are available for remote work.

Rice. 5. Available working bases
At the same time, the "Agent 1C: Link" icon will appear in the system menu of your computer, through which secure access to your databases via the Internet will be provided.

Rice. 6. Icon "Agent 1C: Link" in the system menu
note: the list of databases available for remote work, you can change it at any time if necessary.
How to connect to a working database from a remote computer
To work with your databases via the Internet, open your website (xxxx.link.1c.ru) in the browser of a remote computer and enter the login and password specified during registration. IN personal account you will see all the databases that are available for remote work.

Rice. 7. Connecting to infobases from a remote computer
Click on the desired database and work in the familiar interface.
Connecting the 1C:Link service takes a few minutes. To do this is no more difficult than installing, for example, skype or registering on a social network.
Your work programs will be available to you from any computer with an Internet connection, in the usual mode, with all modifications and settings saved.
The service will provide a high level of connection security, and you will not worry about the safety of your data.
Work through "1C: Link" does not require additional costs. The service is already included in the package of information technology support services (1C:ITS).
if you have current contract 1C:ITS of the TECHNO level, you can connect Internet access to two information bases for free, and if 1C:ITS of the PROF level - to five.
It is often necessary to work with 1C databases from home or provide access to databases to some remote branch via the Internet. With the help of Hamachi, we can connect any computers over the Internet into a regular local network, use shared folders, printers and other devices.
Hamachi is free, there is a limit of no more than 5 users on the same network. But it is easily bypassed, because the number of created networks is not limited. For example, if you need to connect 8 remote users to the server via the Internet, we create 2 networks in Hamachi, add our server to each of them and 4 users to each network.
Hamachi setup instructions
We go to the site https://secure.logmein.com/RU/ and register our account. After you clicked "Register", a window will appear:
Select "Remote access to computers".
Next, enter your registration data and click "Continue". 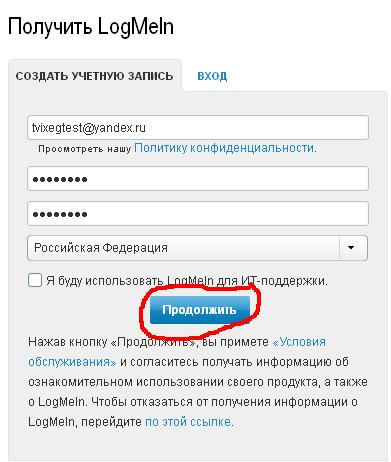
In the next window, he will offer to download LogMeIn, we do not need it, let's move on to setting up our account.
Next, go to "My networks" and click "Create networks". 
Set the network name, description and select the type of network. I chose a mesh network where every computer on that network would have access to every other computer on that network. 
Then click "Continue". In step 2, we will make requests to connect to our network require confirmation. In this case, the password to connect to our network is not particularly needed. 
Next, at step 3, click "Go to adding a client." 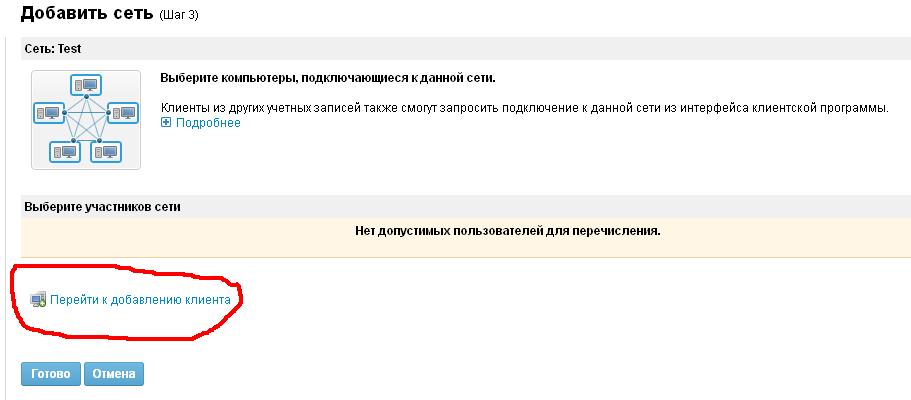
Next, select "Install LogMeIn Hamachi on this computer". 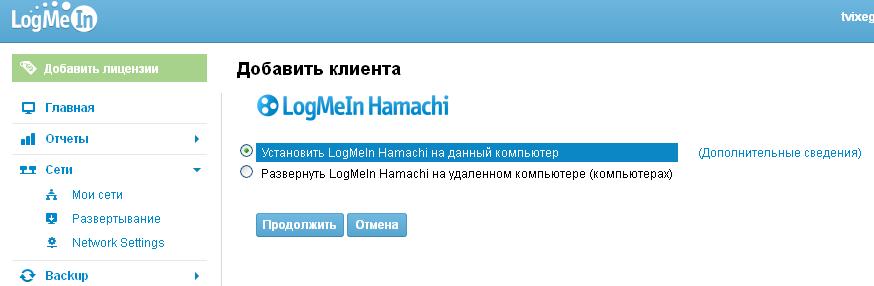
Next, download the distribution kit of the program. 
We launch it and install it. We go into the program, go to the "Network\Connect to an existing network" tab. 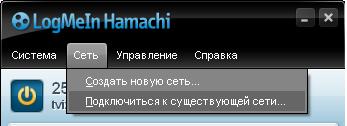
In our account, we look at the identifier of the network we created and enter it in the window that opens. 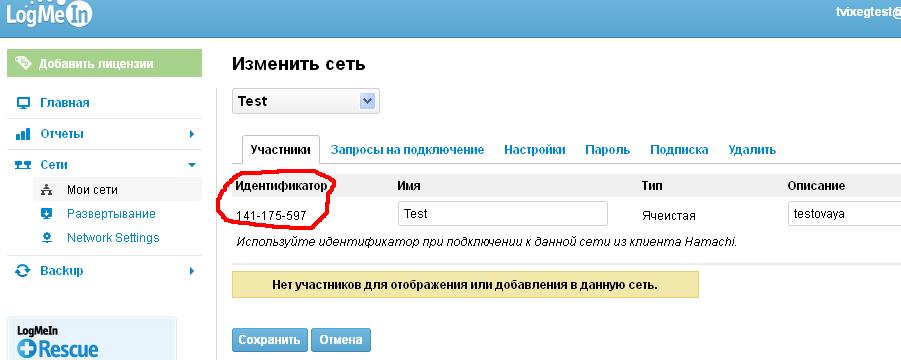

We agree to the request for membership. Then, in our account, next to the network we created, go to the "Connection Requests" tab and check the "Accept" checkbox. Click "Save". 
Thus, we have added one member to our network. Next, you need to install Hamachi on other computers, send a request from them to connect to our network, and accept these requests in your account.

After that, all these computers will be networked. We will be able to use shared folders, printers and other devices as if these computers were in local network.
There are several ways to connect to the 1C:Primary database. It all depends on the organization of the workplaces of your company's employees (whether they work permanently in the office, remotely) and the privacy policy. Consider all possible options.
Standard connection
- information base located within the local network
- computers at workplaces are powerful enough to operate the platform directly at the workplace.
What do you need to work
- Platform 1С:Підприємство should be installed at all workplaces
- The infobase must be located within the local network
- For the file version, access to a resource with an infobase for all workplaces must be configured
- For the client-server option - access to the server.
Advantages and disadvantages
In the file version of work, computing resources are distributed among workplaces, the “server” is only required to provide access to the infobase file; in the client-server version, the computing resources of both the server and client workstations are used. But in the case of "weak" computers in the workplace, this can lead to low system performance. The main disadvantage is that it only works within the local network.
Terminal connection
Suitable for your company:
- if the normal option cannot be applied to improve stability and speed
- system operation (only a “picture” is transmitted over the network, and not infobase data).

Used when:
- 1C:Primary is not installed on your computer. All computers are in the same local network, but the platform and infobase are installed on the server, and all users work "remotely" (used for more stable operation when there is a powerful server);
- The infobase is located on a remote computer outside the local network.
What do you need to work
Advantages and disadvantages
The main advantage is that it can be used when the infobase is located outside the local network. It can also be an advantage to increase the speed and stability of the system if all users working with the program through a terminal connection work directly on the server, because in this case it is enough to have one “strong link” (server) for stable operation. At the same time, computing resources at workplaces are used only for the functioning of a remote connection, and the entire load associated directly with the operation of the 1C:Enterprise application falls on the server.
Using remote administration programs
Suitable for your company:
- no other options available.
Connection to a remote computer on which 1C:Pridpriyemstvo is installed is carried out using special programs for remote connection, such as Radmin or teamviewer. After that, you use the program, as with a normal connection.
What do you need to work
For the computer to which the remote connection will be made, the possibility of this connection must be configured. To connect several users, a server OS must be installed on the remote computer that supports the required number of terminal connections, for example, MSWindowsServer. To connect one user, WindowsXP and above is enough.
In order to use TeamViewer to connect remotely, TeamViewer must be running on the computer you are about to connect to. After that, the user of the remote computer must tell you the login and password that TeamViewer will automatically generate. After that, by entering these data on your computer, you can connect to the remote one and run 1C: Enterprise.
Advantages and disadvantages
The advantage is usually the simplest and fast way connection to an infobase located outside the local network in the absence of a configured terminal connection. The main disadvantage is that the user cannot work at his workplace while his computer is controlled remotely. Also, the disadvantages include not always the correct scaling of the image at different screen resolutions of the connecting computer and the remote one.
Via web client
Suitable for your company if:
- your employees work all over the world (users connect to the database through a browser).

It is used only for working in the "1C:Enterprise" mode, starting from version 8.2. The connection is made through a browser. The web address of an infobase located inside or outside the local network is entered as the web page address. After connecting, the username and password of the user of the 1C:Primary database is entered.
What do you need to work
It is necessary that, in addition to the main infobase, a web server (Apache, IIS) be deployed, on which the infobase will be published. A browser must be installed at the workplace (MS Internet explorer, Mozilla Firefox, Google Chrome, etc.).
Advantages and disadvantages
Advantages:
- launching 1C:Primary does not differ from the usual for all Internet users entering a web page in a browser
- independence from operating system installed at the workplace;
- alternative to remote connections when using low-speed communication channels (such as GPRS and telephone modems).
Disadvantages:
- the functionality of the web interface differs from the functionality of the interface in normal mode and is not always sufficient;
- inability to work in the "Configurator" mode.
Combined Methods
Suitable for your company if: other options do not fit. However, such a connection is extremely inconvenient and time-consuming. Combined connection example:
- connect to a remote computer of the user of the organization through TeamViewer
- on a remote computer, we terminally connect to the server on which the platform with the connected database is installed
- after connecting to the server, run launch pad and go to base
Advantages and disadvantages Advantage that such a system can meet the requirements information security organizations when other options do not fit.
Disadvantages: duration and inconvenience when connecting. Discomfort while working.
Materials prepared by TQM systems. We are an official partner, we provide comprehensive services.
We are always glad to mutually beneficial cooperation.
Rated 5.00 out of 5 based on 4 ratings
In this article, we will consider in detail the simple options for providing remote access to your computer in relation to remote support and maintenance of systems based on the 1C Enterprise platform.
You can do this setting yourself without help system administrator, specialist in 1C. In the future, we will be able to connect to your 1C database instantly in order to quickly and efficiently solve any issue and any problem using 1C. At the same time, it is important that you see all our actions in the process, control our work, and you can disconnect the access session at any time. Thus, you no longer have to wait for a specialist, consultant, 1C programmer for weeks, and in the future, wait months for a solution to your problem. It doesn’t matter what version of the 1C Enterprise platform you have, what 1C configuration (Accounting, Payroll, Trade Management, etc.), using remote access, you yourself will directly demonstrate your problem.
The easiest and safest way to provide remote access to your computer is to use specialized programs.
The most popular remote access programs:
Let's consider each of them in more detail:
teamviewer
Perhaps the most popular program to date. You can download and run without installation. It is very convenient when you need high-quality 1C support, but your IT specialist is not available. Powerful functionality, free for non-commercial use. In this case, you do not need to worry about the license and cost, since we solve these issues.
Support a large number platforms (Android, iOS, Windows), so our specialist can help you even from the other side of the world.
To start using, just download the installation file for the Windows operating system from the official website http://www.teamviewer.com/ru/
After starting, inform our specialist of the values displayed in the fields "Your ID" and "Password". The connection will happen instantly. We will solve your problem according to 1C, in the future we will help you set up teamviewer for free for further use, set the necessary security settings and advise you.

Brief instructions for providing remote access to 1C through Teamviewer:
- Download file - TeamViewer
- Run without installation
- Tell us your ID and one-time password
Teamviewer functionality: remote control, file transfer, chat, audio conference, video conference, demo mode.
LiteManager
At first glance, a simpler program, but with good functionality. At the same time, an important plus is that it is free for both non-commercial and commercial use with a limit of no more than 30 computers. It consists of two parts: Server (server) and Viewer (program for connecting to the server).
It is possible to connect not only by ID (unique identifier), but also by the IP address of a computer on the network. There is an inventory function, screen recording, you can record all our actions and play back if necessary. If you need to purchase a license, the cost of the paid version is cheaper than that of competitors.
The interface looks less modern than TeamViewer's.


Brief instructions for providing remote access to 1C through LiteManager:
- Download server installation file - LiteManager for Win
- Run and install
- Tell us ID
Ammyy Admin
Reliable, simple and convenient alternative to "Team viewer"! Does not require installation and administrative rights, free for non-commercial use, fast and efficient. Ideal solution for remote connection to your computer.
To start using, just click on the "Get started with Ammyy Admin" button: 

After that, you need to choose a path to save the program file. The location of the file must be remembered for future use:

When the download of the program file is completed, you need to run it. To do this, open the folder where the save was made in the previous paragraph and run this file:

As soon as the "Ammyy Admin" program starts, you need to provide our specialist with the data from the "Your ID" field (marked with the number "1"). If you yourself want to connect to a remote computer, you must enter the data of the remote computer in the field marked with the number "2" and click the "Connect" button: 
Connection to a remote computer using the Ammyy Admin program has been successfully completed! 
Very often, users do not need full access directly to the computer on which 1C is installed, but they need to enter the 1C database remotely in user mode. It also sometimes requires access from a tablet, smartphone and other mobile devices. To do this, you need to install a web server and publish your database on it. How to do it in minutes read in