Publications. External printing forms constructor NEW beta (regular and managed applications!) External printing forms constructor 1s 8.3
As is known - without a paper.. no serious business can do without. And when we say that there are some electronic documents in 1C, the question immediately arises of how to print them in paper form.
The process of printing an electronic document 1C is called a 1C printable.
Each document can have several 1C printables. For example, the document Sale of goods and services (i.e. sale) is printed in 1C printable forms: TORG-12, Invoice, Waybill, Act of Services Rendered, and so on.
The essence of the 1C printable is a template (of the Excel document type) in which variables are set. During the printing process, the text from the electronic document is substituted for the variables. The template is usually stored in the configuration.
The problem of changing the standard 1C printing form is that it is usually not desirable to change the standard configuration, otherwise it will be more difficult to update. Therefore, various methods of using external printing forms 1C appeared and began to reinvent the wheel.
The external printing form 1C is a print template that is stored somehow separately from the configuration itself.
However, this is all theory. How to create your own printable? And even better - how to make changes to the existing one?
How a 1C document is printed
To print any 1C document (which can be printed) - you need to click the Print button in the document. 1C will prompt you to select a 1C printable for this document from the list.

To the left of the Print button, there is usually a button for quick access to the last selected 1C printable.
The print result looks like this. To print it to the printer, you need to put the cursor in the 1C printable, press Ctrl + P or the button with the printer on the button bar or in the File / Print menu.
Print settings (margins, paper orientation, etc.) are located in the File/Page Setup menu. Also in the user settings, you can make sure that printing is done directly to the printer.
Where does this printable come from?
Where is the printed form 1C
Let's go to the configurator. Find the desired document in the configuration window. Let's open its Layouts branch. It is they who turn into a 1C printing form when printing.

However, it will not be enough - we were offered to choose many more options when printing. The fact is that many layouts of 1C printing forms are hidden elsewhere.
Let's go back up the 1C configuration window. Open the General branch, and then the General Layouts branch. This is where most of the layouts are located. This is especially true for state-regulated printing forms 1C - TORG 12, Invoice, etc.
By the way, it is not difficult to notice that you will see several layouts of TORG12 or Invoice. Why? It's easy to explain. Laws and requirements change periodically. But we can't just change the same layout - and if we have to print the document from a date that is earlier than the date of the change. Therefore, several layouts are made and, depending on the date of the document, the correct one is used.

But that's not all! There are also external layouts. Where are they stored?
Let's return to the 1C Enterprise mode. Through the menu of a user with administrative rights Operations / Directories, select the External processing directory.

The lines of this directory, which look like a Printable, add printing options for the document specified in the table Accessory of the printable (in the picture, this is the Sale of goods of services).
In order for this to work, you must do an external processing that has in its object module a Print() procedure marked Export that organizes the printing process.
But we are getting ahead of ourselves. Let's first see how the 1C printable layout is organized.
Layout of the printed form 1C
The layout of the printed form 1C is as follows.

As you can see, it is divided into blocks. Blocks can be horizontal (name on the left) or vertical (name on the top).
The layout itself, in the form in which it is, is not printed. Individual blocks are printed. The programmer in the print processing procedure specifies the order of the blocks and the number of repetitions of each block. The result is a printed form.
To assign a region, select several rows (or several columns) and select Table/Names/Assign Name from the menu. To remove - there is also a Remove name command.

The name is needed so that the area can be accessed from the program code. The title can be assigned not only to rows or columns, but simply to several cells. To do this, select the cells and select the same menu.
However, by default, arbitrary cell names are not displayed. To see them, select the menu item Table/Names/Show named cells.
So, today we learned that the 1C printing form is formed using a layout. The layout consists of blocks - cleverly - named areas.
Typical (usually used) blocks for printing form:
- Header - displays the title of the document
- Line - one line of the table is displayed, this block is repeated as many times as you need to print lines
- Footer - displays the end of the document.
Now we need to deal with
Sandbox
burly man August 23, 2011 at 10:22 amLayouts in 1C 8.2 - it's not difficult (Part 1 - Creating a layout)
Let's say you need to display a report like this:
This report can be easily built using a data composition system (ACS), especially if all the necessary data is stored in one directory. However, let's try to display the same report using a layout.
To generate this report, you need one directory "Employees" with the details "Date of Birth", "Position". Let the last name, first name and patronymic of the employee be stored together in one default field - "Name". To specify the position of an employee, there is another simple reference book "Positions" with default fields. The structure of the required directories is shown in the figure below.

Now let's create a new report and call it EmployeeList. Let's go to the "Layouts" tab and create a new layout of the "SpreadDocument" type.
An empty spreadsheet document will open in front of us, ready to work. Now we need to present the necessary report in the form of a layout.
To do this, we first copy the original report into a blank spreadsheet document, i.e. to the report layout. You will get something like this:

Let's put the layout in order - we will align the headings in the center, set the display of borders for the table and delete all data from the table, except for the first record. We will have it as a sample.
Let's break the finished report into areas as follows:

For each area, you need to assign an appropriate name, for this you need to select the desired area (in this case, all areas are groups of lines) and click on the button with the icon, or the key combination Ctrl + Shift + N. In the window that appears, enter the name of this area. Let's name the regions as they are shown in the figure.
Now those table cells in which data from the infobase should be displayed must be designated as containing a template. To do this, this field is selected, and "Properties" is selected in the context menu (right mouse button). In the drop-down list of the "Fill" cell properties, select "Template" (an example in the figure below).

After that, if an expression in square brackets is found in the text of the cell, then it will be perceived by the 1C system as a parameter. For example, if the cell text is as follows:
My name is [MyName],
Then to display the text "My name is Ivan" is enough parameter "My name" assign the value "Ivan".
In our case, the template will be the report output date, as well as all columns from the row containing employee data. As a result, after all the manipulations, the report layout will look like this:

This completes the layout. Now you need to programmatically generate a report from the generated areas and display it.
Tags: 1C 8, layout, reports, layouts
This article is not subject to comments, since its author is not yet
Colleagues!
We continue the topic of reporting in 1C. Recently, our client had a problem transferring documentation from 1C 8.3.
Entering additional information into the printed form, numbering the print sheets, indicating the date, time and the user who issued the report.
We covered a similar example in the 8.2 configuration in the previous release. Now we will look at the print settings that allow all this to be done in the 8.3 configuration.
Moreover, much of this is automated in 8.3.
So, how can you include the above information in print? What should be done in this case?
We offer our overview of options, perhaps it will also be useful to you.
Option 1. Directly from the printed form of the generated report or document:
You form a printed form of the invoice for payment and call it through Ch. menu - Table - Printing preferences - Headers and footers and set up as needed.
This is done one-time for any FORMATED printing form.

Setting up header fields

Pay attention to the icons in the upper left corner of the form:
![]()
This is in order: page number, number of pages, date and time. Move the mouse to the desired location in the header or footer and click on the desired icon. After clicking on the OK, when printed, this data will be displayed in the printed form where you specified.
Option 2. Configured for any printing (reports, documents, certificates) from the program
If you do not want to set up headers and footers manually each time, then you can configure the general view of headers and footers for printing through the Administration - Header and footer settings section.
It looks like this:

There are more opportunities for displaying information in printed forms: the data "Report Name" and "User" are added. This is just our case.
The selection of data in the headers and footers is carried out as described in option 1, only instead of icons we select the text buttons "Time", "Date", "Report Name", etc. But the essence of this does not change. After Specifying the necessary information in the right places of the form, the setting is saved.
When printing a form, all the specified data will be displayed in it.
Option 3: Editing the Layout in User Mode
Why am I also considering this method here, which has its own functionality and which, strictly speaking, does not apply to the topic under consideration.
Because it often happens that you have to use a combination of this method and print settings to achieve the desired result. Editing printable layouts allows us to draw some things we need right in the layout of this printable.
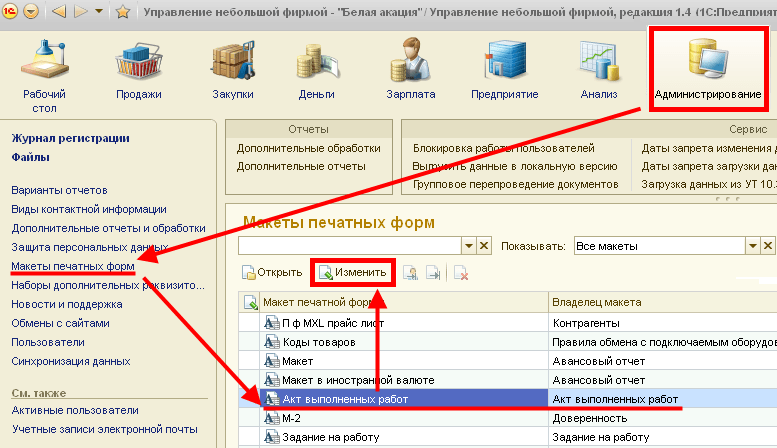
Layouts are changed in the section Administration - Print forms, reports, processing - Print forms layouts.
Here is an example of editing the Invoice-Order layout (invoice for payment to the buyer document):

We select the layout, indicating at the entrance that we will edit it and add some text information to the end.
For example, like this:

We save the changes and form the printed form.
And we print with changes.
But the possibilities for such editing are limited.)

So option 3 is convenient to use for entering information permanent, unchanged, everything else will require the completion of the printed form by the programmer.
But often this is enough. 🙂
Life goes on, legislation changes, the developer releases configuration updates, and again we have a choice: install the update ourselves or call the programmer again to “deliver a new release” ...
Let's get acquainted with the mechanism of changing printing forms without changing the configuration.
In the practice of every accountant using 1C, there has ever been a need to refine the configuration for themselves: who corrected the accuracy of the price or amount in the incoming invoice, who inserted the logo and corrected the appearance of the outgoing invoice. Everything would be fine, but there are a lot of such changes over time, and when the time comes to update the release, a dilemma arises: either lose all the changes made, or call the programmer to transfer all the changes to the new release (of course, for an additional fee). How to be? In order to somehow simplify the updating of configurations, the developers created a new mechanism: "External processing, printing forms, processing for filling out tabular parts." Today we will consider only a part of this mechanism - printing plates.
Any subject is best learned by example. Let's set ourselves the following task: to add to the configuration the ability to print an invoice (document "Sale of goods and services") with our company logo. In addition, it is necessary that in the header of the document the inscriptions "provider" And "buyer" were highlighted in bold and finally, it is necessary that at the bottom of the document there is a place for the signature of the security service that allowed the shipment.
We introduce two additional conditions:
- The new printable should replace the old printable. "Invoice"
- We can't change the configuration because we want to use auto-update configuration in the future
Well, what is the task? Seems too complicated? Well, the more difficult it is, the more interesting, and the more you want to solve it. Then get to work.
We start our database in the Configurator mode. Open the configuration by selecting the command from the main menu "Configuration > Open Configuration". In no case will we change the configuration itself. We will use it as a prototype. We will do the main work here, but we will edit external processing. Create an external processing command in the main menu "File > New". Choose the type of document "External Processing". For the first processing, set the name "Company Invoice"
Important! The processing name must not contain spaces, just like variable names.
Now let's do a little "plagiarism". Let's copy the layout "Invoice" from document "Sale of Goods and Services". To do this, find it in the branch "Documentation" configuration tree. Expand this branch by clicking on the icon «+» and find the layout we need "Invoice"(it's in the thread "Layouts"). In order to copy this object, you need to select this layout in the tree and execute the command "Edit > Copy"(the same action occurs by combination CTRL+C). Now let's go to the processing we created, select the label in the tree "Layouts" and in the main menu, select the item - Edit > Paste (CTRL+V). The result should look like Figure 1.
Now double-click to open the layout.
What is a "layout"
Let's say a few words about the purpose of the layout.
Layout- storage "building blocks", areas from which, like bricks, a spreadsheet document is built, which we used to call a printed form. Areas are defined using horizontal and vertical sections or their intersections. Our layout only has horizontal sections: "Header", "Supplier", "Buyer", "Table Header", "Line" (see Fig. 2). Area - a set of cells. As in MS Excel, cells can be merged, text and background colors, fonts, and so on can be changed. All cell settings can be viewed and changed in the cell properties window. You can call the settings window by right-clicking on the cell and selecting the context menu item "Properties"(the same result is achieved with the keyboard shortcut Alt+Enter).
A cell can contain one of three types of value:
- text– a value of this type will be printed in the same form;
- parameter– a cell of this type contains the name of a variable, the value of which will be printed.
- sample– cells of this type are a combination of the first and second options. A cell can contain text and variables. In order for the program to distinguish text from a variable, variables must be enclosed in square brackets: "Today is [Date]".
Important! The table editor displays the value of cells of the second and third types in triangular brackets. In figure 2, a cell with text "Buyer"- has the form of text, and to the right of the cell "Introducing the Buyer"- parameter.
Why am I telling all this? Now you know in which cells you can easily change the contents, and in which it is undesirable to change something, since you will need to make changes to the printing algorithm.
Let's return now to our task. We have created processing, copied the layout and are ready to modify it for ourselves. First, let's take a closer look at it.
What's in the Print Layout
The layout structure of all documents is very similar. By carefully examining one document, we can deal with others. First section "Header". When this section is displayed, the title of the document will be generated, consisting of the type, date and number of the document. Sections follow. "Supplier" and "Buyer", in which the program will display information about the supplier and the buyer, respectively. More interesting section "Additional information", which developers use to display other information about the document, for example, information about the contract with its number and date. The peculiarity of this section is that it can be displayed many times, and each time it can contain different information. What exactly and when to output is described in the printout algorithm.
This completes the header of the document. The header is usually followed by a tabular section. Interestingly, the layout describes two options for displaying the tabular part: "Table Hat", "String" and "HatTablePlaces" And "StringPlaces". Depending on whether the column is filled or not "Places" in the document, the first or second output option of the tabular part of the document will be used. The curious reader must have already wondered: why in the output section of the header "Price" And "Sum" are enclosed in triangle brackets, as if they were variables? So it is, these are variables in which, depending on the settings of the document, the inscription will be displayed "Price", "Price with VAT" or "Price without VAT" and similarly for the sum.
Well, below in the layout there are sections with the help of which the results of the document and the signature are displayed.
Editing the Layout
The logo would be nice to place above the information about the supplier and the buyer. I suggest editing the layout area "Header". You need to reduce the size of the cell with the content "HeaderText". This cell is made up of several merged cells. Change the size as follows:
- Prudently copy the contents of the merged cell "HeaderText"(to do this, select the cell and use the command Edit > Copy or CTRL+C)
- Having selected this cell, select the item in the main menu "Table - Merge", which will lead to the opposite effect - the merged cell will be split into many original cells
- Now let's select a smaller number of cells - instead of the cell of the 2nd column, we will start the merging from the 6th column, ending it on the column 32, - and again click on the button "Combine"
- team Edit > Paste (CTRL+V) paste the contents of the old merged cell into the new merged cell
- We will simply clear the freed cells in columns 2 - 5 (select and press the Delete key)
Now you can insert a picture with a logo in the vacated space. To do this, select the menu item “Table > Pictures > Picture…”. Find a file with our logo on the disk and click " OK". Now let's move the picture to the vacant place. The result should look like Figure 3.
Now let's bold the value in the cells "Provider" And "Buyer"(Fig. 4). To do this, in the properties of the cell, find the parameter "Font" and make it bold.
And finally, it remains to add the signature of the security service. This information will be placed in the section "Signatures". To get a place for signatures, you need to move the section apart. Select line 37, right-click on it and select "Push apart", and so twice. In one of the added lines, we will place a place for the signature of the security service. As a result, everything should turn out as in Figure 5.
Important! The typical configuration uses two languages: Russian and Ukrainian. The layout stores the representation of the text in both languages (the cell design is common). In order to enter the Ukrainian version of the inscription we added, you need to go to the properties of the cell and in the field "Text" push the button "search". A window will open for entering the representation of the text in different languages (Fig. 6).
How to ensure printing
So, the layout is ready. Now it's just right to do the algorithm for printing it.
In order for us to painlessly integrate this layout into the configuration and use it, the processing that we created must satisfy the following conditions:
- Need to create props in processing "ObjectReference" with type "AnyLink"
- You need to create a procedure in the processing module "Print() Export" without parameters and be sure to specify the keyword " Export"
The first item is needed so that the print algorithm knows where to get data for printing, and the second one is the print algorithm itself. Let's fulfill these conditions.
On the window panel, select the editing window for our processing (in Figure 7). A window with a tree of objects of our processing will open. Choose a branch "Requisites" and press the button "Add",. The property properties window will open. Enter the name - "ObjectReference" and specify the type "AnyLink". Now we can move on to the text of the print module. We will not write it from scratch, instead we will copy it from the document "Sale of Goods and Services".
To do this, we find in the configuration tree among the documents "Sale of Goods and Services", right click on it and select "Open object module"(See Figure 8).
This will open the document module. We need the first function "PrintDocument". Its text must be selected and copied. It is very convenient to select the text of the function when it is collapsed, but you must also select the line below it, otherwise we risk copying only the title.
See in Figure 9, we've highlighted the heading and the line below it. After that, copy to clipboard. Main menu Edit > Copy (or CTRL+C).
We remembered the text in the clipboard, now we go back to our processing "Company Invoice". Click on the button "Actions > Open Object Module"(Fig. 10).
Paste the copied text: Edit > Paste (or CTRL+V).
Now it is necessary to slightly straighten the copied text, since it was written for printing the document from the document itself, and we are going from external processing. For this you need:
- Rename function to "Print"
- Replace "ThisObject" on "ObjectReference"
- Replace "ThisObject" on "ObjectReference"
- Replace "Bank Account Organization" on "ReferenceToObject.Organization's Bank Account"
- Replace "Products. Result" on "ReferenceToObject.Products.Result"
For these actions, you can use the main menu item "Edit > Replace".
After that, be sure to check the syntax. To do this, there is a magic combination CTRL + F7. As a result, a message should appear: "No syntax errors found!"
Well, on this we have completed all the dirty work. Now we can save the results of our labors in a file, for example "Company Invoice.epf". To do this, you need to make the window of this processing active and save it using the main menu of the program "File > Save As...". Processing file name - "Company Invoice.epf"(it will be offered by default). You can save it temporarily to your desktop so that you can find it later.
Important! As you can see, we did not make any changes inside our configuration. For all the above actions, you don’t even need to remove it from support (that is, enable the ability to change).
We connect external processing to the configuration
Now we can connect processing to our invoice. To do this, start in mode. We go to the menu "Service", where there are three points related to the mechanism "External processing, printing forms, processing for filling in tabular parts". In our case, we only need the item "External Printing Forms"(see fig. 11).
This will open the directory. "External Processing", with selection by type "print forms". It will store a list of all external printing forms with the provision of what documents they are for and in what cases they need to be shown.
Important! The processing itself will be stored in the database along with other data, that is, after saving the processing inside the database, we will not need an external file.
We need to create a new element in the directory. Click Insert. Now consider the content of the element. In the name we make a meaningful brief description of the essence of this form, for example, "Company Invoice". Like any other reference book, it also has a code. Let's leave it by default. The view attribute is filled in by default and cannot be edited – "Print form". And the last attribute of the header element is a comment. Here, as usual, in more detail about the purpose of the printed form. In addition to the header, the elements of this directory have two tabs. The second contains information about restricting access rights to this processing. This topic is beyond the scope of this article (we will talk about this and other access rights settings in the configuration without finalizing it in one of the next issues).
Let's take a closer look at the first tab.
The tab contains four columns. Object representation– the type of document for which we would like to use our printable,
Selection– the condition under which this printing form should be available. For example, we have redesigned the printed invoice form and translated it into English. And we want for clients from the folder "European" instead of the standard printable "Sales Invoice" a new form was printed, in English. To do this, you can use the column "Selection". An example of such a selection is shown in Figure 13.
But in our task, no selections are needed.
Printable file- specifies the file from which to take the layout and printing procedure. In this cell, you need to select the file we saved on the desktop.
Replaceable printing plate- if we want the printed form we created to replace one of the standard ones for this document, then we need to specify which one needs to be replaced. If there is nothing to select, an additional printable will appear.
In our case, we need to "Company Invoice" printed in place of the regular invoice. To do this, select in this field "Sales Invoice".
We all now save this element. And open any invoice.
It should look like Figure 14.
Well, on this the task that we set ourselves at the beginning of the article has been completed. We believe that we have succeeded in illustrating the possibilities that the use of the external processing mechanism opens up for the user.
To consolidate your skills, you can try to add to the configuration an additional printable “To warehouse” for the document “Receipt of goods and services”, which would repeat the usual invoice, but without prices and amounts, and would also contain fields for entering the accepted quantity.
It is carried out in accordance with the standard layout of the printed form built into the application by developers (it is called the "supplied" layout).
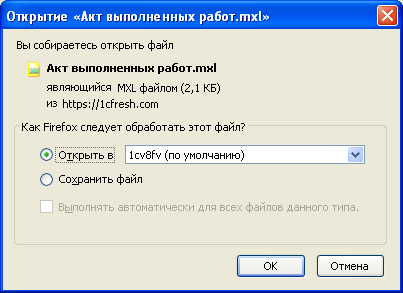
If necessary, you can change the standard layout and, in the future, print the document based on your personal ("custom") layout. To edit the layout of the printed form, a mechanism for uploading to a local computer is provided. The layout is edited in the local version of the 1C:Enterprise application (in particular, you can use the free application 1C:Enterprise - Working with files).

Follow the steps below to change the printable layout.

Editing the layout of the printable is completed, when printing the document, the layout to which the changes were made will be used.

If you would like to return to the previous printable layout, click the button Use Standard Layout. In this case, the edited layout will still be present on the server, and it can be re-enabled by pressing the button Change.
We wish you pleasant work!
How to insert a company logo into the layout of the printed form?
Let's give a specific example of editing a printable layout Invoices for payment, namely, consider how to insert an image into it, for example, a company logo (this image must first be prepared and saved as a graphic file, for example, in png or jpg format).

Thus, now the invoices for payment that you prepare for transfer to your counterparties will have your company logo. In order to add the logo to other documents, you will need to repeat the described steps for the corresponding printed forms of these documents.
We wish you pleasant work!