Program 1c accounting 8.3 for retail. Tenders for corporate projects
Send this article to my mail
In this article, we will consider the basic settings and directories that must be filled out for retail sales in the 1C Retail program, edition 2.2

So let's get started. Let's start setting up 1C Retail 8.3 from scratch by filling in information about the organization on behalf of which documents will be drawn up. Section Administration → Organizations and finances → List of organizations. We create a new element of this directory and fill in the information: account information, responsible persons (along the way, you will have to add them to the directory Individuals) and contact information.

If you plan to keep records of several organizations in the database, then you will need to check the Several organizations checkbox and create a separate card for each.
Let's set up the price types that will be used when running the store (Marketing → Price types). For example, the purchase prices of goods and materials and the selling prices for retail sales.

The next step in setting up 1C Retail 8.3 from scratch is to add information about the retail store (NSI → Stores). We enter information about the warehouses that are in the store and the pricing rules, the types of prices entered at the previous stage will come in handy here.


Now he will move on to adding users and assigning them rights to work with the database (Administration → Users). Since the first user is automatically added to the administrators group with full rights, you must first add the system administrator, and then you can enter the rest of the organization's employees who will work with the database.

To assign rights to these users, we create access groups by selecting the access group profiles already configured in the system (it is in the profiles that the rights to work with the database are indicated) and adding the corresponding users as members of the group.

When setting up 1C Retail 8.3 from scratch, the obligatory step is to connect the workplace equipment (Administration → Connected equipment). Set the flag Use connected equipment and follow the link.

Here we add the equipment that will be installed in your store. Select Type and fill in the basic information. By clicking the Configure button, we go to the window for filling in the parameters. By default, they are already installed, you can simply check them and do a Device Test. If you do not have a device driver installed, the system will prompt you to install it.

All equipment is configured in the same way.
Next, we proceed to fill in the list of goods. Preliminarily check and set the parameters for accounting for the item you need - characteristics, series, packaging. They are located in the Administration → Item settings section. Next, in the NSI section, enter the Item types that you plan to use and set the accounting parameters in them. And only after that we proceed directly to filling out the Nomenclature reference book (it is also located in the NSI section). To begin with, you can enter only those items that are in stock balances, the rest can be entered as needed. Here you can create separate groups for your convenience.
New positions are added using the Create command. After selecting the item type, some of the fields will be filled in automatically, you will need to fill in the rest of the details manually. To enter additional data on goods and materials (characteristics, barcodes, packages), go to the appropriate reference using the Go command.

Please note that if you are planning to keep records of alcoholic beverages, then additional system settings will be required, including you will need to compare the nomenclature reference book with EGAIS data, for more information on this issue, see the article Organization of work and setting up EGAIS in 1C Retail 2.2
Next, we indicate the cost of the introduced goods, this is done in the Marketing → Item prices section. In the new price setting document, you must assign a cost to items in the Nomenclature directory by price type.

After that, you can start entering the balance of goods in warehouses (Warehouse → Posting goods). We create a new document, specify the posting warehouse and fill in the list and prices of goods that are already stored in the warehouse.

Also at the initial stage, you can make the main suppliers. You can add them in the NSI → Counterparties section. You can fill in the information using the Fill in by TIN command.

Having made all these settings and entered the specified data, you can already start working in the store, but we will also focus on the interface of the cashier's workplace (Sales → RCC Settings). Here you can set the panel of quick products, hotkeys, the appearance of the RMK, etc.
Short description:It is necessary to finalize the RMK in 1s: Retail with minimal intervention in the configuration and with maximum ergonomics.
Description of software and structure:
Configuration: 1s:Retail 2.2 (2.2.7.39)
Compatibility Mode: Version 8.3.10
Platform: 1C:Enterprise 8.3 (8.3.11.2924).
RIB for 15 kiosks (shops) and one central base
Kiosks do not have a full keyboard (only numeric keypad and mouse)
Tasks:
1. When you click on the "Recovery" button for the user, display a form with the buttons "Collection", "Salary", "Other purposes".
Then the result of pressing the button is recorded in the "comment" field of the formed recess.
2. Add the "Order" button to the RMC. By clicking on the order button, display a form with an assortment (according to the assortment matrix) and automatically calculated recommended quantities, as well as a separate column "To order", in which the user himself indicates what quantity to order. Next, you need to request confirmation from the user about the order with the display of non-zero positions "to the order" and, after confirmation, create orders (either to the supplier or for transfer - each position has its own source of supply).
2.1. Rules:
a) automatic calculation of the need to form from:
- sales statistics adjusted for days with a zero stock balance
- the rest of the goods in stock
b) Prices for the order to take from the latest receipt
c) The source of the order provision must be obtained from the last source (if the goods arrived earlier by transfer, then the order must also be formed for transfer)
d) When re-forming an order, previously unsecured orders must be taken into account and displayed to the user.
Additional requirements:
1. All of the above must be done so that when making changes to the calculation algorithms, there is no need to update each database separately (initial implementation is not taken into account). Note: To the best of my knowledge, the compatibility mode used does not support extensions.
2. All of the above must be done so that the interface and the principle of operation are as clear as possible to a user who is not familiar with 1s.
We propose to consider how the process of retail sales takes place in a non-automated outlet based on the program 1C 8.3 Accounting, edition 3.0.
A non-automated outlet (NTT) is a retail facility that does not have the ability to directly access the 1C database. This could be a retail store, kiosk, marketplace, or outreach.
Reflection of retail sales involves the creation of several related documents. It:
Receipt of goods.
Price setting.
Move.
Sale from a retail warehouse in NTT.
Collection or receipt of proceeds.
Retail goods are sold from a retail warehouse. Where it gets by moving from the wholesale warehouse. Let's first analyze the receipt of goods. This process is registered by the document "Receipt of goods and services". The following fields are filled in the header:
Invoice No. - supplier's document number.
Original received - check the box if the supplier has presented the original documents for the supply of goods.
Number and date - are formed automatically in order.
Organization - if one organization is registered in the accounting policy of the 1C program, then the field is filled in automatically or is absent. And if accounting is maintained, for example, remotely via 1C in the cloud for several organizations, then we select the required company from the directory.
Warehouse - indicate which warehouse the consignment of goods falls to, is selected from the directory. As a rule, this is the "Main Warehouse" or "Wholesale Warehouse".
A counterparty is a supplier organization. Choose from the directory of contractors or create a new one.
Agreement - is substituted automatically after selecting a counterparty.
Invoice for payment - selected from the journal, if it was previously issued. If not subscribed, then the field remains empty.
Settlements - this item can be configured depending on the type of settlements with the counterparty. Just click on the link and specify the desired type.
The consignor and consignee is a link, by clicking on which it is possible to specify or change information. It is used when the data differs from the declared ones.
An item with VAT is displayed automatically based on the parameters entered in the counterparty card and accounting policy.
The tabular part of the document can be filled in any of the following ways:
Through the "Add" button. Each product is individually selected from the nomenclature and the quantity is manually specified.
Through the "Select" button. In this case, goods with the required quantity are selected from the nomenclature and transferred to the document in bulk.
After adding the product, if necessary, you can specify information in the columns "Custom declaration number" and "Country of origin".
After entering all the data, we check and carry out. If the supplier has provided an invoice, you must register it by entering the number and date in the appropriate field at the bottom of the document. The item has been credited. Now you need to set the price at which it will be sold. To do this, there is a special document "Setting item prices". It is located on the Warehouse menu tab. The document is filled out manually. The 1C program has the ability to massively set prices directly from the receipt document, which is very convenient and saves time. We go into the created document "Receipt of goods and services" and press the "Create based on" button. In the drop-down list, select the item "Set item prices". A form will open filled with basic data. All you need to do is select the price type in the corresponding field.
On the basis of the receipt, you can create several documents "Setting item prices" with different types of prices (if it is not possible to enter all the necessary types of prices).
The form has an item "Register zero prices". If the checkbox is checked, then it is better to uncheck it. Otherwise, for goods for which a new cost has not been established, a price with the value "0" will be registered. It is unacceptable.
You can correct the price value (increase or decrease by %) using the "Change" button. The cost of the goods is assigned, it can be moved to the outlet. It can be NTT or a trading floor. The process is formalized through a special document "Movement", the log with which is located on the menu tab "Warehouse". This is useful if you need to move a small number of positions. During a mass transfer, a “Movement” is usually formed from the receipt document through the “Create Based on” button. All filling takes place according to the document-base, it remains only to set the type of the recipient warehouse and manually enter the number of items to be moved.
Based on the receipt, you can create several Transfer documents to different warehouses. The quantity is edited manually. If you suddenly made a mistake and indicated more than what is in stock, the program will generate an error displaying the name of the product.
Now you can sell the goods. If sales are carried out from the “Trading Room” warehouse, then at the end of the working day, a “Retail Sales Report” is generated. All sold items will be listed here. The report is created for the warehouse, which you need to select yourself, reflecting the revenue:
Fields to be filled in:
Warehouse – for which warehouse the report is generated.
Article DDS - it is necessary to indicate "Cash receipt retail revenue".
Cash account - an account for which revenue is recorded.
If necessary, you can enter the "Account Account" and the Income Account, if not automatically substituted, and subconto.
To report retail sales at a manual outlet, you must first take inventory. We go to the menu tab "Warehouse" and select the item "Inventory of goods". The document header indicates the warehouse and organization. Adding goods in bulk is carried out through the "Fill" button. From the drop-down list, select "Fill with inventory balances". The tabular section will display the entire nomenclature that is listed in the specified warehouse. After recounting the goods, the existing balance is entered in the column "Actual Quantity". The column "Deviation" will reflect the amount of goods sold.
After the inventory, directly from the document, through the "Create Based on" button, we form the "Sales Report". But the report will not be carried out until the receipt of revenue is registered in 1C. To do this, go to the menu tab "Bank and cash desk" and form the document "Cash receipt".
Fill in the fields:
The type of operation is retail sales.
Warehouse – which warehouse was used for sales.
Amount - the amount of revenue.
In the tabular section, add a line indicating the amount of payment and the article DDS.
We carry out the document. After that, we return to the sales report and post it.
The first step in setting up the 1C: Retail 2.2 program will be the creation Organizations. To do this, go to the point Regulatory Reference Information (NSI), select in the navigation bar Organization details.
In the window that opens, select Legal entity or Individual entrepreneur. After that, fill in the relevant details: Name in the program, Abbreviated name, Full name, TIN and others. 
The next step is to create Price types. Go to the section Marketing, select in the navigation bar Price types and press the key Create.
We need to create two types of prices: Purchasing and Retail.
Let's first create Purchasing for this, in the window that opens, fill in: Name, Pricing Method, and Data Composition Schema. Purchasing The price will be filled in from the goods receipt document. 
After adding Purchase price must be added retail price, that is, the price at which we will sell. Fill in the new price: Name, Use when selling, Price setting method and Calculation rules. In this case, we will get an automatic price calculation, i.e. Goods Receipt Price + 50% markup = Retail Price. In the future, you can change the price manually. 
The next step is to create Pricing Rules, go to Marketing Pricing Rules and press Create.
In the window that opens, fill in Name and Price type.
Program 1C: Retail to work requires the creation store who will release the goods. We go to Regulatory Reference Information (NSI), in the navigation bar select The shops and press Create. 
In the window that opens, fill in the basic details: Name, In the shop here you need to choose either work with one warehouse or with several, Warehouse name, Sales Organization this is the organization with which sales will be carried out, Pricing Rule, Type of minimum selling prices this is the same purchase price, below this price it will be impossible to sell, so as not to work at a loss, The order of rounding the amount of the check this item will allow you to round the amount of the check so as not to mess around with pennies, if you think that you will have even prices anyway and this is not required, then you are mistaken, because when applying discounts, pennies will still appear, in paragraph Rounding type choose Round up total this item will allow you to lose less money on rounding. After filling in all the details, press the button Write and close.
RMK (Cashier Workplace) cannot function without the Fiscal registrar, so the next step is to add the fiscal registrar to the system. In our case, we will add fiscal registrar emulation. We go to the section Administration, select in the navigation menu Connected equipment.
Next, check the box Use connected equipment and go to Connected equipment.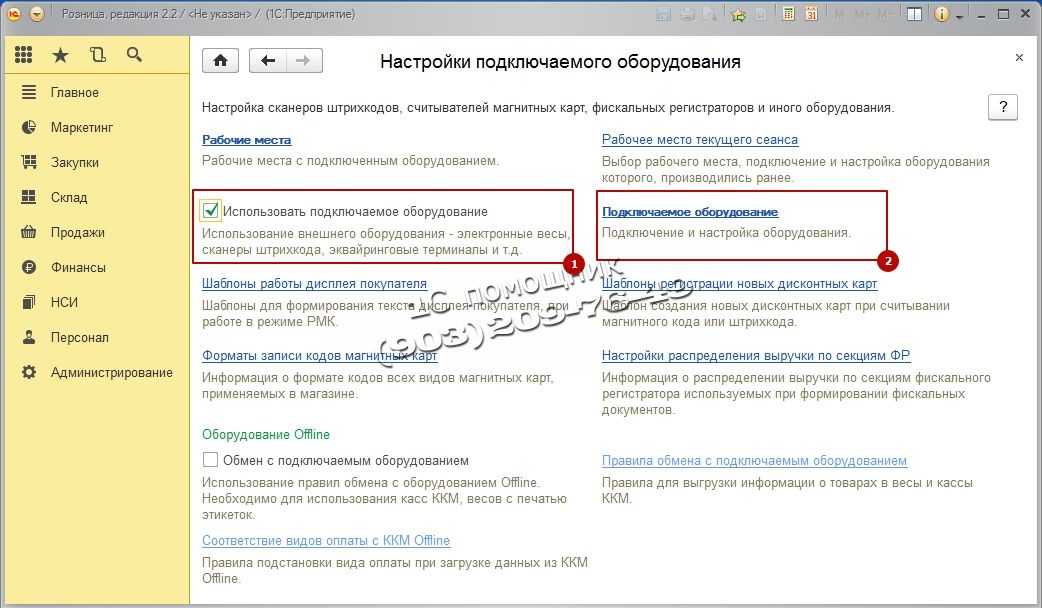
The list of equipment is empty, we are adding new equipment. Press the key Create.
Fill out the opened form: Type of equipment choose Fiscal registrars, Hardware driver select 1C: Fiscal registrar (emulator), check the box Device in use, click on the Record button an object and go to Tune…
If the device driver is not installed on the computer, click: Functions and choose Install driver. If the driver is installed, check settings will appear. You can change them to your liking or leave them as default. 
The next step is to set up KKM cash desks which will punch checks in your Store. Go to the section Regulatory reference information (NSI), KKM cash desks and press Create.
We fill in the main points. Type of cash desk, Shop, Name, Workplace, Connected equipment the Fiscal registrar that we created earlier should appear in the field. Then presses Record and close.
Now we need to add our user the rights to use all the functions of the RMK. This point is very important. We go to Administration, Users and rights and choose Additional user rights.  First, let's give the user all rights. Click on Button with a green checkmark and press Write down. All necessary rights will be given to the user.
Next, we need to post the goods to the warehouse; for this, we need to create a document Receipt of goods. We take the data for filling from the supplier's invoice. We go Procurement, select the item Goods receipts.

A list of all documents will appear Goods receipts created earlier, in order to create a new document, click Create.
We will not consider in detail how the Goods Receipt document is created, this can be found in the article
In order to sell goods, we must have Retail prices for goods. To do this, after creating and filling out the Goods receipt document, select Create based on then we choose Setting item prices.
The document will open. This document generates Purchase and Retail prices. The program itself calculates the price based on the formula that we set earlier. Purchasing is equal to the receipt price of 50 rubles, and Retail equal to Purchase +50% margin amounted to 75 rubles. You can change the calculated prices manually by double-clicking in the price field and then entering your price. To save the document, click Run and close.
So we have made the basic settings of the RMK, now we go directly to the Cashier's Workplace. To do this, go to the section Sales and choose RMK (controlled mode).
The RMK panel opens, initially we need to Open a shift, click Opening Change and then press Sales registration.
In the window that opens, press the button Menu(F10) when you click on it, the bottom menu will appear, then press the button Search (F11) to select an item from the list. 
In the opened window Search and selection of goods in RMK enable the display of additional information on prices and balances. To do this, click the button below Show Information.
In the next window, select two checkboxes Display: Remains and Prices. At the bottom of the selection, current stock balances and the retail price will appear. 
Select a product with two mouse clicks and close the product selection window. In the RMK window, enter quantity of goods sold press the button Cash (F6) to make a sale, enter the amount of money deposited, the program will calculate the change and press the button Enter.

Your sales receipt will be displayed at the bottom right. If you are not using the Emulator, but a real fiscal registrar, then your fiscal registrar will print a Receipt.
After you have completed the working day, you need to close the shift. To do this, exit the RMK by pressing the key Exit(F12). The RMK launch window will open. Now we need to close the cash register. We press the button Closing the shift.
The program will ask you to confirm the closing of the shift. If you are ready to close the shift, click Yes.
If everything is in order and the amount of sales per day matches the sales, press the button Closing the shift.
Cashier is closed. The program will display an information window about the cash register shift. If you are using a real fiscal registrar (not an emulator), then it will print out for you Z-REPORT. 
This manual will help you step by step to reflect all retail operations in . I want to consider the following points here: setting up entries in the retail sales report, receipt of goods and moving them to retail, sale from a retail warehouse, sale of goods in non-automated outlets (HTT) and receipt or collection of proceeds at the cash desk.
Non-automated outlets in 1C are trade objects in which it is not possible to put a computer or establish a connection with a common database. Sales data is not entered daily. This is, for example, a stall or exit trade.
As a rule, before reaching the retail warehouse or NTT warehouse, the goods fall on the wholesale warehouse. At the wholesale warehouse, it is processed and then moved to retail.
I will not describe the receipt at the wholesale warehouse, since there is about it. I will give only an example of filling out a 1C document so that my further actions are clear:
Setting item prices in 1C for retail
After receipt, you need to set retail prices for goods in 1C. For this, the document "" is used. It is entered in the "Warehouse" section. But we will create a document based on the receipt document. Let's go to the previously created goods receipt document and click the "Create based on" button. In the drop-down list, select the item "Set item prices".
A new document window will open, where the main details will already be filled in, it remains only to specify the price type. In order not to return to this section, let's create two such documents at once, where we assign prices for the "Retail" and "Retail price" types. We will make the prices the same. Here is an example document:

By clicking the "Change" button, special options for manipulating the price are also available. For example, increase or decrease by the specified percentage.
Moving goods from wholesale to retail warehouse
Now you can move the goods from the wholesale warehouse to retail. For this, the program uses the document "". It is located in the Warehouses section.
Get 267 1C video lessons for free:
Before making the transfer, we need to set up two warehouses - one with the type of warehouse "Retail", the second with the attribute "Manual outlet".
Warehouses are created in the "Directories" - "Warehouses" section.
Let's call the first warehouse "Shop No. 2", the type of warehouse - "Retail store". We select the price type from the "Nomenclature price types" reference book:

Let the second one be called "Trading Room". "Warehouse type" - "Manual outlet", Price type "Retail", - "Products".
We will also create two documents 1C 8.3: "Shop No. 2" and "Trading Room". Documents will also be created on the basis of the goods receipt document. In this case, we will only have to fill in the requisite "Warehouse - recipient" and the quantity of goods:

As a result, our goods have a price and are in retail warehouses. You can proceed to the registration of the sale of goods.
Retail sales report in 1C for a store
To reflect the sale of goods in retail, we need the Retail Sales Report document from the Sales section. First, we will issue a sales document from a retail warehouse. It is not much different from the document "". The only difference is that the counterparty is not indicated and you can immediately reflect the proceeds from the sale.
For this, a cash account is selected. For analytics in 1C, you can also fill in the details "DDS Movement". This will be a subconto at the cash register account. Document example:

Sale of goods in NTT
When selling goods in a non-automated outlet at the end of the shift, we do not know how many goods are sold. But we know how much was moved from the wholesale warehouse. How to fill out a retail sales report in 1C 8.3 (8.2) in this case?
To calculate the quantity of goods sold, you need to calculate the remaining goods in stock and subtract it from the receipt quantity. For example, 50 packages of sweets were transferred to NTT, after trading 30 packages remained. Accordingly, 20 packages were sold.
To reflect this calculation in the program, you must use the document "" (section "Warehouse").
In the header of the document, we indicate the organization and warehouse of NTT.
In the tabular section, we add and indicate the actual balance in the warehouse. You can use the Fill button. The deviation from the accounting quantity will be our sale:
